Gabled Stone And Glass Torispardon House Reinterprets Scottish Farm Buildings

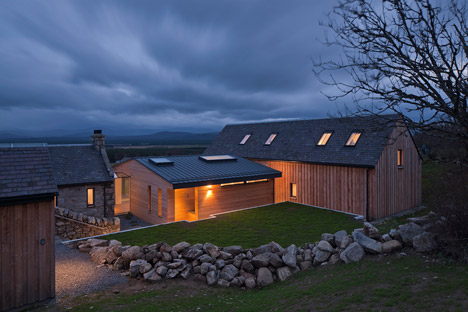
A present day timber and glass structure connects the more standard stone-walled buildings at both end of this residence in the Scottish highlands, made by architects Stuart Archer and Liz Marinko .

Torispardon by Stuart Archer &amp Liz Marinko

The residence for a single occupant replaces a derelict cottage and farm constructing on a hillside site inside of a conservation area in the Spey Valley. The Gaelic word Tor – meaning a rock or piles of rocks on best of a hill – gave the task its title, Torispardon.


Connected story: Black-stained residence by Dualchas Architects finished on the coastline of a Scottish island


The footprint, massing and components of the original buildings were recreated in the two new stone-walled structures, whilst the linking middle section offers a contemporary counterpoint.

Torispardon by Stuart Archer &amp Liz Marinko

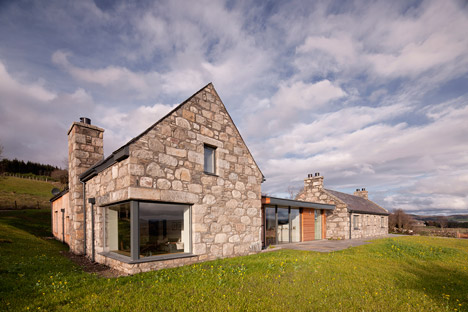
“Farmer’s crofts in the highlands frequently have a number of outbuildings inside their boundaries as a farm expands or calls for new amenities, a new outbuilding is constructed,” explained Archer and Marinko. “Instead of generating a new singular property it was felt that this additive technique was far more appropriate.”

“The cottage and steading reference the standard local stone vernacular, although the hyperlink developing is contemporary in form yet deliberately subservient to the other structures,” they extra.

Torispardon by Stuart Archer &amp Liz Marinko

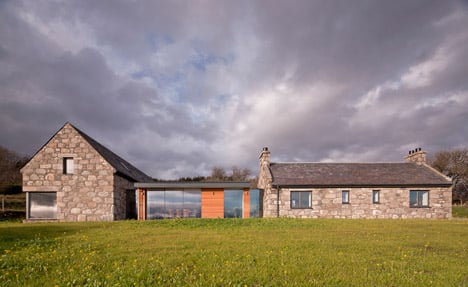
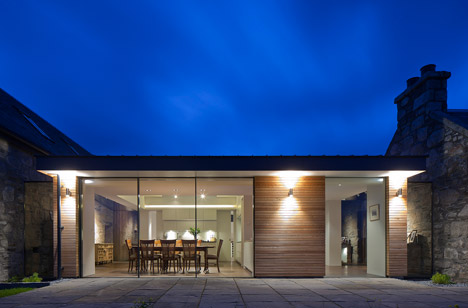
Glass boxes inserted amongst the 3 blocks improve the sense of separation among them.

“Frameless glass aspects tie the buildings collectively physically whilst enabling the three structures to continue to be visually separate,” mentioned the architects.

Torispardon by Stuart Archer &amp Liz Marinko

Regional masons used reclaimed granite and whinstone from the unique buildings to construct the strong external walls of their replacements. The high thermal mass of these supplies allows the constructing to absorb and release heat slowly, assisting to preserve an even internal temperature.

Torispardon by Stuart Archer &amp Liz Marinko

At the rear of the steading – the more substantial of the two stone blocks – local larch is applied in a standard vertical board-on-board style and is meant to evoke nearby agricultural architecture.

Torispardon by Stuart Archer &amp Liz Marinko

Larch is also utilised for the linking structure, but in this situation narrow planks of a denser Siberian species generate a more contemporary aesthetic.

Torispardon by Stuart Archer &amp Liz Marinko

“The materiality of the venture is important,” explained the architects. “Whilst it was essential to use regional supplies for sustainable and aesthetic factors, the building’s types and materials selections had been also a result of the project’s location.”

“The glazing was also equally essential from the chunky painted timber windows of the steading and cottage, to the frameless Swiss sliding door system, the idea was to meticulously choose and maximise the views of the project’s beautiful surroundings,” they extra.

Torispardon by Stuart Archer &amp Liz Marinko

The consumer asked for a property ideal that is ideal for solitary living but can also accommodate large events, so the cottage includes rooms for guests that can be closed off from the rest of the property when not in use.

Torispardon by Stuart Archer &amp Liz Marinko

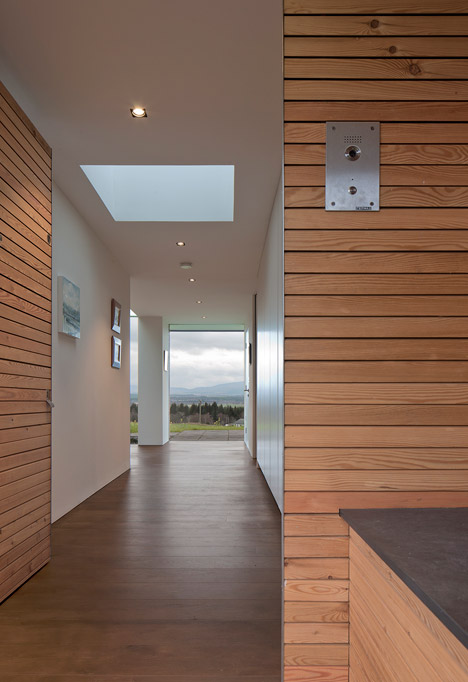
An entrance at the rear of the building leads into the linking construction, which characteristics a steel frame reminiscent of barn buildings.

Torispardon by Stuart Archer &amp Liz Marinko

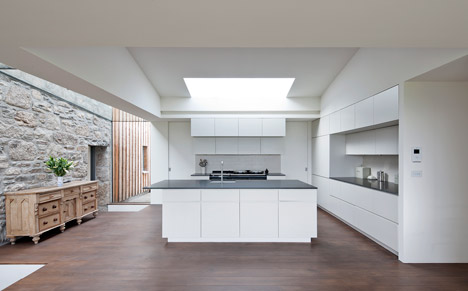
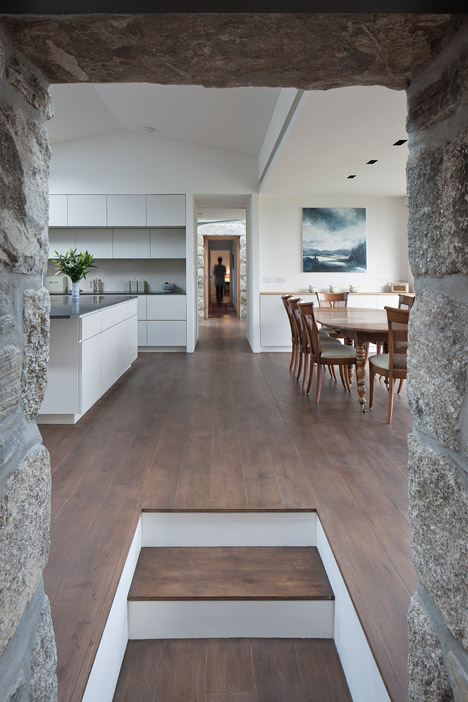
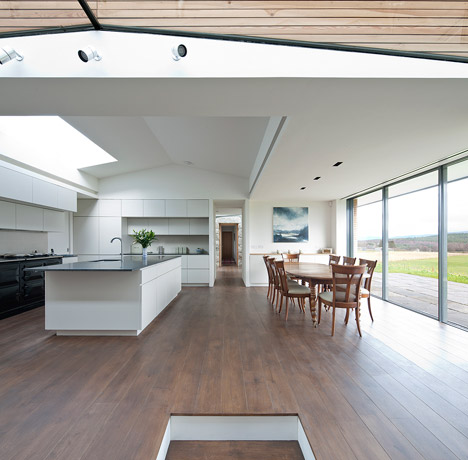
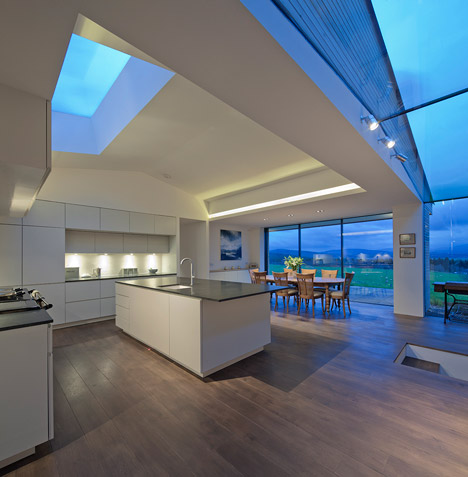
This open-plan room houses a kitchen and dining location flanked by glazing. Skylights and the glass walkway bridging the gap between the buildings fill the area with all-natural light.

Torispardon by Stuart Archer &amp Liz Marinko

The steading is partly sunken into the sloping web site and is accessed by brief sets of steps from the kitchen that lead to the residing location.

Torispardon by Stuart Archer &amp Liz Marinko

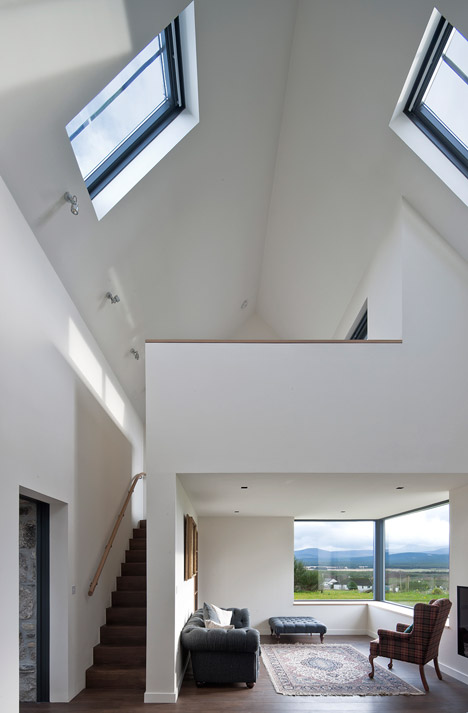
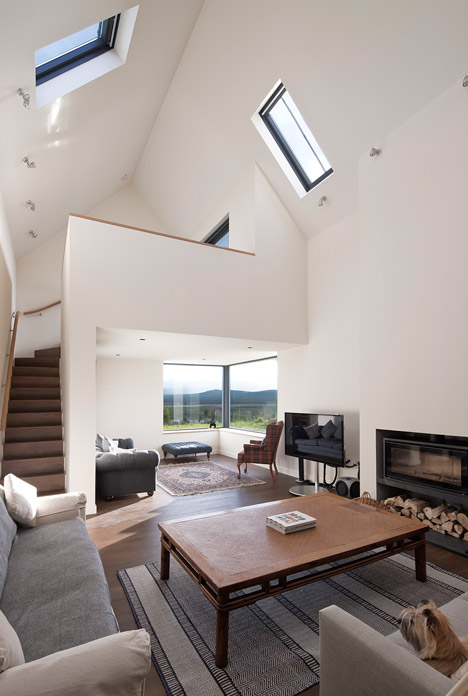
This double-height area features a mezzanine snug tucked beneath the vaulted ceiling and a corner window with deep reveals lined in oak, providing a perch for gazing out across the landscape.

Torispardon by Stuart Archer &amp Liz Marinko

The master bedroom can be found past the living location in the timber area of the building and boasts a dressing area and en-suite. A staircase prospects from the bedroom to a 1st floor study and balcony.

Photography is by David Barbour.


Venture credits:

Architects: Stuart Archer &amp Liz Marinko
Contractor: AW Laing Ltd, Grantown on Spey
Engineer: Allen, Gordon LLP

Torispardon by Stuart Archer &amp Liz Marinko
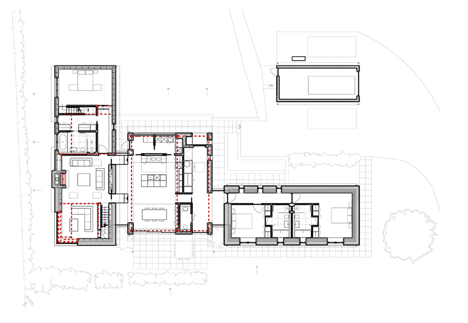
Ground floor prepare Torispardon by Stuart Archer &amp Liz Marinko
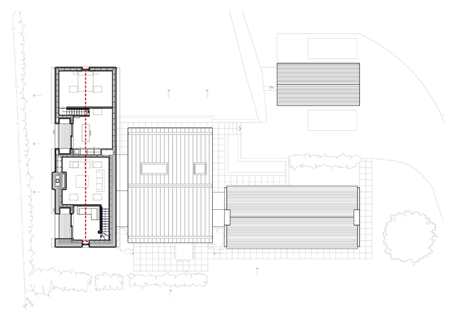
Very first floor plan
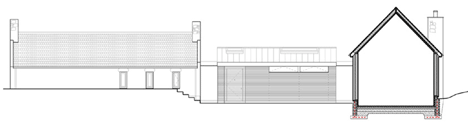
 Torispardon by Stuart Archer &amp Liz MarinkoSegment Dezeen

Monday Madness

Content Monday, people. After a week of no posting, I&#8217m anxious to give you guys some updates. But, given that this:

&#8230is currently going on outdoors of my home right now, there isn&#8217t considerably time among chainsaw noises, yelling, and canine barks (that are also setting off my neighbor&#8217s car alarm) to type coherent sentences. So, just a few swift details about what to assume this week:

one. Obviously, the chainsaw means that the tree service I selected last month is hard at perform turning my back yard into a significantly sunnier area. I&#8217m attempting to the two keep out of their way and concurrently get photographs for you in the course of the approach (each and every time 1 of the greater sections is taken down, it shakes the property and scares the crap out of Charlie). But HELL YEAH! A lot more sun! Much less brown! And just in time for issues to start warming up. It will be enjoyable figuring out what to plant back there and do with the area after it&#8217s all carried out.

2. Following a bout of foods poisoning last week (which was really, genuinely negative, and also the explanation for the lack of posts), I had very little time to finish up some of the stuff I slated on the calendar for February. Which indicates I&#8217m that considerably more excited to get some updates out to you this week.

three. Fortunately, I managed to recover in just adequate time to take a fast trip to San Francisco for a media summit planned at the end of final week. It was an in-and-out issue, so I didn&#8217t truly see any sights, but it was beautiful and a superb break from all of the freezing cold temps in Georgia (which have presently started out warming up once again&#8230 per the normal for wacky climate in this state). Truly hunting forward to possessing an excuse to go back yet again, so if you have any suggestions for what to see up coming time, I&#8217m all ears!

four. I&#8217ve nevertheless received to share February&#8217s modest DIY venture (here&#8217s January&#8217s), but have also began doing work on March. This 1 may possibly get a small nerdy.

five. I have been striving for MONTHS to finalize the new blog layout, and am nonetheless unable to make a last decision on the layout (or rather, have time to focus on finalizing it). But, because layout is always a small enjoyable, I&#8217m creating up a publish the place you can see some of the MANY variations of what the new UDH logo has been looking like behind the scenes. There are quite a number of, so it will be fun to also see what you believe of them.

That&#8217s it for now. Even if the trees are the only items that truly get completed this week, it will be tons of perform completed—literally.

The publish Monday Madness

The Ugly Duckling Home

DIY Painted Bead Necklace // DecoArt

DIY Painted Bead Necklace | Dream Green DIY + DecoArt

My buddy Rachel—master creative behind 1 of my fave blogs, The Crafted Life—just so happened to host the most adorable bead painting workshop in Austin, Texas last month. Even though I was desperate to attend, I was stuck out here on the east coast with a freak snow storm (or two). That said, I ended up producing the most of my sorrow by channeling her inspiration into a solo bead-painting occasion in the #dgdstudio. Because I thought maybe you may possibly want to do the same in your personal residence, I documented the procedure to display you how.

DIY Painted Bead Necklace | Dream Green DIY + DecoArt

Supplies

  • Wooden beads
  • DecoArt Americana Multi-Surface paint (I employed &#8220Flamingo,&#8221 &#8220Pink,&#8221 &#8220Overcast&#8221 and &#8220Coastal Waters&#8221)
  • Twine
  • Plastic painter&#8217s tray
  • Foam paint brush
  • Detail bristle paint brush
  • Scissors
  • Thin brass pipe (optional)

When deciding on your colors, there actually is no set formula. Just go with what you enjoy and you&#8217ll practically usually love the finished necklace in the finish. As for my individual process, I normally try out to decide on at least one neutral color (in this situation, the grayish, beige paint), and then I supplement with standout colors. I also try out to combine the two warm colors and amazing ones, so that lately has meant a lot of teal and pink.

DIY Painted Bead Necklace | Dream Green DIY + DecoArt

Initial, give your beads two to three coats of a strong colour utilizing the foam paint brush. Permit the beads to remedy for about 20 minutes in between coats so that they are dry to the touch. Then, grab your detail paint brush and include little dots, dashes or shapes to a couple of the beads to give them a tiny character. I chose to include pattern just to 3 out of my five beads so that it didn&#8217t get also overpowering.

DIY Painted Bead Necklace | Dream Green DIY + DecoArt

1 provide in my materials lineup was a bit of a surprise and was a last minute addition—the brass pipe. At first, I struggled with not touching the wet paint as I worked to paint the beads, and then ultimately had an ah-ha moment: they necessary to be strung onto something stiff so that I could spin them and have manage, without inadvertently coming into speak to with the moist surface. So I riffled through my supply drawer and located a small scrap of brass pipe to slip proper by means of the beads&#8217 holes. It worked like a charm.

DIY Painted Bead Necklace | Dream Green DIY + DecoArtDIY Painted Bead Necklace | Dream Green DIY + DecoArt

After the beads had dried totally for about an hour, I used (okay, really my sister slash model used) the scissors to cut off a length of twine to create the basis for the necklace. Then, we looped the beads on a single by 1, tied a knot, trimmed the extra twine and referred to as it completed.

DIY Painted Bead Necklace | Dream Green DIY + DecoArtDIY Painted Bead Necklace | Dream Green DIY + DecoArt

To say that I&#8217ve worn the completed necklace at least a few times since I finished producing it would be a gross understatement. In fact, I just looked down and noticed that I have to have unconsciously slipped it on this morning while obtaining prepared.

I&#8217m clearly in really like. I think it&#8217s obtaining significant&#8230

DIY Painted Bead Necklace | Dream Green DIY + DecoArtDIY Painted Bead Necklace | Dream Green DIY + DecoArt

P.S. The winners of the Josi Severson Textiles giveaway have been announced! Click via to see if you were 1 of the fortunate two.

Sponsor-Disclaimer-DecoArt

Dream Green DIY

March ‘15 Before And After

Hey hey! I’m sorry for that previous post displaying up this morning! Ha! I didn’t even understand it was there till I began obtaining remarks on it. NO it is not 90 degrees and Could right here, regrettably. I was seeking for an old paint shade in a post from years in the past, observed a website link was wrong in the submit and then when I saved it, it went dwell once more. So odd. Anyway, back to the cold and snow. (Wah.)

Today is the March prior to and after hyperlink up and wow, you guys did not disappoint final month!! I had to quit at eight functions or I would have kept going. As always I am super impressed!

Anne’s mud space built ins had me giddy:

mudroom built ins to ceiling

Holy cats. They did such an remarkable task. And I Enjoy people vivid, fairly drapes in the room as well. It is just lovely. They share the whole process on her weblog, go verify it out!

Haeley’s easy DIY command center is quite and was super affordable:

command center on door

The back of your pantry door is this kind of a perfect spot for some thing like this, or for a lot more storage! If ours wasn’t glass I’d be undertaking the same.

Ok, you will not Think Lauren’s chairs and how she created them into what they are these days:

knock off restoration hardware chair

This is a cannot miss individuals. She saved hundreds per chair undertaking this project on her own and they came out so effectively. I’m amazingly impressed.

Jennifer shared a super easy, no sew way to make your drapes pleated:

easy pleating drapes

It is kind of brilliant and now I want to do the identical! I always use this technique I showed you many years in the past but hers give you true pleats. Enjoy it!

Kammy shared her daughter’s space and you have to check it out due to the fact it’s so sweet and rather:

blue walls yellow trim

But also simply because the prior to and soon after is so dramatic – she did this kind of a lovely job on this room!

Leah’s residing space is so fresh and vivid – and so cozy as well:

gallery wall above couch

It reminded me of spring, which I truly want right now. )

I’ve shared this easy way to renew your grout just before, but I think it is well worth sharing over and above once more. Jennifer shares the process here:

renew dirty grout

If you have tile that is in excellent shape with yucky grout, this will make a enormous distinction!

And last but not least, Laura finished her workplace redo and I Really like the accents she developed with the wallpaper:

navy and white wallpaper

I love utilizing blue, particularly a deeper navy blue like this. Which is humorous, due to the fact about six many years ago you would not have found one particular bit of blue in our property. None!

Ok, it is time to see what you’ve been up to recently! If you’d like to be regarded for a highlight next month, please incorporate a hyperlink to TDC or copy and paste this into your post:

<div align="center"><a href="http://www.thriftydecorchick.blogspot.com/" title="TDC Just before and Soon after" target="_blank"><img src="http://www.homestoriesatoz.com/wp-articles/uploads/2012/03/beforeAndAfterButton_thumb1.gif" alt="TDC Prior to and After" fashion="border:none" /></a></div>

Now go ahead and link it up!

An InLinkz Website link-up

Thrifty Decor Chick

Japanese Sliding Doors Designs!

If 1 exotic and imaginative needs to equip his apartment, then we would advocate 1 in any case, to opt for Japanese sliding doors. Although you may value a bit a lot more money, but it&#8217s well worth for certain! Simply because Japanese sliding doors have the capacity to transform any residing area totally. A just developed bedrooms could get a stunning search, just due to the fact of the set up of these doors.

beautiful Japanese sliding doors

We have compiled a lot of exciting models of Japanese design sliding doors in this submit. Consider a seem at the photographs. These styles are not for sale, but they may possibly give you some inspiration!

beautiful exotic Japanese sliding doors

beautiful living room Japanese sliding doors

beautiful white modern Japanese sliding doors

beige modern Japanese sliding doors

cool interesting Japanese sliding doors

cool white Japanese sliding structures

creative room design sliding Japanese

great great Japanese sliding doors

Japanese sliding cool exterior design of the house

Japanese sliding cool photo

Japanese sliding doors as decoration in bedroom

Japanese sliding doors beautiful design

Japanese sliding doors drächemotive

Japanese sliding doors for a modern apartment

Japanese sliding doors in the elegant bedrooms

Japanese sliding doors made of wood

Japanese sliding doors of a cabinet in the bedroom

Japanese sliding doors very nice design

Japanese sliding doors white and light brown color

Japanese sliding super cool design

sliding creative model-Japanese

very beautiful Japanese sliding structures

white chic Japanese sliding doors

Relevant posts:

build cabinet sliding ItselfSliding doors themselves to construct &#8211 the apartment modern day layout Sliding doors created of wood &#8211 a wonderful selection for the living space
Space Decorating Suggestions

Latest Ideas!