
Bear in mind how I said I wanted to produce some thing this week? Effectively, thanks to misplacing all my craft stuff and giving myself a kink in my neck soon after moving some furniture around, I figured out precisely the way to cure that.
Ow. But in spite of the pain (which unfortunately creeped down to my upper back right after sleeping on it final night… guess I’m acquiring a new pillow for 2015!), I still managed to get a little Christmas crafting carried out:

When I was in college and before I purchased the house, I did a lot of crafts. Embossing, polymer clay, jewelry creating, and so forth tiny-scale stuff that accumulated a lot of exciting little tools and a need to have for storage in my workplace. But after switching to largely power tools and home repair projects these last couple of years, my memory for where every little thing is stashed in my crafting boxes is a little… off. It took some digging to find a few things that I believed may possibly inspire a new piece of art for the holidays, but right here’s what I in the end picked:
- Wood veneer speak to paper (from the dollar store)
- Ultra-fine glitter (I wasn’t confident if I would eventually pick silver or gold, so I grabbed both)
- Glue pen (I like Martha Stewart pens… they are tightly packaged and don’t dry out)
- Poster board
- Decorative tape (optional, not pictured)
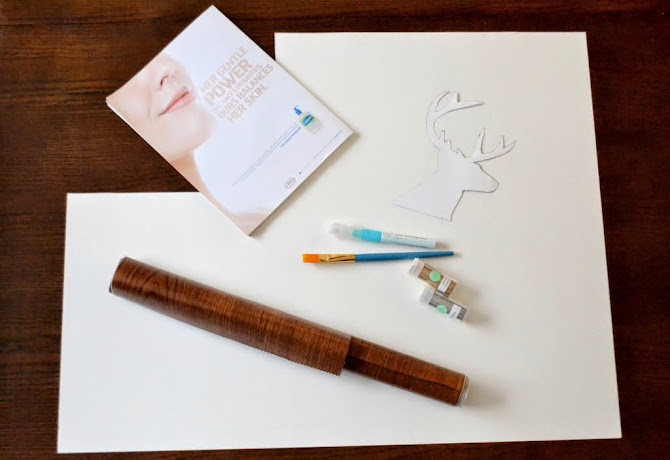
And a handful of other supplies that had been merely functional to total the project:
- White sheet of paper (for cutting out & utilizing as my outline for the get in touch with paper)
- Pen/pencil
- Scissors
- Old magazine
- Old credit/membership card
- Paint brush (or old makeup brush)
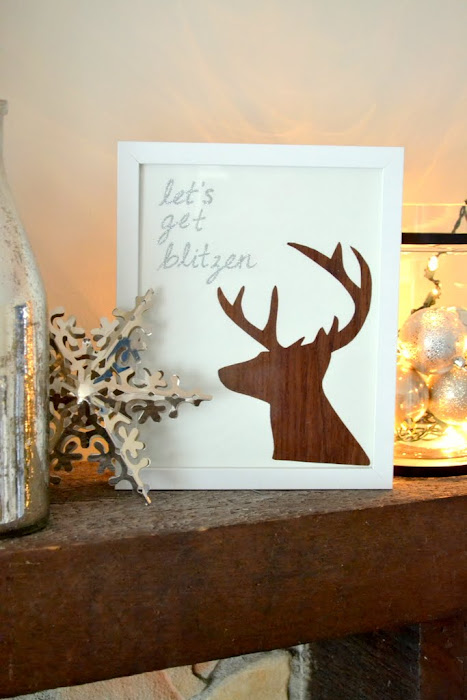
With an 8吆 frame chosen, I cut the poster board to size. Considering that my printer was MIA (aka stashed in the closet & I didn’t feel like obtaining it out), I utilised a plain sheet of printer paper (which strangely, I nevertheless had accessible) to trace out this reindeer silhouette directly off my pc screen. I then cut it out, flipped it more than onto the back of the speak to paper, and traced the very same image in reverse. It sounds a lot a lot more complex than it is.
Once the make contact with paper was reduce to the appropriate shape and size, I peeled off part of the backing and started at the bottom correct corner of the poster board. By peeling off the backing a tiny at a time and using a piece of rigid plastic (credit cards perform nicely, but I use a dingy old Marta card for crafts), it’s easier to avoid air bubbles and wrinkles. The only tricky portion was getting the antlers in spot, because they’re smaller and wider than the card, so I smoothed out 1 and then the other.

After the “reindeer” (reindeer/deer silhouette, Google image search turns up the exact same outcomes) was on, the only factor left to add was some lettering. Not to knock a excellent “Noel” or “Merry & Bright”, but I wanted some thing that created me chuckle.
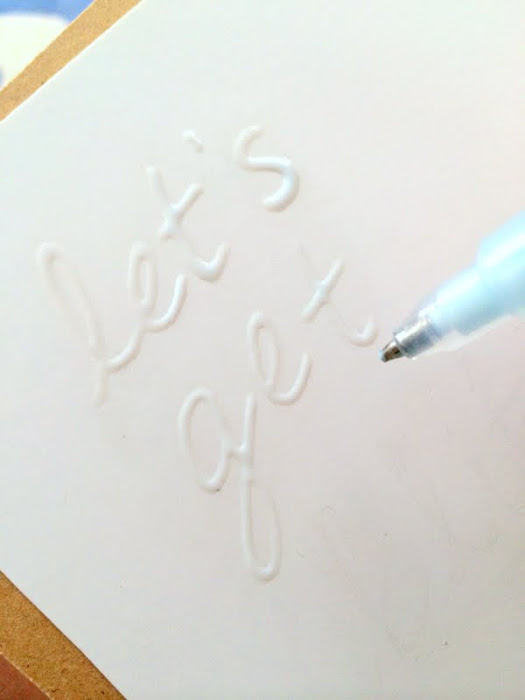
After lightly drawing on a few letters with a pencil (I tried going with block letters as well, but it just didn’t appear right), I grabbed the glue pen and filled everything in. Glitter can be ridiculously messy, but it’s hard to beat when it comes to Christmas decor.
I was tempted to pop a bright red nose on the deer, but that kind of killed the entire “Blitzen” thing, so I left it alone.
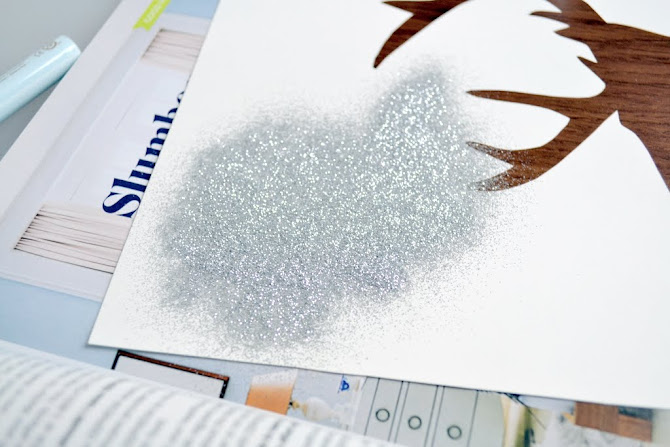
Tip: When sprinkling on glitter, I locate that a magazine performs fairly properly underneath because you can use the fold to tap the excess glitter down and put back into the container.

Tip #two: When functioning about lettering like this, you’ll probably nonetheless see lots of added glitter in amongst and about every single letter right after a great shake. Let it dry, then use an old, soft paint or makeup brush to remove the rest and maintain the lettering intact.
With a little dry time, I popped it into a frame, and it’s accomplished. Suuuuper basic DIY Christmas Reindeer Art, and a happy Friday craft.

I had a tiny fun arranging items on the mantel (that glass container is just leftover ornaments with a set of lights mixed in).
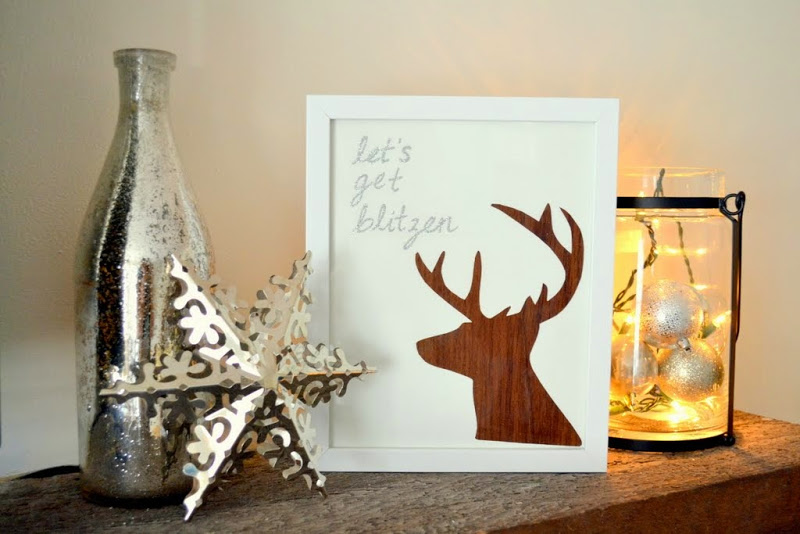
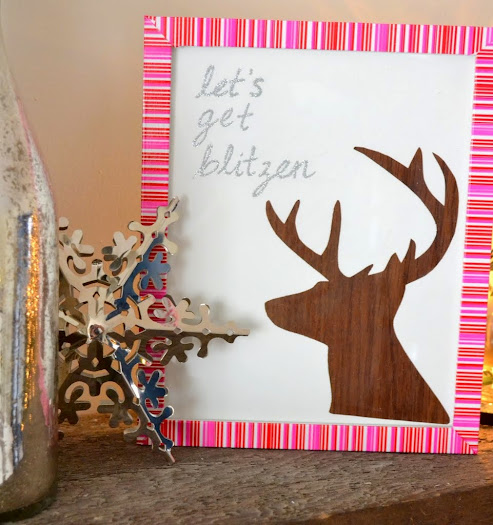
Whilst I was taking these photos, I also wondered what it may possibly appear like with a far more colorful frame. I dug out this pink and red-striped tape to see what it would look like to add some colour to the mix (the makers of Echotape sent me a huge box of different sorts of tape earlier this year to try out… while most of it was for more heavy-duty stuff, they incorporated a couple of printed tapes like this one particular from their Goddess Tape line, but it appears to be discontinued now). The ideal portion about this tape is that it can come proper back off with zero residue (I choose the white version, but it’s fun to play around with it).


I’m considering of creating a few more factors to frame over the weekend (“run run reindeer” comes to mind, as well as some ornaments, “get lit”, and possibly a “jingle my bells” thrown in, ha!). Funny how one particular craft leads to another. Gateway crafts, so-to-speak. This wasn’t really anything specific craft-sensible, but it did put me in the vacation mood, which was the entire point to begin with.
Now, if only I could locate a painkiller and a neck pillow, I’d be all set…
The post Christmas DIY: “Let’s Get Blitzen” Reindeer Art

")


