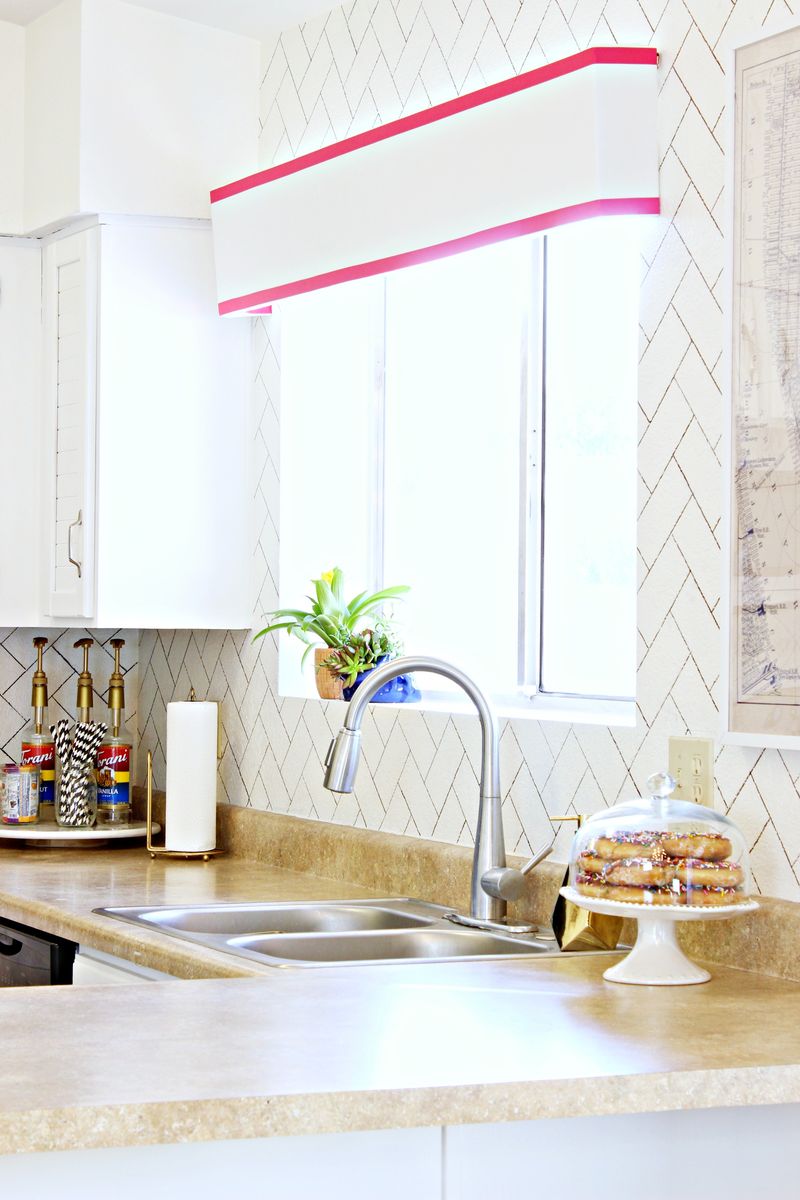
Subway tile is one of the most traditional, beautiful tiles out there. We love how there are a ton of wonderful options to pick from. You can pick from a selection of tile and grout colours and the possibilities for patterns are endless! I’m a renter and unfortunately, I am not capable to include a tile backsplash at our present rental house. However, I have been offered the “go-ahead” to paint, so I’ve truly had to get inventive with paint to update the residence and include my personal type into this otherwise cookie cutter house. I made the decision that painting a faux backsplash was the ideal way to get this search in a rental and on a budget. This whole undertaking fees less than ten dollars and appears like a million bucks!
Supplies:
-carpenter’s square
-pencil with eraser
-ruler (clear works greatest!)
-(2-three) black paint pens
-subway tile or 3×6″ cardboard template
-touch-up paint
Phase 1: Begin at the leading corner of the wall and location your carpenter’s square in a “V” place. This will enable you to create the ideal angle for your herringbone pattern. Employing a piece of subway tile or cardboard template, commence tracing the outside of the template with a pencil to create the rectangle shape. Repeat, moving down vertically right up until you attain the bottom of your wall.
Phase Two: Start your next column of rectangles, this time going the other path to generate the “V” form.
Stage Three: Alternate directions with every single column creating the herringbone pattern. Erase blunders as you go. The pattern can get a bit complicated, so just make sure you work in columns and alternate directions as you go. This will maintain the pattern going the appropriate way.
Step 4: Once you have your total wall covered in the penciled pattern, commence going more than the lines with your paint pen. Use a ruler as you go to ensure straight lines, specifically on textured walls. Maintain touch-up paint helpful for errors or drips. Repeat right up until your total wall is complete.
I’m super fired up with how it turned out and we were able to full this project in 1 afternoon. I adore how the black paint looks like dark grout and taking the pattern all the way to the ceiling adds to the drama of it all.
It would be truly awesome in a gold metallic as well! It would be awesome behind a headboard, down a hallway or wherever! This was the last of a lot of tasks in my kitchen makeover, and I am past thrilled that my kitchen is finally done! What do you feel? –Mallory & Savannah
Credits // Author and Photography: Mallory Nikolaus and Savannah Kokaliares. Images edited with Celeste from The Fresh Collection.


