
How to Set up a USB Wall Charger Outlet
In this digital age, it can be a challenge to help an older property maintain up with our ever-rising technological requirements. For illustration, do you have much more gadgets that want charging than you have available retailers in practical, available areas? We had just a one-gang (two outlets) electrical setup in a prime spot in our kitchen, which just wasn’t enough when the blender, griddle, Bose speaker, iPad, and phone all required electricity simultaneously. It grew to become apparent that we needed to update our electrical predicament, stat.
 See in gallery
 View in gallery
This tutorial gives phase-by-stage guidelines on how to get a normal one-gang outlet (with two obtainable openings) and expand it to a two-gang outlet (with 4 available openings) PLUS two USB connectors. And the good information is, it’s a quick and comparatively simple exchange…with far-reaching benefits. Ready? Let’s do it.
*Note: The author is an experienced, but not skilled, residence improvement enthusiast. Neither the writer nor Homedit is responsible for any prospective damages or harm induced throughout the process of following this tutorial.
DIY Degree: Beginner to intermediate
 View in gallery
Resources Essential:
- *(not all supplies are proven modify this listing as suitable for your demands and setup)
- Front-nail 2-gang electrical box(the blue plastic ones for interior), DEEP – 38 cubic inches
- A one-gang USB charger outlet (these are a bit much more pricey than common retailers, but worth the space-saving functionality!)
- A rectangle-faced one-gang common outlet
- A rectangle-slotted 2-gang outlet encounter plate
- Razor blade, drill, screwdriver
 See in gallery
Identify the outlet needing to be expanded and/or upgraded to a USB charger outlet. Flip the breaker to this outlet and double check out that there is no electrical power operating to this outlet. Eliminate the face plate.
 View in gallery
Take away the outlet (and any spacers) by unscrewing the prime and bottom outlet screws.
 See in gallery
Gently pull the outlet away from the blue electrical box and unscrew the wires from the outlet.
 See in gallery
Subsequent we’ll be getting rid of the blue electrical box and putting in a two-gang box. If your drywall is currently eliminated (examine out this tutorial for getting rid of drywall), the up coming handful of methods will be relatively simple to do. If your drywall is still intact, you’ll require to identify which side of your outlet has the stud. Then you will need to use a drywall saw to reduce the drywall on the non-stud side of the outlet box to the width of your new blue double electrical box.
 View in gallery
Employing a flat screwdriver, loosen the nails attaching the blue box to the stud. These are generally identified at an angle on the best and bottom of the blue box.
 View in gallery
Pull out nails, then remove the blue box. Unhook wires from the box as you pull it out.
 View in gallery
The wires will stay in the wall. (I’m stating the obvious, just in case.)
 View in gallery
Grab your new 2-gang blue box. A couple of items about what you want to make certain of: (one) Your box can be front-nailed to the stud. This prevents injury to current insulation. An exception to this recommendation is if your drywall is not already removed during this procedure if that is the situation, you may possibly want to use a common electrical box and deal with the insulation injury rather than mess with having to remove bits of drywall then replace them. (2) Your box is added deep. We advise a 38 cubic inch box (numerous two-gang boxes are smaller sized, like about 34 cubic inches). You need that extra depth because the USB outlet is deeper than normal shops.
 View in gallery
Hold the box up to the stud in excess of the previous box’s hole, and mark in which you want to reduce the insulation to.
 View in gallery
Use a razor blade to lower by means of and remove the insulation.
 See in gallery
Your box need to fit snugly and cleanly into the opening.
 View in gallery
Use a screwdriver and a hammer to eliminate the proper knockout (best or bottom, whichever direction your wires are coming from). You should only need to get rid of one knockout of the smallest size (one/2”).
 View in gallery
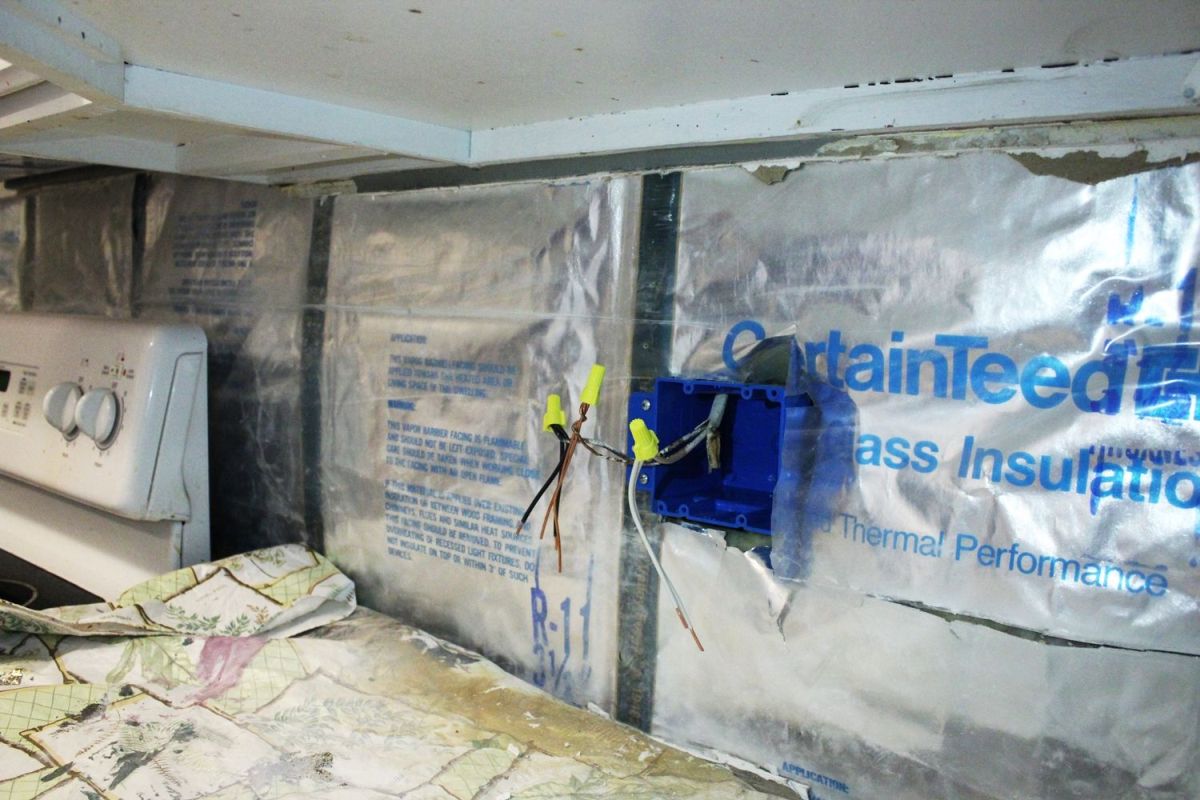
Pull the wires through the knockout hole and insert your box following to the stud.
 View in gallery
Mount your box to the adjacent stud with wood screws. Predrilling is optional, but I usually suggest predrilling just to be secure.
 View in gallery
Slice the insulation to fit the box “wings.” Insulation need to be flat and smooth about all edges soon after box is set up.
 View in gallery
Making use of wire pliers, straighten the ends of the wires in the box.
 See in gallery
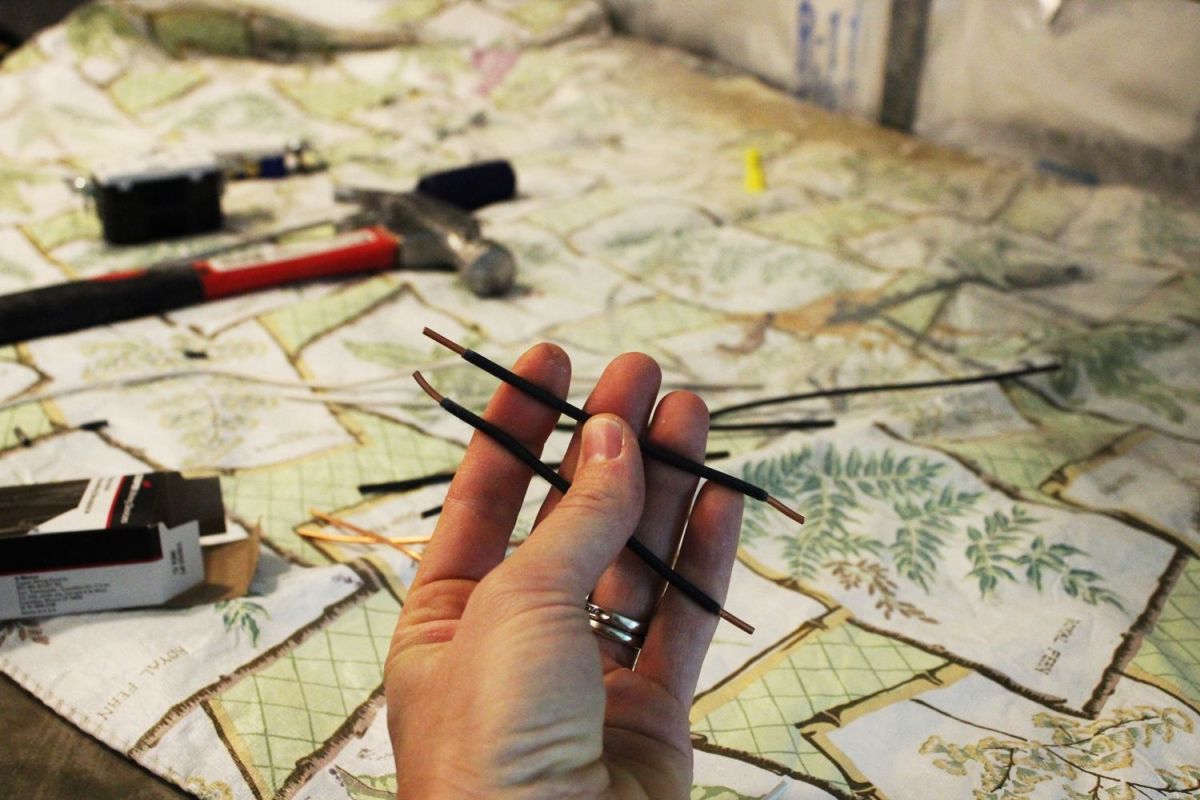
You will now require to cut two (each and every) strips of twelve-gauge wire in black and white, each about 4”-6” in length.
 View in gallery
Remove the end casings on each ends of the two black and the two white wire strips, about one/2″ to three/4″ in from the ends.
 See in gallery
Your strips will seem one thing like this.
 See in gallery
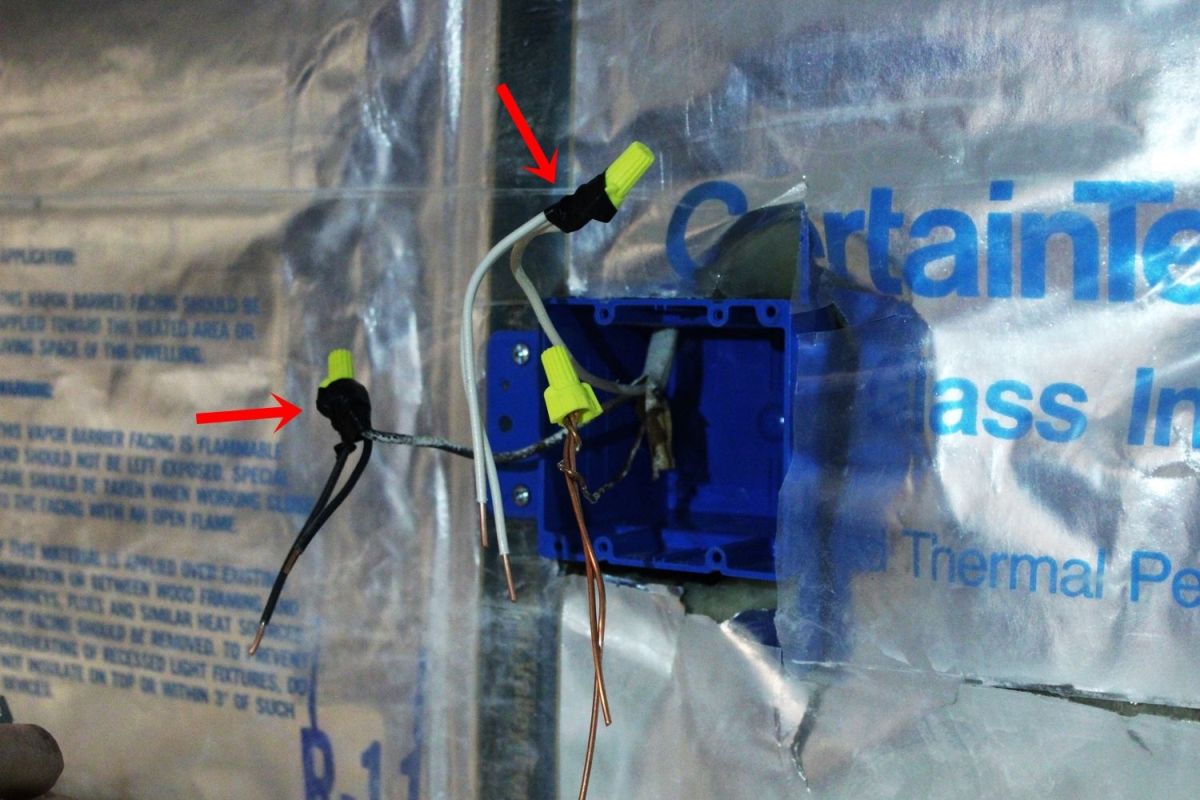
The thought is that you will be doubling the variety of shops right here, so you will need two black wires and two white wires (and two ground wires) to attach to the ends of the present black and white and ground wires, respectively.
 View in gallery
To rephrase, every single wire nut (the black, the white, and the ground) will mix the ends of three wires so that two wires of every single are obtainable for the two shops.
 See in gallery
Secure and protect the ends of the wire nuts with electrical tape. You don’t need to use electrical tape for the ground wires, even though.
 View in gallery
Use needlenose pliers to bend the ends of the wires into a modest semi-circle.
 View in gallery
These curved ends will hook onto the screws on your outlets.
 See in gallery
Match the black wire with the outlet’s gold screws, the white with the silver, and the ground (bare copper wire) with the green.
 See in gallery
Hook the ends of the wires under the proper screw head, then tighten it down carefully with a screwdriver.
 See in gallery
Following you have connected one black, white, and ground wires to a single outlet, you must have a black, white, and ground wire left to attach to the 2nd (USB charger) outlet.
 View in gallery
Once more, match the black wire with the gold screw, the white wire with silver, and the ground/copper bare wire with green.
 View in gallery
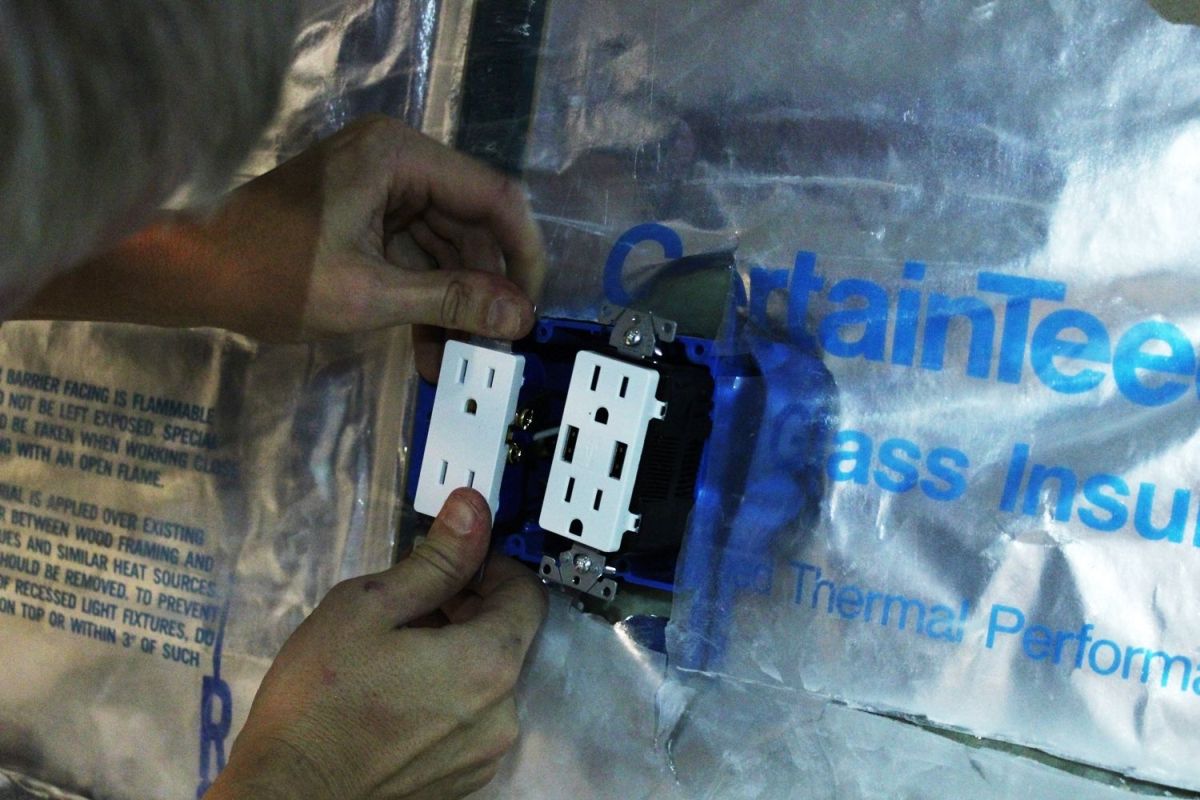
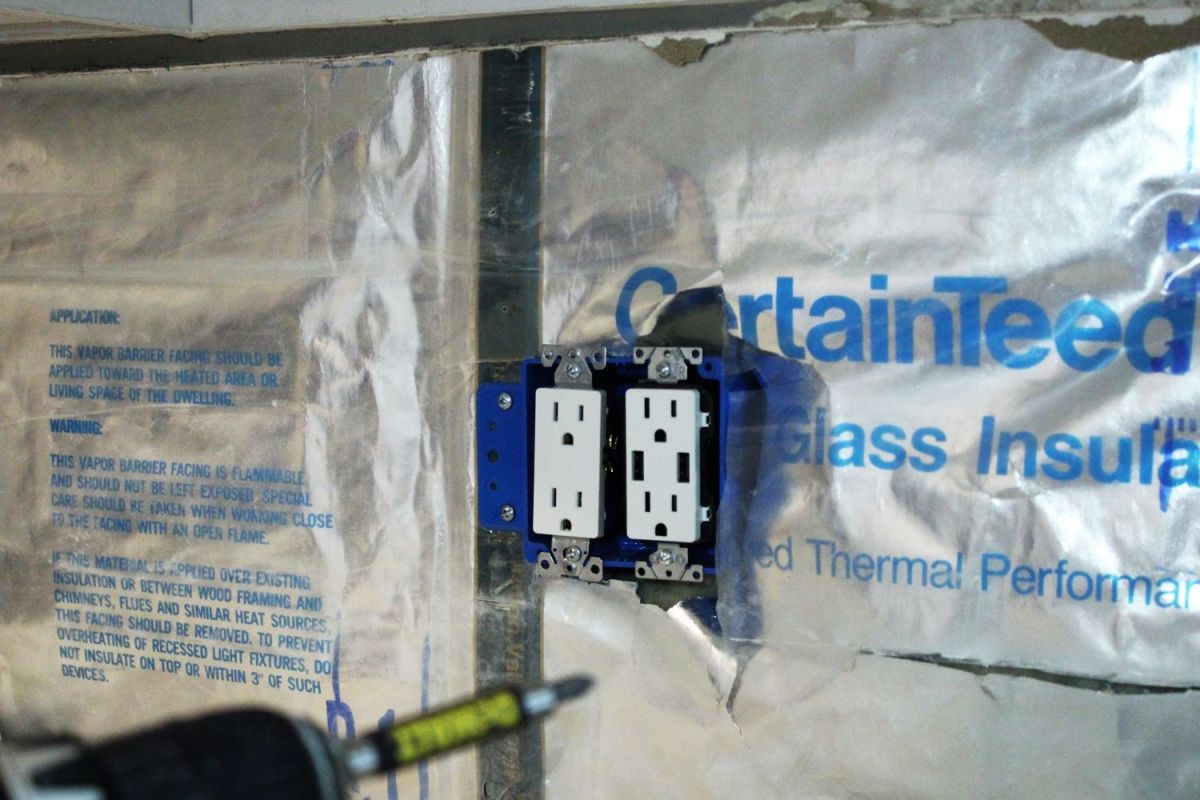
Your shops should be firmly attached and ready to install in the electrical box at this level.
 View in gallery
Make confident the outlet “faces” are aligned in the route you want, then push them into the box.
 See in gallery
Make sure they are flawlessly vertical and parallel, then screw the shops in.
 See in gallery
The USB charger outlet will stick out additional than the regular outlet. You may opt to use a spacer behind the regular outlet to deliver it forward ever so slightly, even though this is not needed.
 See in gallery
Install drywall about your new shops. (Verify out our tutorial onhow to set up drywall.)
 See in gallery
Set up your tile or no matter what else, if applicable, to the drywall. (Verify out our tutorial on how to install a subway tile backsplash.) Then set up the encounter plate.
 See in gallery
Viola! You have carried out it. You just freed up some critical gadget-charging area.
 See in gallery
This is the first, and possibly final, time this iPhone will have the USB charger all to itself.
 View in gallery
Appreciate your modest-but-important technological upgrade to your home!
Check out other tutorials in our DIY Kitchen Upgrade Series:
DIY Faux Concrete Countertops
How to Improve Your Kitchen Lighting
How to Install a USB Charger/Electrical Outlet
How to Remove Kitchen Tile Backsplash
How to Install a Subway Tile Kitchen Backsplash
How to Exchange a Kitchen Faucet


Thank you so much for this post! I am very happy that there are people who find time to share their experience with other. It is very useful! I know that USB outlets are very comfortable nowadays! I’m dreaming to install it in my house and right now I become imagine how to do it right. But I still do not know what to choose, I mean what manufacturer is better? I look on some websites and found a lot of variants but all of them from China and I want something American or from Europe! Have you ever heard about ABB? I faced to this web site http://electrical-components.com/abb – it is not very expensive and has good reviews but I can’t find wall outlets with usb( Have you ever heard about it?