
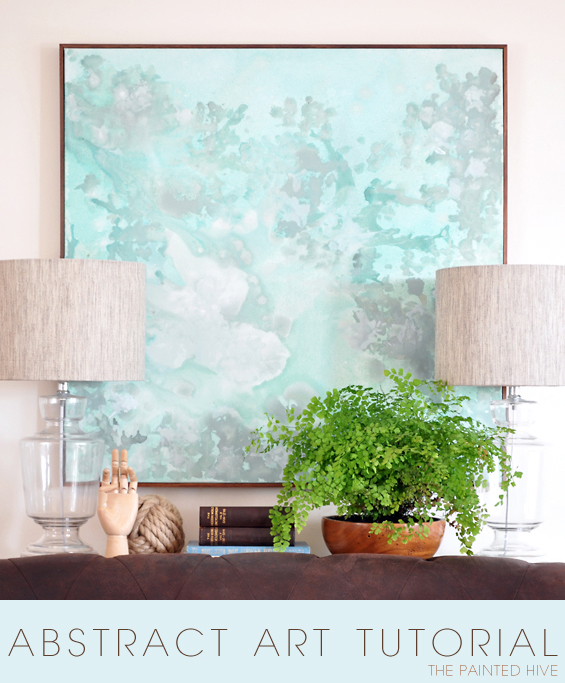
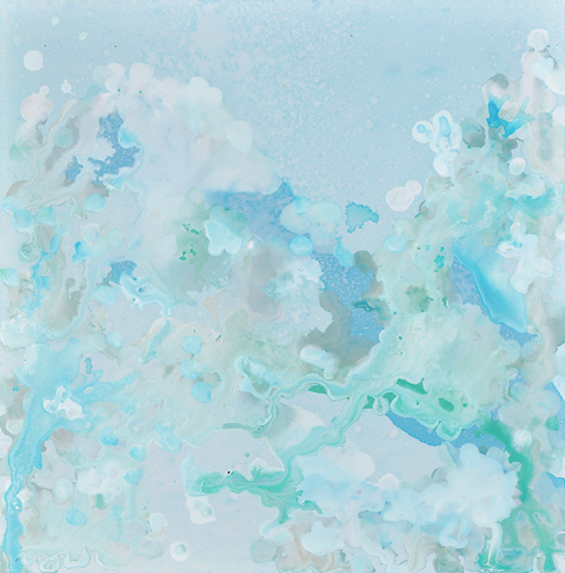
Okay, right here it is.
Just in case you missed it, in this recent submit I innocently posed the query of an abstract artwork tutorial following the surprising good results of my personal flukey attempt.
I believed there might be a minor curiosity however the response was truly mind-boggling!
Appears abstract art tutorials are in large demand.
Now, you ought to know, I don’t drop rest above as well significantly, though the believed of obtaining to create a clear tutorial covering what was in fact fairly an ambiguous procedure produced me restless. Compounding the self-imposed strain was the level of pleasure and anticipation you guys seemed to have about it. It was super flattering, though still…gulp.
How the heck was I going to convey my blundering procedure in a concise way?
Hopefully this tutorial does the trick.
![]()
Prior to I get began, right here’s the usual yada-yada.
Of course, there are a zillion-trillion various techniques to develop a piece of art and a trillion-billion variations on my amateur approach. For clarity and succinctness this tutorial will target on the certain tactics I utilised to achieve the search of my artwork. In actuality, it was almost certainly considerably much more time consuming, self questioning, step laden and fiddly than it appears though I don’t wanna confuse the bejesus outta absolutely everyone. I want this to be a straight-forward, stage-by-stage guide which arms you with some expertise and, most importantly, the self-assurance, to discover your own inner artist. So please, truly feel totally free to stray from my standard instructions (in reality, experimentation is a need to!) and DON’T GET DOWN ON Oneself if issues don’t look to come very easily.
This painting method is somewhat accidental. Have a common vision in thoughts even though be open to adaptation and prepared to embrace the unpredictability of the medium. Despite the fact that I feel it’s essential to undertake this task in a thoughtful way, attempt to strike that stability amongst discipline and abandon – I know, I know, considerably less difficult mentioned than carried out!
I attempted to develop this tutorial while painting a total new massive piece of art comparable to my original painting, though discovered it all too difficult. It was just restrictive possessing to stop often and take notes, stage strokes, demonstrate tactics and snap pics. The whole artwork felt as well calculated. So, for ease, I made the decision to use a smaller canvas and merely show the basic steps. The resulting artwork turned out really diverse although nonetheless kinda great (there’s a photograph in direction of the finish of this submit).
Anyhoo, here we go…
 
YOU WILL Need to have…
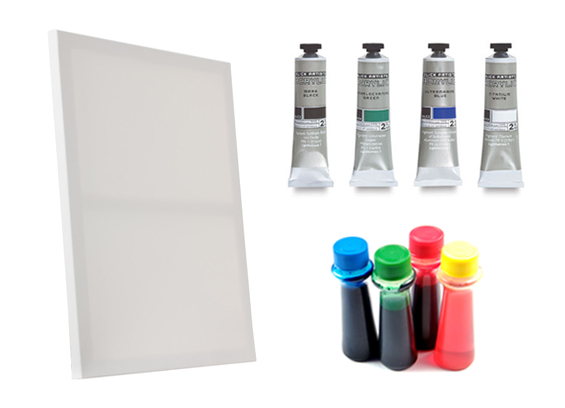
Stretched Canvas
I employed a large 90cm x 90cm (36″ x 36″) canvas for my unique painting and a smaller sized 60cm x 60cm (23″ x 23″) a single for this tutorial.
You could use canvas sheet although pre-stretched frames are just so cost-effective and readily accessible today. I like the deeper canvases as they have a tendency to hold their form better, don’t dip in the center as significantly and make framing easier. You might even find pre-printed canvases on sale for super cheap (I saw some Massive photographic prints on sale at a clearance retailer the other day). Of program, if you do use a pre-printed canvas the extra step of an preliminary white coat could be needed.
Note: Commencing with a little canvas may seem to make sense, and while it is a excellent notion for practicing techniques and gaining an comprehending of how the effects might transpire, in terms of generating an artwork it may possibly in fact be a lot more difficult. Employing a tiny canvas signifies scaling down details. Scaling down particulars signifies the require for further finesse. Issues can turn out to be all also muted then influence is misplaced. I also feel that large abstract paintings just have that air about them. That mentioned, super large canvases carry their personal problems as operating on a massive scale can also be challenging. I suggest anything at all from close to 60cm – 120cm (24″ – 47″) however it’s absolutely up to you.
Acrylic Paint
I employed a combination of various craft paints I presently owned. I know there are very good and bad brand names, even though I’m not that fussy when it comes to paint. I used blues and greens to suit my colour scheme along with some white, black and brown.
Edicol Dye
I utilised normal food colouring. The dye functions to give higher tonal variation. I don’t know how it does it, though it produces interesting transparent regions, distinct borders about shapes and is absorbed somewhat into the canvas which creates underlying patterns. As opposed to the acrylic paint, it also re-hydrates as soon as dry which allows it to be picked-up and blended into subsequent layers. Just be mindful if you want to produce a comparatively muted painting however as dyes are heavily pigmented and tend to produce really saturated colors. You only need to have a couple of drops.
Note: You can go as crazy as you like with colour although if you’re interested in creating a relatively monochromatic artwork equivalent to mine, opt for one principle colour (blue in my case) and one complimentary secondary colour (I went with green). White and black/brown can then be used to include depth and contrast. Also, hold in thoughts that when working with mixtures of paint, dye and water, colour creation is not an actual science. As colours merge and dry you will virtually undoubtedly discover some unpredictable final results. You may possibly want to trial any colors on a mini canvas first.
 
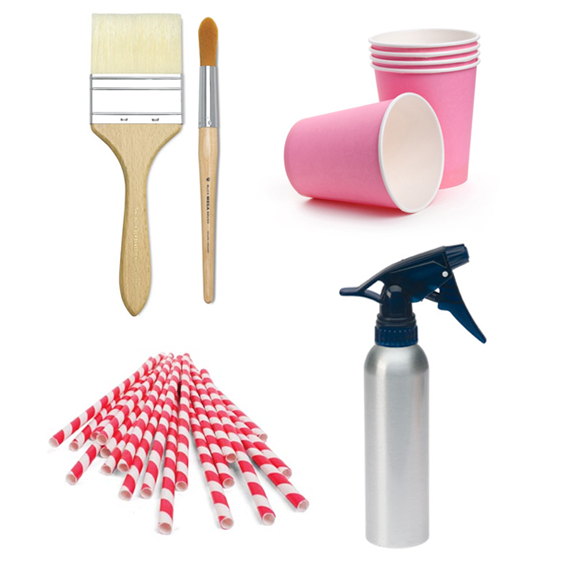
ALONG WITH…
 
Preparation
Lay down a drop cloth (if needed) and place your canvas horizontally on an even-ish surface. Gravity will play some component in the search of this artwork as paint ‘flow’ is involved also significantly of a slope may cause an undesirable bias, as well even a surface might lead to paint to pool in the center of the canvas. Of program, levels can be adjusted as necessary for the duration of the painting procedure and I did locate myself very carefully re-positioning the canvas from time to time. I like to perform at close to thigh height though you might choose to perform higher or at ground level, just ensure you can paint comfortably and maneuver effortlessly close to your canvas.
I like to perform outdoors. Ideally on a wonderful, hot day. Temperature in fact plays really a position in the seem of this painting as drying time effects the amount of flow and blending. It also dictates speed as some drying time is essential between particular applications. You can use a hairdryer to velocity-up drying time if necessary however be mindful with ‘pushing’ the paint excessively.
You can prime your canvas (utilizing gesso) if sought after however most stretched canvases comes pre-primed anyway. You may also select to include some texture (see note beneath).
Note: Given the fluid nature of the medium employed, small texture is accomplished. I genuinely love textural paintings however in this situation like the way the character of the canvas weave is so prominent. If, nonetheless, you want to enhance the degree of texture, develop some up prior to commencing painting. You can use anything at all which will stick, set firmly and retain its kind. Gesso is commonly employed, however anything from craft glue to plaster paste can suffice. I actually trialed this style of painting over a preceding textural acrylic of mine and found the subtle textures developed some wonderful results although the a lot more bold textures were overly distracting. Of course, it all depends on the search you’re personally after, even though if you’re thinking about including texture, maybe focus on gentle stippling over a lot more clear strokes.
 
THE Method
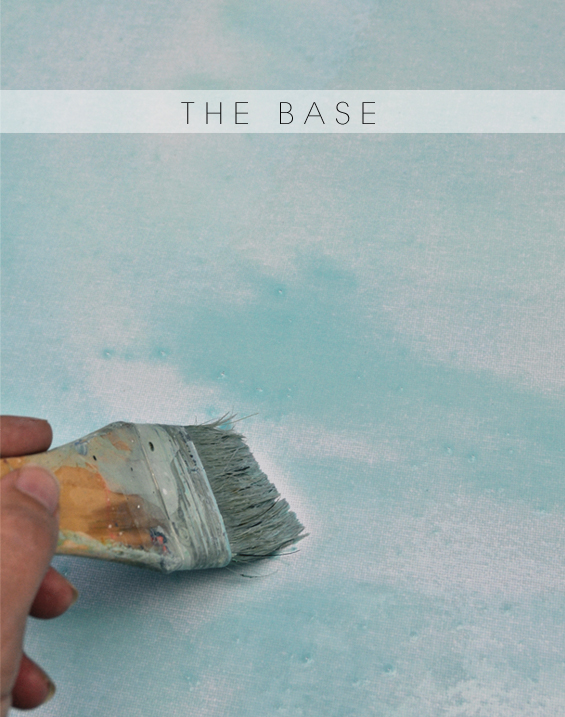
1 The base.
Combine up a runny blend of white acrylic paint, dye (in your selected colour – I went with blue) and water then casually coat the whole canvas making use of a wide brush. Don’t fret as well a lot about visible brush strokes and un-even distribution at this stage. Some tonal variation is anticipated although any obvious regions must self-degree out (you can also use the atomiser to even more saturate and blend any notably patchy spots). Keep in thoughts that the colour will most likely fade as it dries. If it turns into also insipid, just brush above it yet again with a significantly less watery paint resolution. As it commences to dry you can also spritz the canvas with a slightly darker blend of dye and water to include a bit far more colour and some speckles. Alternatively, you can spray it with some diluted white paint if you feel the need to tone it down.
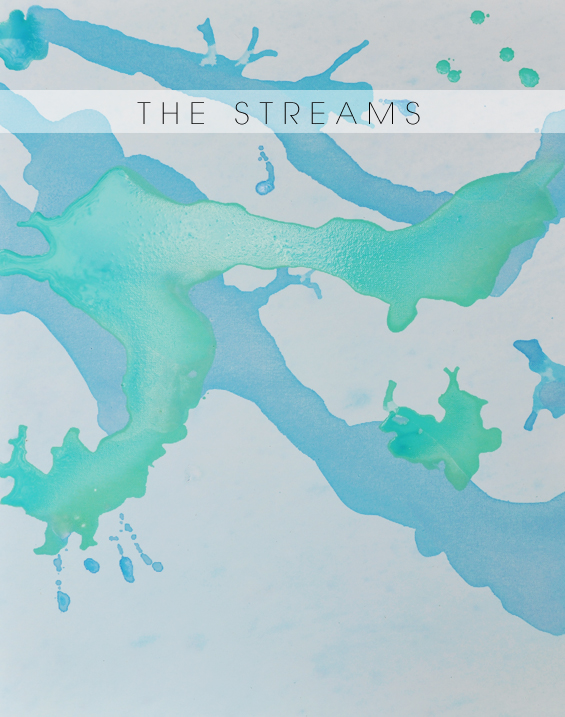
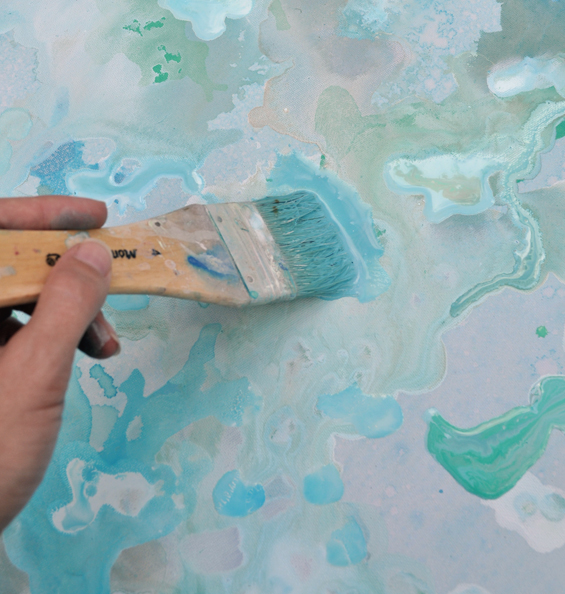
two The streams.
Mix up a mixture of white acrylic paint, dye (in your picked colour – once again, I went with blue) and water which is slightly thicker and a lot more colour saturated than the mixture you used for the base (for some purpose, the base appears quite white in the above photo – it’s actually a lot more blue). Pour a number of minor pools onto the canvas, spread them out a tiny using a brush then enable gravity to do some operate.
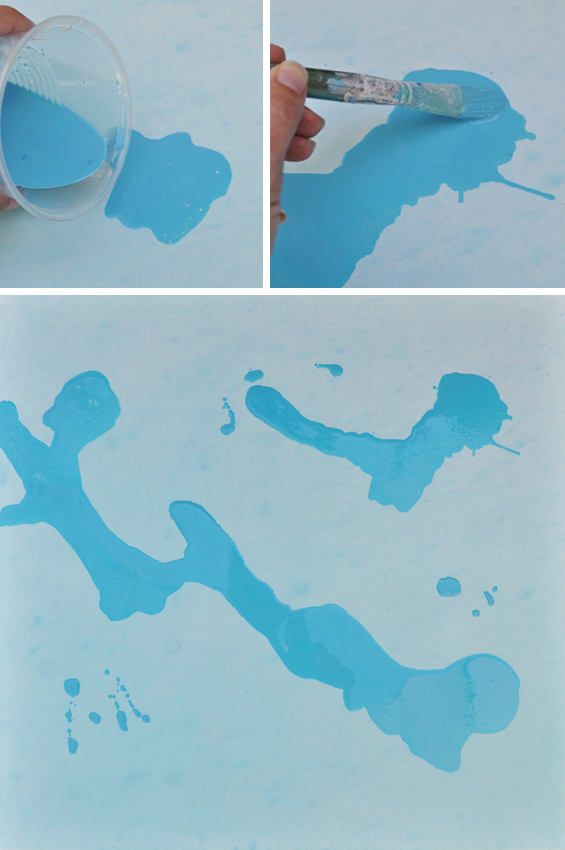
You can support guidebook the shapes of the streams if you like even though don’t be concerned too much about their form as subsequent layering will hide and alter that anyway. This is much more about laying down some areas of colour and movement and generating a foundation to create on. You can also use a brush to just drop a handful of small splotches right here and there and a straw to blow out some thinner streams. Whilst some of this detail will be lost, in certain instances it could proceed to show by way of the following layers (if wanted, you can include any detail back at the end).
There’s no want to be overly careful, even though don’t go too crazy quantity-sensible. The watery mixture will spread significantly and you don’t truly want to coat your total canvas. Whilst you’re not in total control and additional modifications are even now to come, keep composition in mind and try to retain some background expanses.
Before the streams are totally dry, pour on a handful of pools of an alternate colour (I went with green) and repeat the approach. Some mingling must happen which seems to be quite marbled to commence with (which is beautiful) though it does dry to a a lot more uniform, flat finish.

Once again, be mindful with quantities. If you observe undesirable pooling or directional flow, try tilting the canvas mildly or sopping up excess liquid with absorbent paper towel. Don’t fret about paint dribbling off the canvas edge.
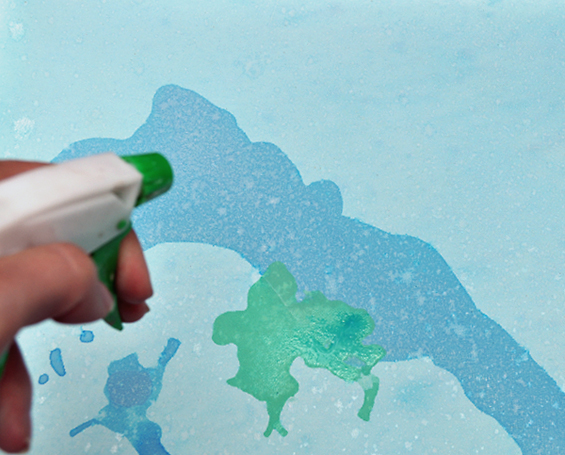
Play about with spritzing the canvas with water or diluted paint to achieve higher flow, softer edges, a lot more blending or extra speckles as sought after. After once more, colours will modify on drying so be patient and make modifications as required. Try not to pre-empt factors as well significantly.
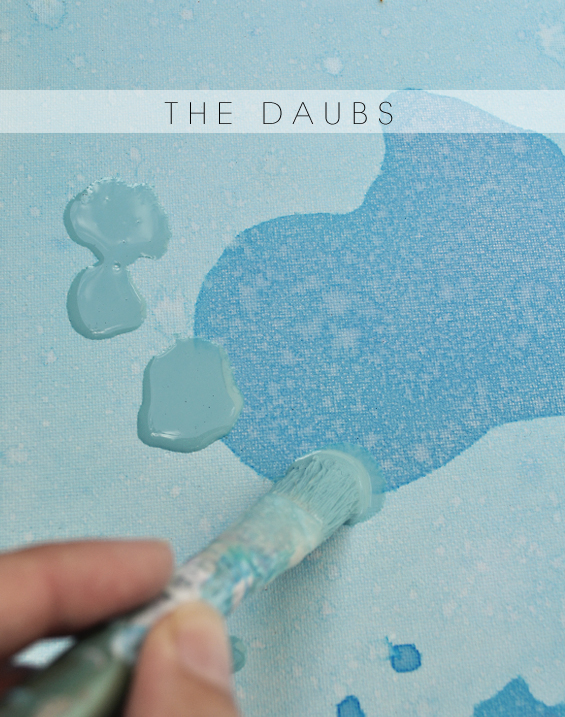
3 The daubs.
Combine up quite a thick combination of white acrylic paint, a little dye (in your picked colour – blue once more for me) and some water. You can also include any additional acrylic colours as sought after (I utilized black to develop a soft grey for my first artwork however decided on a dash of brown for this tutorial). While places of the streams are even now somewhat wet, randomly stipple/drop the mixture on, permitting the paint, not the brush, to form natural dappled shapes (to obtain this use a round-ish tipped brush, guarantee you have a respectable sum of paint on the canvas and flatten the brush bristles out so they push the paint – it just generates a much more normal shape). I concentrated on concealing any particularly harsh dye lines or regions I simply didn’t like.
In locations the daubs will blend with each other (as can be observed in the over close-up), creating more substantial shapes. In other locations they may mingle with sections of wet underlying paint, operating into your prior streams or generating entire new ones. Don’t fear too significantly about this unless all of your daubs are turning to streams and contrast is turning into misplaced. In this situation, permit the underlying layers to dry much more totally ahead of re-commencing, or thicken-up your mixture.
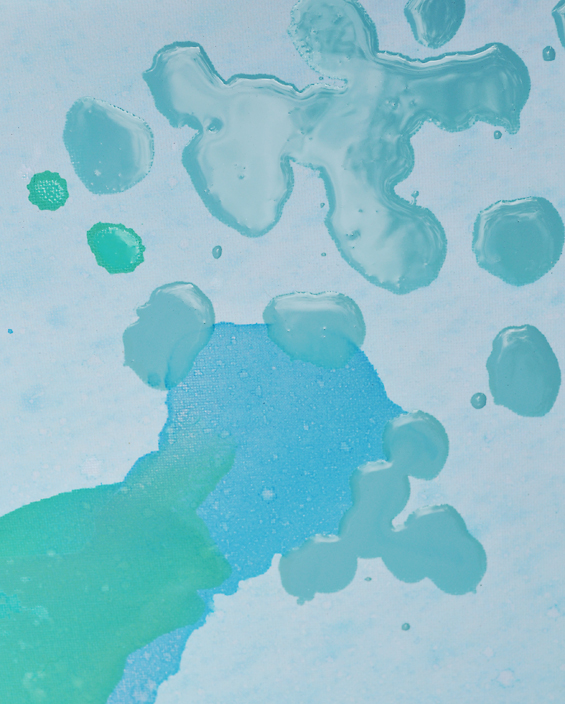
As the paint dries the colour mellows considerably, so deliver some additional contrast to the daubs by dropping thick dollops of undiluted white paint amongst them.
Immediately over is the total canvas soon after my first daub application. Acquiring there, though nonetheless lacking something. I in fact decided to lighten things up additional so extra some more white daubs. I also spritzed the canvas with some diluted white paint. This mellowed out the colour blocks and created some good new muted streams as can bee observed in the shut-up under.
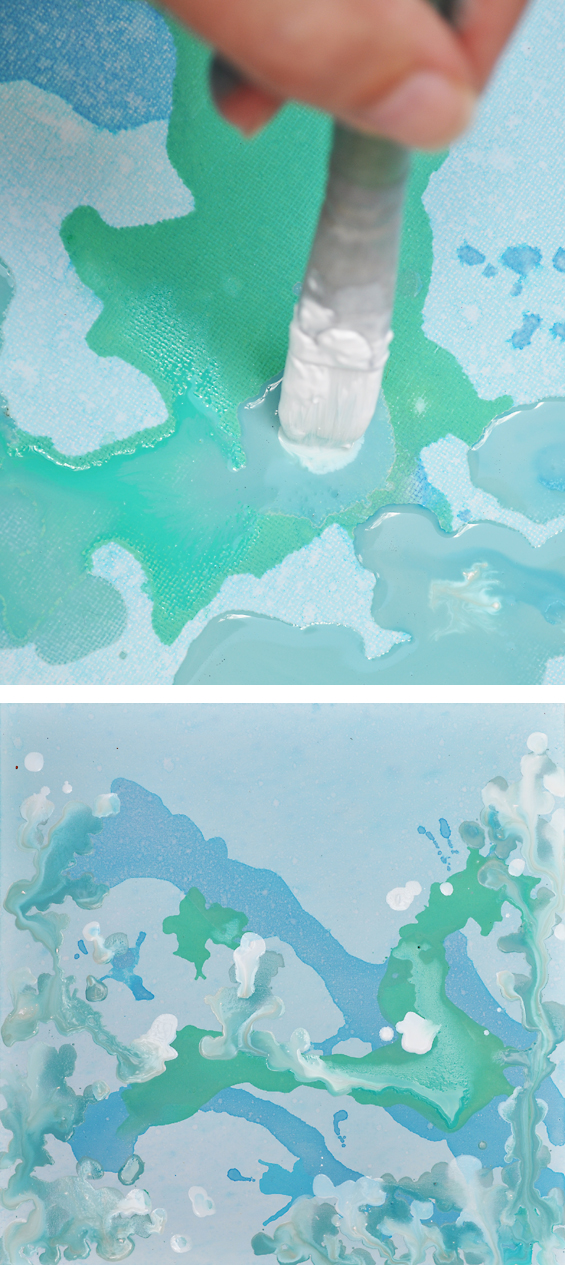
This ‘daub’ application is the stage which requires the most consideration and restraint. It’s easy to go too far and end up with 1 huge mottled mess. Stand back frequently and assess exactly where the daubs are actually needed. Don’t just go wild daubing like a crazy lady! You want to retain sections of the background and portions of underlying colour. This aids create a far more interesting painting with places of both movement and rest.
Under is the whole canvas, nonetheless somewhat wet, right after my secondary application of white daubs.
If at any time you truly feel you’ve gone too far, deliver out the atomiser and play close to with spritzing. I know it’s daunting watering down all your difficult perform, although you’ll be amazed just how straightforward it is to produce new fascinating patterns and, if need be, a wonderful fresh base from which to build upon once again.
Note: Although not important, it may assist to determine the painting’s orientation just before commencing this stage. While abstract artwork can typically be hung in any configuration, composition smart, I personally locate it less difficult adding these final aspects if I have an idea which way I consider is up.
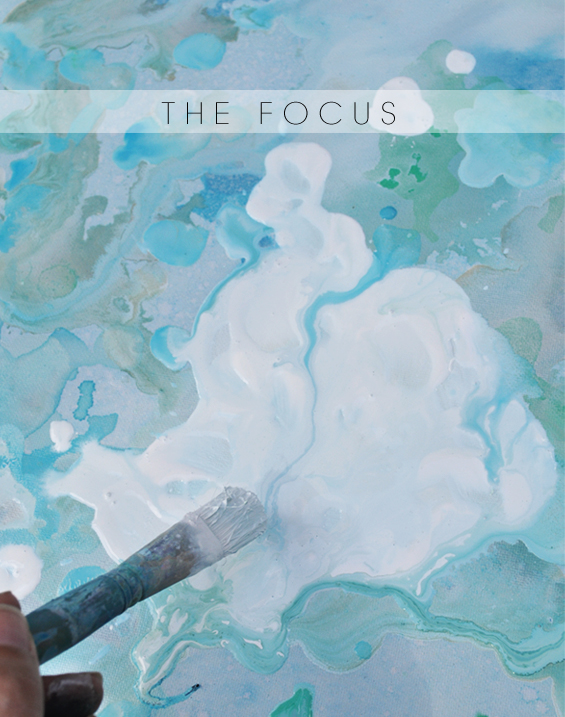
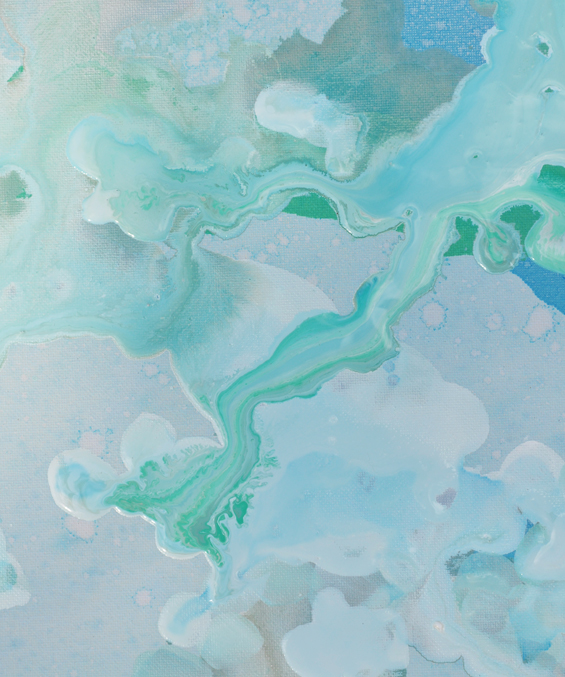
four The focus.
This isn’t needed, though I like the thought of getting a specific region which draws your eye. If you’d prefer a a lot more uniform search, simply leave this stage out.
Whilst the underlying layer is nevertheless a minor wet, lay down a modest location of diluted dye resolution.
Now, use a brush to apply some thick acrylic paint in the colour of your decision (I like the neutrality of white) on best of, or just beside, that spot of watery dye. Begin spreading the pant into a desirable form. The dye need to be pushed to the edges of the paint and type a subtle border about it in sections. This helps produce the impression the emphasis shape is embedded within the artwork, rather than just being plonked on best.
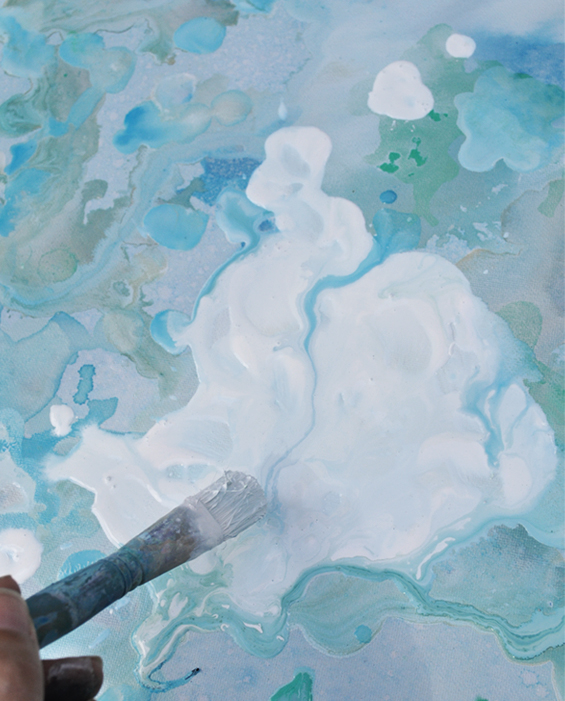
It’s quite inevitable that your concentrate area will select up some of the surrounding and underlying colours. If you locate it gets overly muddied, apply additional thicker regions of paint. Keep in mind, the colors will most very likely dry far more muted and you truly want this concentrate region to stand out.
At this stage you ought to also assess the all round composition and make any alterations you truly feel are essential. You might want to include some far more defined shapes or regions of colour to increase contrast or supply stability.
Note: To total your painting, think about including a frame. It genuinely does assist give a good professional finish and is an effortless DIY (I didn’t do a framing tutorial even though it’s just a matter of mitering some thin timber trim and nailing it straight onto the canvas frame – or, if you don’t like the concept of mitering, you can use simple abutting corners). If you choose the casualness of no frame, you can paint the canvas edge a solid colour to co-ordinate with your painting or extend your painting to the edges during the painting approach. Oh, and don’t forget to consist of your signature in the bottom corner!
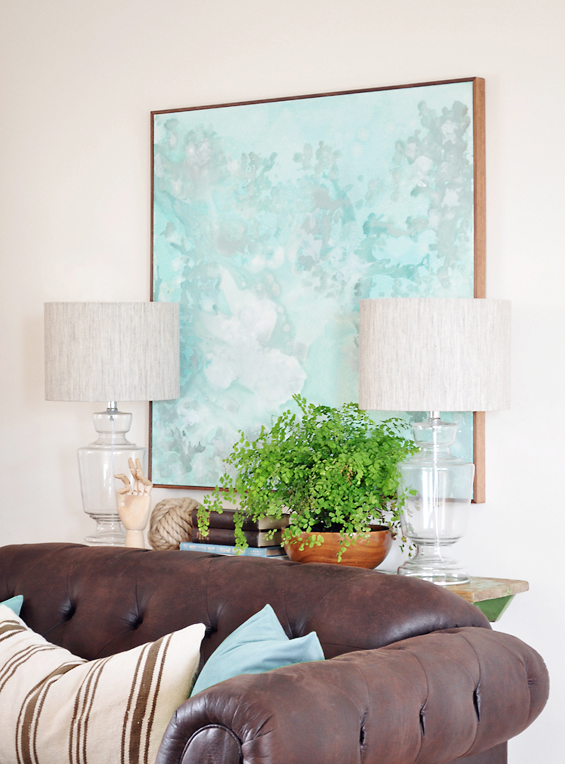
So, right here’s the completed painting.
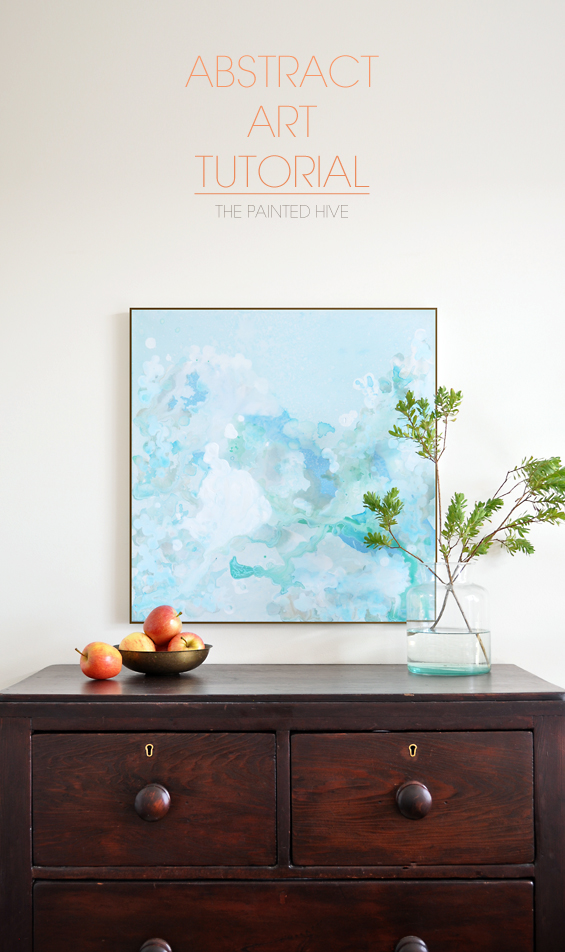
Remember, I did develop this painting mostly for demonstrative functions so it’s various to my authentic work, and also fairly a bit smaller, however I think it nevertheless has its personal appeal. Which a single do you choose?
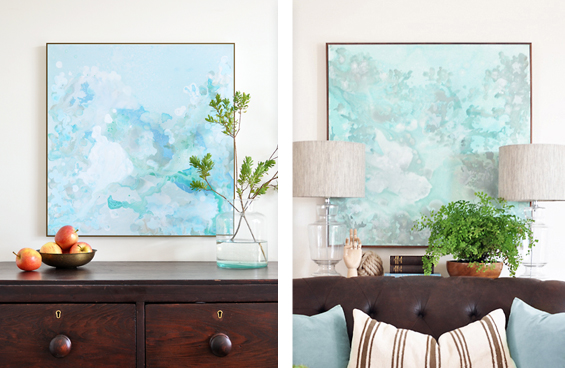
I very like them both. I believe. It’s kinda hard to separate your self and seem at them objectively. I know I do like the colours even though!
 
Difficulties SHOOTING & Starting More than
Inevitably, there will be hiccups and moments of doubt (I can definitely vouch for that!). If you uncover you’re definitely hating the way your painting is progressing, don’t get rid of heart. If factors aren’t also far gone, stand back and assess the place you can make alterations. It can be challenging to alter places you’ve presently painted, specifically if there are sections you genuinely like, although if you’re not totally in love with your art it’s worth giving it a go. If factors are too far gone, just water down the canvas and paint in excess of it yet again. Bear in mind, every mistake is an chance to discover anything and you’ll almost certainly locate that your prior attempts will have armed you with a lot more skill and a greater knowing of how to go about things yet again. Don’t fear as well much if regions of muted paint from your earlier try proceed to display by way of the canvas. They can be used to add some added interest. Please, just don’t give up also easily. I practically did!
Also, and I genuinely have to pressure this – DON’T DISMISS YOUR Work As well EARLY! I’ve been extremely lukewarm on a number of of my paintings initially only to choose I actually fairly liked them right after a day or two. I don’t know what it is precisely, although it would seem it’s effortless to be further essential early on. Bring your painting inside, lean it up against a wall, or hang it if feasible, and let it to grow on you a bit. You may be amazed!
![]()
Anybody can create abstract artwork. I think the issue which leads to trepidation amongst us aesthetic DIY’ers, is the reality we want to produce something with a particular, even professional, seem. It can be challenging knowing the place to begin and doubly disheartening to get the plunge only to truly feel disappointed with the outcome.
As a fellow rookie (I’m assuming you’re reading this tutorial due to the fact you’re a novice also 🙂 I actually-ruly hope this tutorial, along with my suggestions, helps spur some self-confidence.
Have fun!
 
![]()
 
Oh, and send me a photograph if you give it a go!
 
 
You have just read through the post Abstract Artwork Tutorial from The Painted Hive. Click on over to go to the site and get engaged in the remarks area – I’d enjoy to hear your thoughts! Republishing this report in complete or in part is a violation of copyright law.


")


