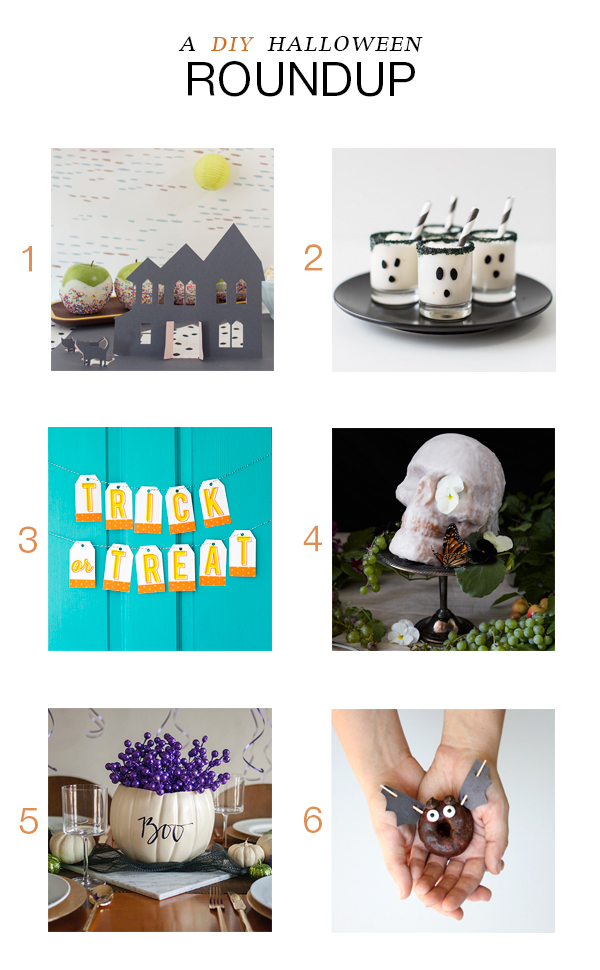
We’re just a couple of days away from Halloween 2014 and, although I wouldn’t call it my favorite holiday, you won’t ever catch me overlooking the opportunity to get crafty. In case you’ve still got a bit of DIY energy left in you, too, I’ve tossed together a mini roundup of my favorite spooky crafts from the season: a Halloween Pop-Up Table Runner from Oh Joy!, ghoul’s guts ice cream cake shots from Sugar & Cloth, a printable Halloween banner via Sarah Hearts, this fabulous vanilla bean skull cake care of The House That Lars Built, my own Home Depot Halloween Style Challenge reveal and the batty donut treats that I put together last year (before I knew how to use a camera apparently—don’t judge!).
Got a fun one to share of your own? Do tell in the comments!
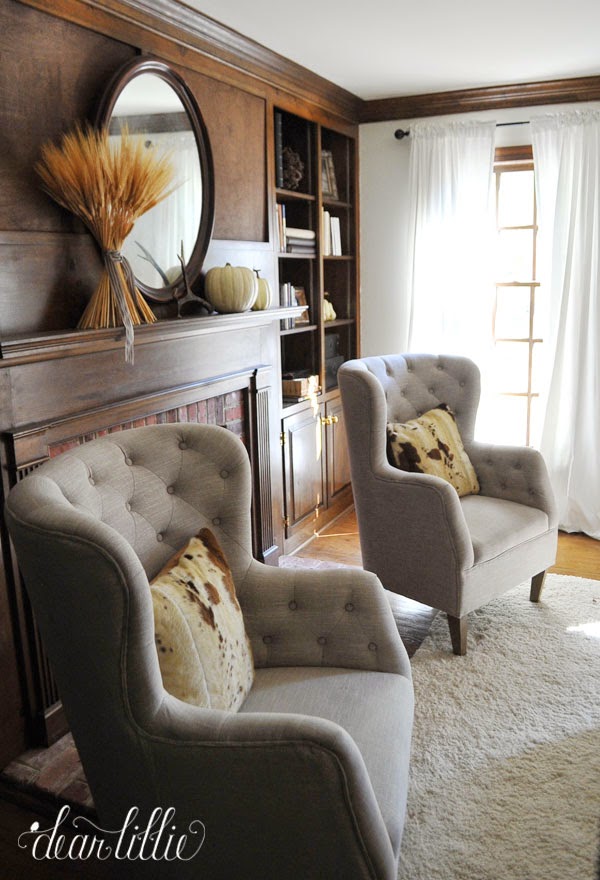
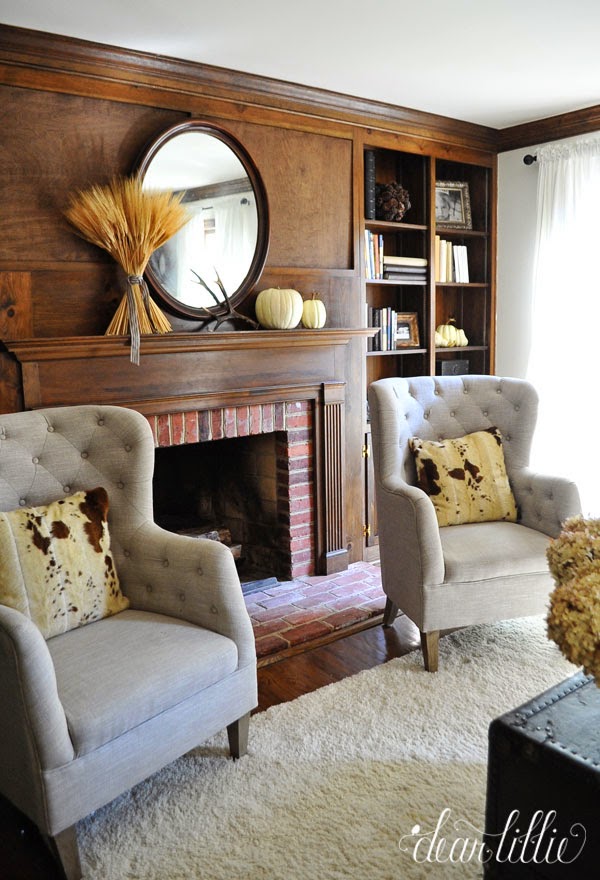
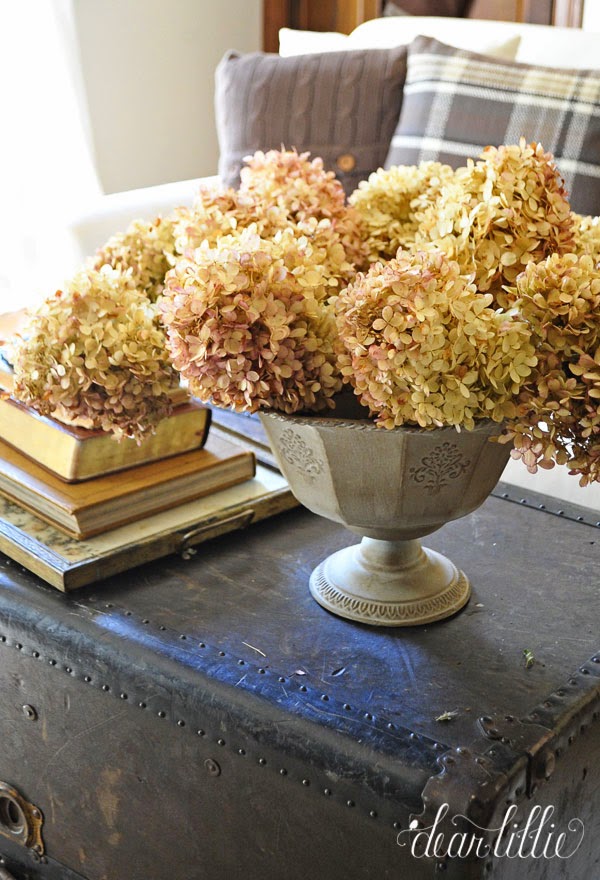
When we painted the kitchen and family room a few weeks ago I took the slipcovered wingback chairs that were in this room (you can see photos of this room with those chairs here) I decided to try switching the sets of chairs because I really liked how the slipcovered ones looked against the new darker gray mantel in the family room. So, I ended up moving these ones in here. I think it looks a little bit dull right now with the autumn decor in there but I think I will really like it once we add some greenery in there for Christmas! And then I have some other greenery we usually have out the rest of the year. So, all in all, I am happy with the switch and I can’t wait to show you this room again in a few weeks when we get it ready for Christmas!
Source List:
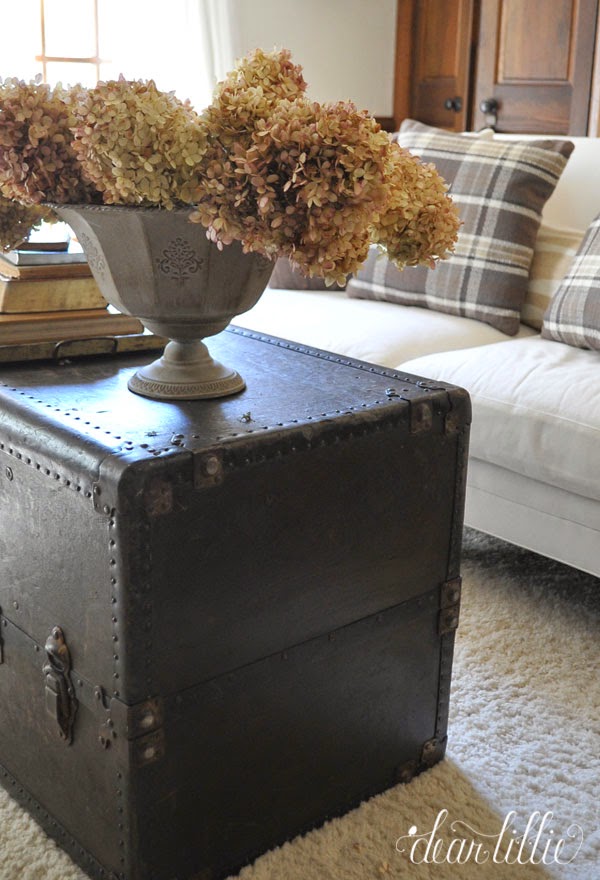
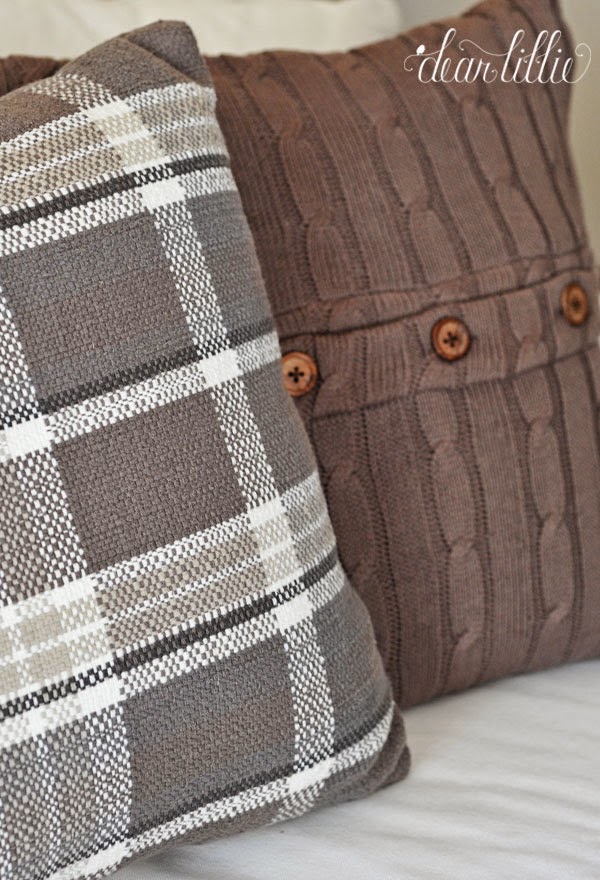
Wall Color – Soft Chamois by Benjamin Moore Sofa – by Lee Industries (was purchased for 1/3 the retail price 7 years ago) Tufted Chairs – TJMaxx Trunk – Found at an antique shop in Ashville, NC about 9 years ago Small Gold Mirror – house warming gift from years ago Mirror above Fireplace – family antique Rug – Remnant from Lowe’s Side Table – also a gift from about 7 years ago, was from an antique shop in Camden, SC Drapery Panels – Ritva Panels from IKEA Curtain Rods – Lowe’s Zebra Pillow – I made them from fabric that was given to me about 7 years ago Faux Cowhide Pillows – World Market Antlers on the mantel – World Market Wheat on mantel – I bundled it together from some wheat stalks I found at Hobby Lobby about 7 or 8 years ago White Pumpkins – Savvy Cable Knit Pillows – Birch Lane Plaid Pillows – Target In Everything Give Thanks Chalkboard Print – Dear Lillie
I hope you all have a fabulous Wednesday! I’ll be back later this week with our hot cocoa station.
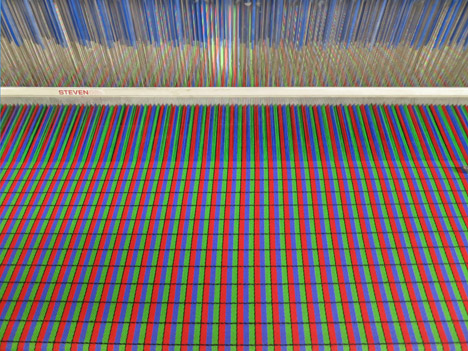
Dutch Design Week 2014: Dutch designer Lianne Polinder has created a textile based on the pixels of an LCD screen as part of her Design Academy Eindhoven graduation project .
Photograph by Femke Reijerman
Lianne Polinder’s Technomimicry collection is made up of four graphic textiles developed with weaving studio Gaudium BV, designed to “explore the relationship between technology, ornament and function”.
Related story: Modebelofte 2014 exhibition showcases “innovative” graduate fashion
“The use of digital and electrical devices and systems has become part of the fabric of our lives. Yet most technology is distant and alien to us,” said the project statement at the Design Academy Eindhoven exhibition.
Polinder’s aim was to make technology more tangible, in the hope that it might be easier to understand in a form that can be touched.
“Technology shapes our world and we become increasingly inseparable from it, while most of us consider ourselves outsiders with no say in the matter,” said Polinder. “That does not seem right to me. If something is a major force in our lives, we should be able to ‘touch it’ rather than be at its mercy.”
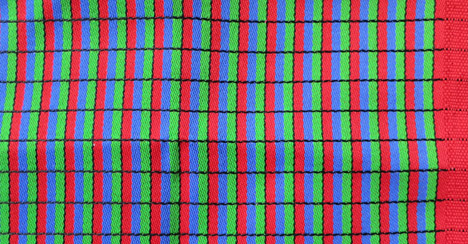
Her first cloth features a pattern based on the arrangement of pixels that form pictures on LCD (liquid-crystal display) screens, like those used for flat-panel displays.
The designer enlarged the composition and turned it into a woven graphic, so the nature of how pixels work can be better understood.
Stripes of red, blue and green – the colours that make up the RGB colour model used to create digital colour images – run vertically down the fabric, broken up by thin horizontal black lines.
On an LCD screen, the brightness of these coloured elements within each pixel is altered to form the picture interpreted by the eye.
The designer used the textile to create a floor-length skirt, which was displayed in front of a length of the fabric at the exhibition during Dutch Design Week earlier this month.
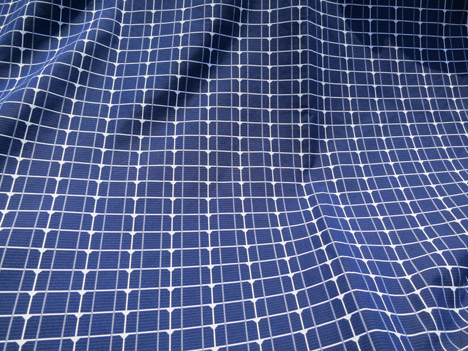
Polinder’s other three textiles are woven to mimic the photovoltaic cells that cover solar panels, used to convert energy from the sun into electricity.
Blue rectangles with chamfered corners are separated by a grid of white lines, further divided by thinner lines that vary across the three designs.
Photovoltaic cells are used in grids across large panels in order to generate enough energy to be useful, which Polinder demonstrates with the pattern.
“The fabric LCD Cloth is woven in a satin binding which makes it relatively supple and suitable for curtains and the like,” explained the designer. “The Solar Fabrics are double weaves in white and blues: sturdy, and more suitable for upholstery or bags.”
This year’s Dutch Design Week, which concluded on 26 October, also saw the launch of an experimental fashion label producing laser-cut garments and included an exhibition of international graduate fashion designers using materials and silhouettes in innovative ways.
I adore a fabulous wallpaper, the modern prints are a fantastic way to add texture, glamour, or drama with a colorful or metallic pattern. Compared to stenciling, wallpaper is limited by its colorways and more expensive, but the look is really beautiful especially with the new contemporary metallic or intricate patterns.
This bathroom makeover was my second time hanging prepasted wallpaper by myself and the task is not as difficult as you might think! With the right supplies you can hang prepasted wallpaper without professional help. The process is drippy and wet (wear your sloppy clothes) and it takes some time, but once you get the hang of it (ha!) you’ll find it’s not as intimidating as you may think.
Wallpapers come in different versions: some are prepasted, some are unpasted, and some are peel off/removable. The prepasted versions work like this: once the paper is moistened with water, the adhesive is activated and you have time to hang the paper straight, reposition if necessary, and smooth out any bubbles.
1) Pick Your Paper. Styles and costs vary, and choosing a paper is a personal choice, but when you find one that calls your name, go for it !
Here are a dozen favorite sources for modern papers:
Graham & Brown
Hygge + West
Thibaut
Anthropologie
Ferm Living
Design Your Wall
Spoonflower
Cole & Son
Decorator’s Best
Wallpaper Collective
Inside Wallpaper
Walnut Wallpaper
2) Prep The Walls. Flat wallpapers with just pattern (and not texture) lay best on smooth walls since texture will show underneath the paper. In our bathroom, we had the walls retextured so they were perfectly smooth, but in homes where orange peel, knockdown texture, or other rough wall surfaces exist, there are two ways to get them smooth enough to install wallpaper.
You can retexture the walls so that they are smooth with joint compound with a few light coats (sand in between) and then prime them in preparation. Or you can purchase and hang prepasted lining paper underneath to prep the walls, this product is affordable and has good reviews, but there are other similar options available. Also, the walls should be primed so that the wallpaper adheres well. Remove all light fixtures, electrical plates, art, shelving, or anything else that will interrupt the application of your paper.
Supplies You’ll Need: canvas tarp for floor; prepasted wallpaper; bathtub or long wallpaper tray for moistening paper; level; pencil; plastic smoothing tool like this; stepladder; large sponge; sharp scissors.
3) Understand the Instructions. All prepasted wallpapers come with instructions and they will guide you through the steps of hanging the paper yourself. Most of them I followed, some I tweaked, here are some techniques I found worked best.
No walls are ever perfectly straight but rather than hang your paper in alignment with the (likely slightly crooked) walls, it’s important to hang your paper so that it’s straight according to a level. Many wallpaper manufacturers recommended using a plumb line and chalk which is fine; I thought it was far simpler to use the level and draw a line with a pencil on the wall. For the first strip, anticipate you’ll need to align the paper to the pencil line and also allow some overlap onto an adjacent wall.
4) Measure and Cut. A paper with a complex or offset pattern with a large repeat will require very careful measurement before cutting to match up the edges, a straight match print with a smaller repeat is more forgiving. Always allow a few extra inches at the top and bottom for trimming and perfect alignment between strips.
5) Activate the Adhesive. There are two ways to activate the paste on the back of the paper, by soaking a paint roller with water and rolling it over the entire strip of paper, but this requires a long work surface. The alternative is to roll the paper in reverse so that the pattern is on the inside and dip it in room temperature water in a bathtub or wallpaper tray which is what I did, unrolling and rerolling with the pattern on the inside. Wait the required time recommended (often just 3-5 minutes) before applying the paper to the wall.
6) Hang Slowly. You can cut ahead but only hang one piece at a time and after a few strips I found I needed to take a break. Better to do it right than rush it!
Once the paper is up, double check that it is straight with the level and use the plastic tool to carefully smooth out any bubbles. Some instructions or tutorials recommend a seam roller for smoothing the seam edges when the strips are next to each other, I didn’t use one, I used my index finger to align the wallpaper’s edges and followed up with the smoothing tool which worked fine to connect the edges and smooth them together. This less than \$2 plastic smoothing tool I found at Lowe’s was excellent, it was soft and flexible enough to not damage the paper, but stiff enough to flatten it against the walls.
7) Trim Carefully. Some instructions recommend using a sharp razor blade to cut the excess paper, for me it worked just fine using the plastic tool to smooth the paper into place then score the edges where they met the ceiling. While the paper was still moist I peeled it back, trimmed it with sharp scissors where I had scored it, and then smoothed it back into place. If the wallpaper dries out, use a soaked sponge to rewet the paper so you can maneuver the edges back into place.
Wallpapering with prepasted wallpaper is a project you don’t need to complete all at once, I did this over the course of three days, a few strips at a time and the result is so pretty! Take a tour of the full bathroom here to see all the details and sources.
There are a lot of textured wallpaper patterns now available, how cool is this plank wood look pattern, it would look fab inside a bookcase or behind a bed!
Get the look of classic painted white brick with white brick wallpaper (I just bought some for a future project!).
I have always loved grasscloth wallpaper, it is such a chic way to add texture to a space, but grasscloth is expensive. My favorite look of all is a contemporary wallpaper installed above traditional wainscoting like this, divine!
thibaut
Have you had your own DIY wallpaper hanging experience, either prepasted or unpasted? Got any tips to share? …
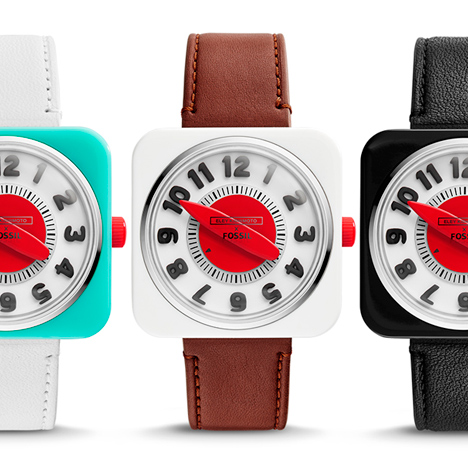
Dezeen Watch Store: London fashion studio Eley Kishimoto and American clothing brand Fossil have released Retro Timer – a watch influenced by designs from the 1950s that includes an unusual timekeeping mechanism.
Modelled on 1950s kitchen clocks, Retro Timer features a large hand to mark the hours, while the traditional minute hand has been replaced by a rotating red aluminium disc. The watch is available to pre-order today at Dezeen Watch Store.
From left to right: Retro Timer in turquoise/white, white/brown and black/black
In order to produce Eley Kishimoto’s design, Fossil had to develop a new kind of watch movement to make the disc rotate independently.
“We started to have a conversation about how we can use the red disc somehow, and then just put a point on the red disc to have it as the minutes,” said Eley Kishimoto co-founder Mark Eley in a video interview with Dezeen Watch Store. “We developed, by happy accident, a new way of telling time.”
The unisex timepiece features a leather strap, rubber indexes and 38-by-38-millimetre injection-moulded nylon case, and is available in three colour combinations: white/brown, black/black and turquoise/white.
Mark Eley (left) and Wakako Kishimoto (right) in their south London studio
“I got the inspiration from a kitchen timer,” co-founder Wakako Kishimoto explained. “I was just looking at a simple, time-telling machine that has a different mechanism and function.”
Retro Timer features a large tapered hour hand and a rotating disc with black mark that indicates the minutes
The Brixton-based fashion label was started by Eley and Kishmoto in 1992, and is best known for its womenswear and graphic patterned print work.
Retro Timer forms part of a wider 19-piece collaboration between Eley Kishimoto and Fossil that also includes bags, scarves and card holders.
Sketches of initial concepts by Wakako Kishimoto alongside the finished watches and iPad case from the new collection
“I think they’ve got an incredibly similar watch to our very original drawing,” Eley said. “They’ve been true to what something from that era would possibly look like.


 Photograph by Femke Reijerman
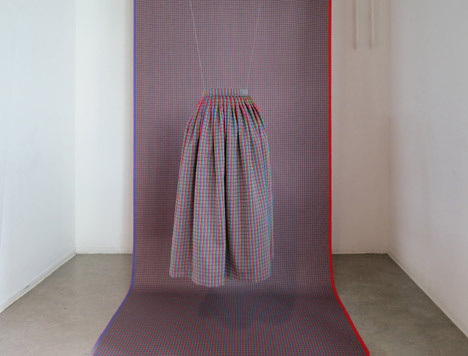


 From left to right: Retro Timer in turquoise/white, white/brown and black/black
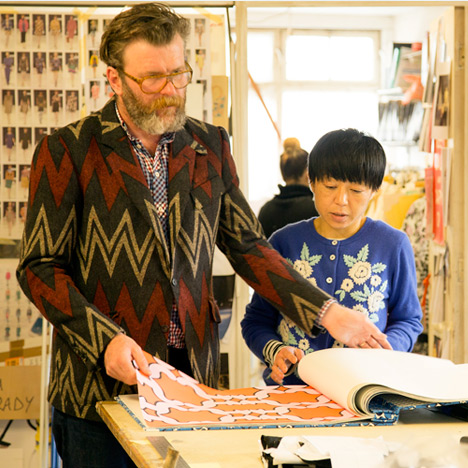 Mark Eley (left) and Wakako Kishimoto (right) in their south London studio
 Retro Timer features a large tapered hour hand and a rotating disc with black mark that indicates the minutes
 Sketches of initial concepts by Wakako Kishimoto alongside the finished watches and iPad case from the new collection


