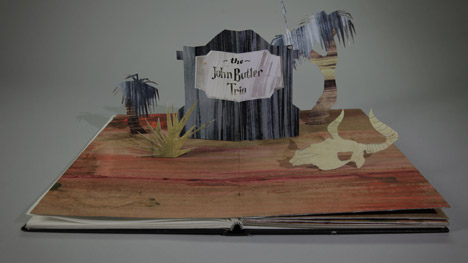
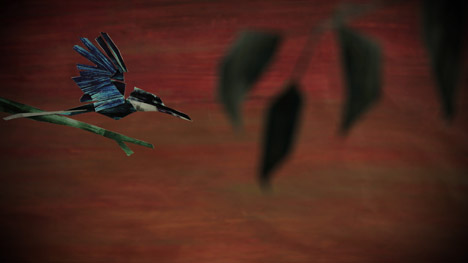
Music: Australian studio Dropbear Digital employed over 330 paper illustrations to inform the story of a wandering spirit in this cease-motion video for John Butler Trio’s new single, Spring to Come.
Director Jonathan Chong of Dropbear Digital collaborated with independent illustrator Snip Green to make the film.
Connected story: SBTRKT’s animated music video follows a creature via urban dystopia
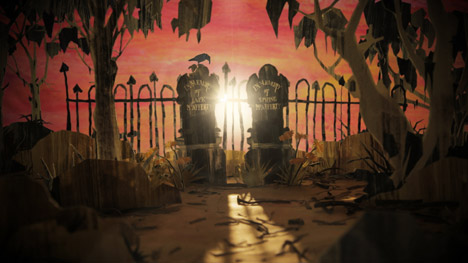
“The story is about an Earth-bound spirit known as Jack who is searching for his long lost wife called Spring,” Chong told Dezeen.
“He wanders the landscape as it alterations via the seasons and all about him the cycle of life continues,” the director stated. “In the end he finds Spring and returns to the light.”
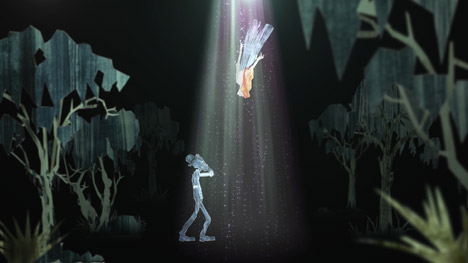
Beginning with an animation of a pop-up book opening, the film cuts to Jack and Spring’s graves, before following Jack’s spirit by way of an otherworldly landscape.
“It was straight inspired by the underlying which means of the song that no matter how dark items can get there’s usually light at the finish of the tunnel and things never remain the very same forever – spring at some point comes complete circle,” mentioned Chong.
Australian soft rockers John Butler Trio approached Dropbear Digital about producing the video soon after seeing a stop-motion promo Chong created for Melbourne outfit Hudson and Troop.
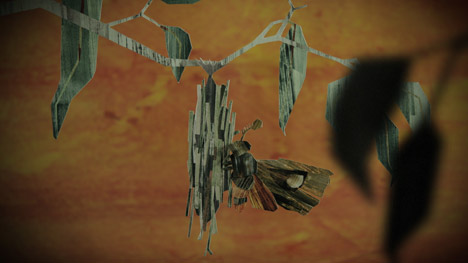
The director told Dezeen that virtually almost everything in the James Butler Trio video “was developed out of paper – from the plants to the animals and the human characters.”
“Almost everything had to be cut out and created by hand. It was animated on a standard animation stand that consisted of three to four layers of glass so that the background, foreground and middle ground could be divided up and animated separately.”
Even though most of the effects in the film were produced in-camera, some were produced after filming. “The setting sun was a sensible light on a slider that was animated by hand, and then the sky and stars were a digital impact,” Chong explained.
The director animated the film utilizing Dragonframe quit-motion software. Spring to Come features on John Butler Trio’s sixth album, Flesh and Blood.
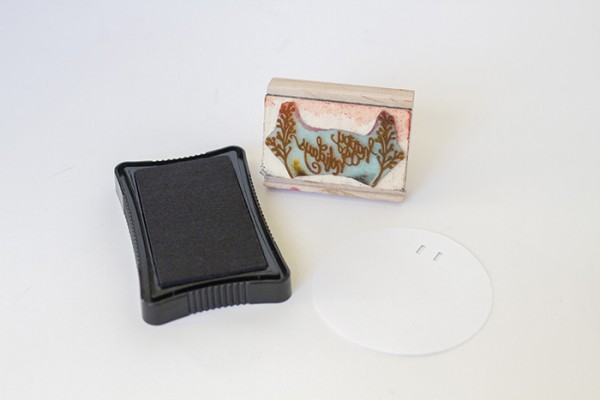
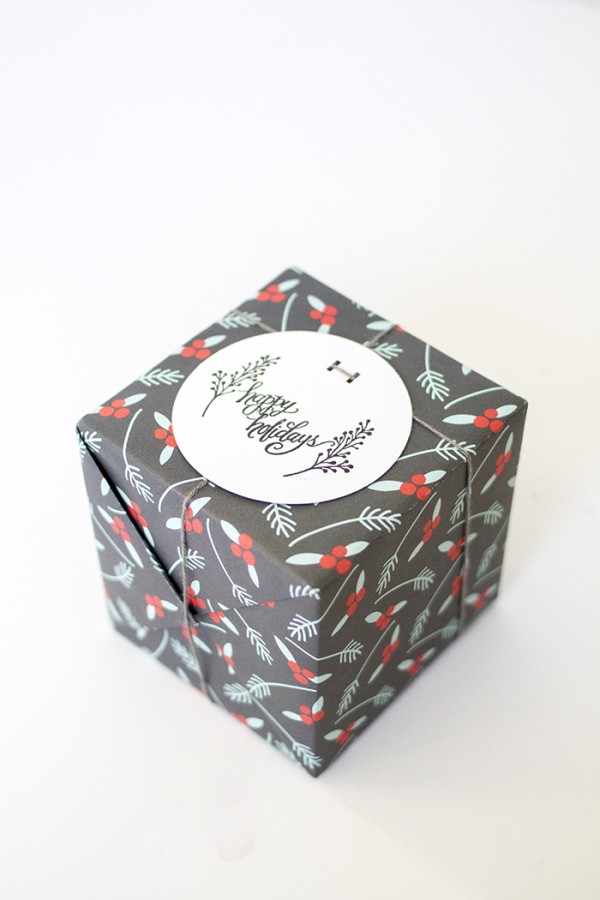
We’re moving appropriate along in this season’s Holiday Paper Wrap Up series—this time, we’re talking stamps. These crafty tools have been around for forever and for excellent cause. The reusable aspect makes them a dream for individuals who don’t have limitless storage and who adore to embellish anything from little love notes to envelopes (guilty!). And nowadays, we’re turning our interest to stamped vacation tags, simply because why on earth not??
Pre-wrapped gift box
Yarn
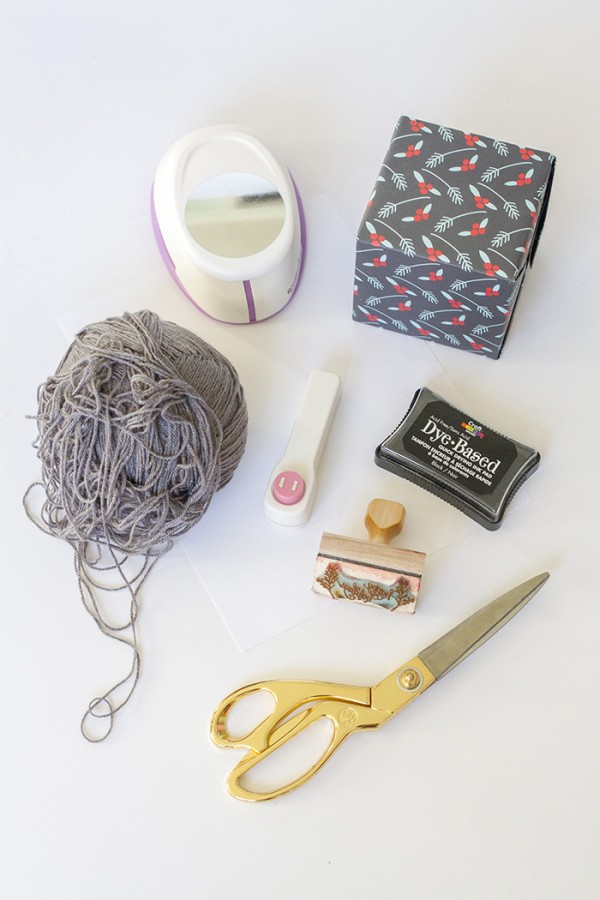
three-inch round hole punch
2-point tag hole punch
Sheet of cardstock
Vacation stamp (mine is from Terbear Collectibles featuring Laura Hooper Calligraphy)
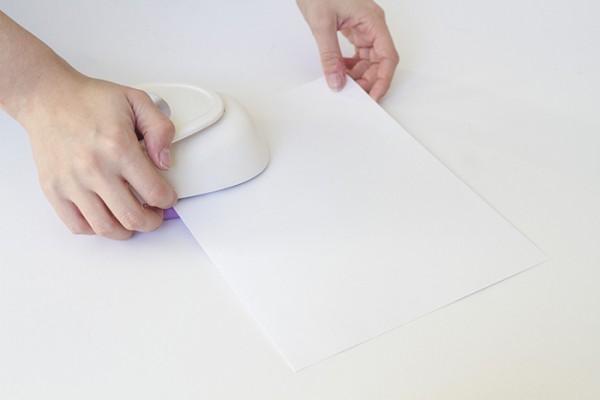
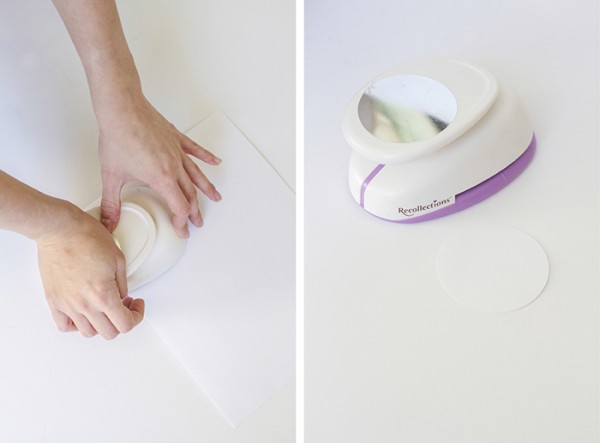
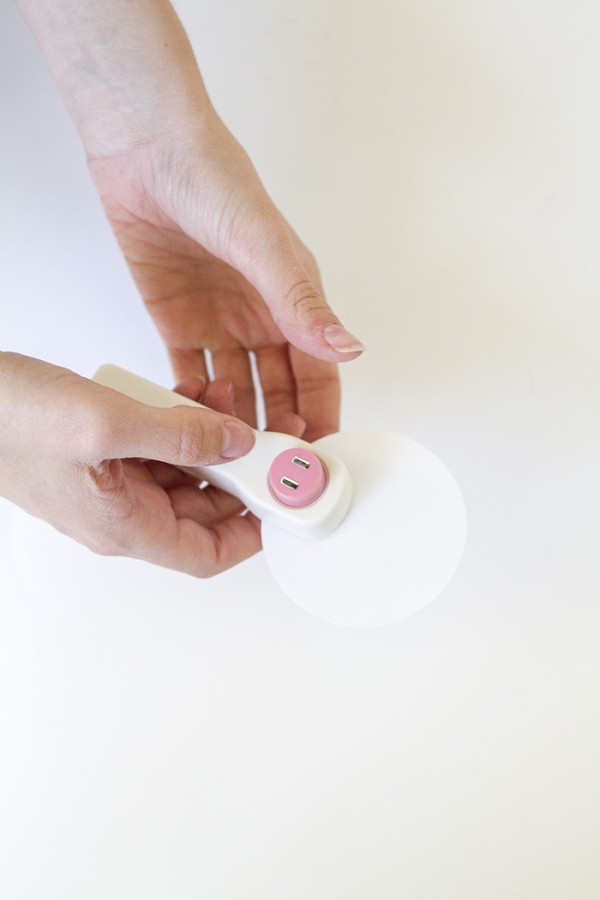
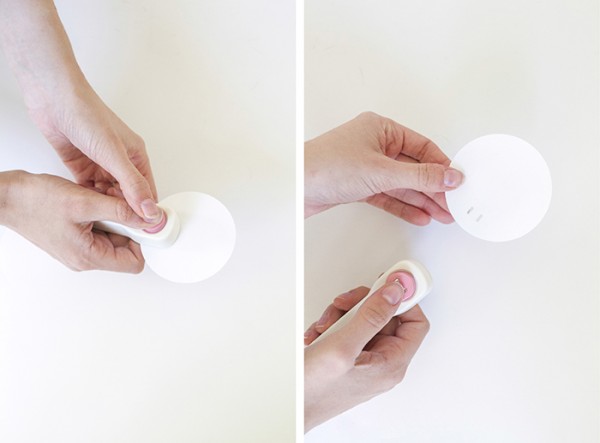
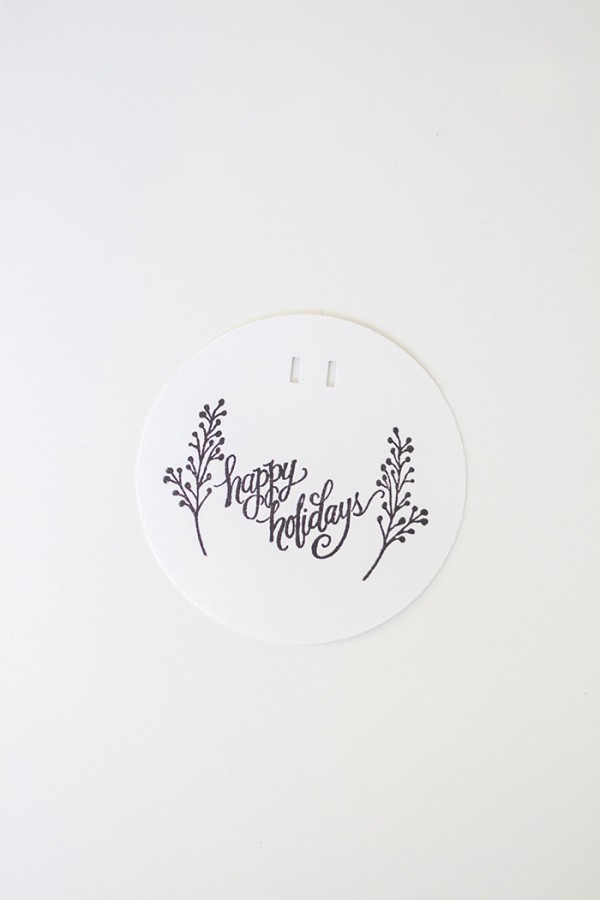
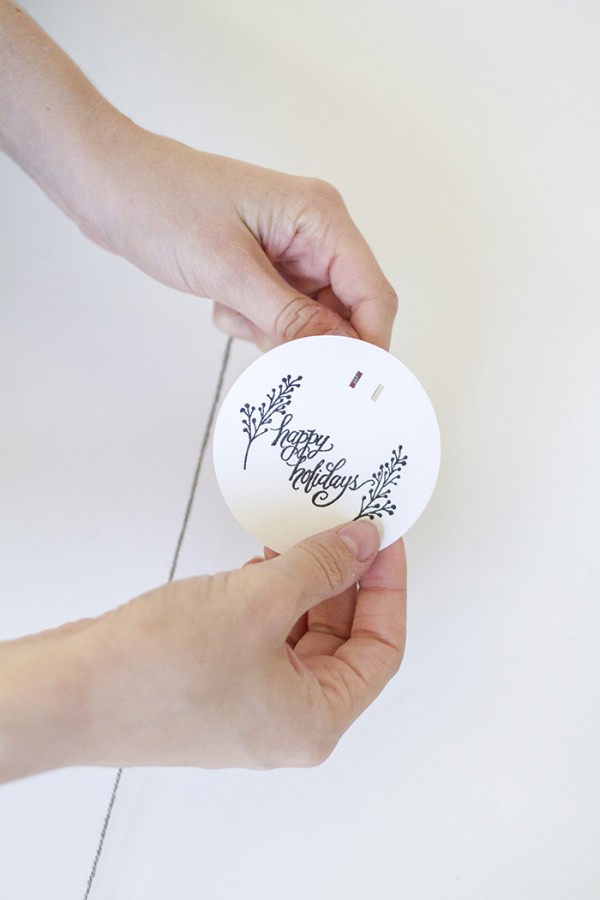
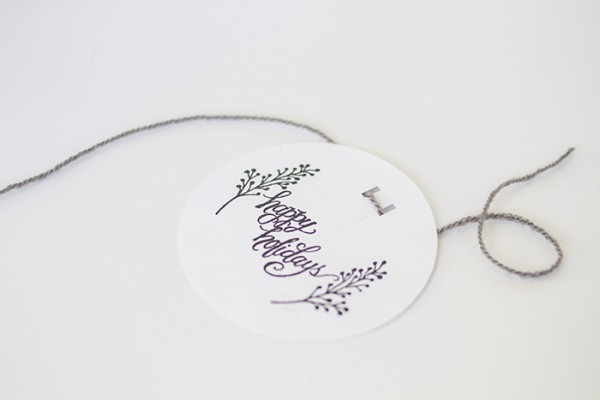
Very first, grab your three-inch hole punch and cut out a circle from your cardstock. I went with white paper to hold items nice and sleek, but you can mix yours up to match the particular wrapping paper that you decide on to use beneath your own tag. Next, use a two-point tag hole punch (I purchased mine from Michael’s craft shop) to add double points for your yarn to slip through in a later step.
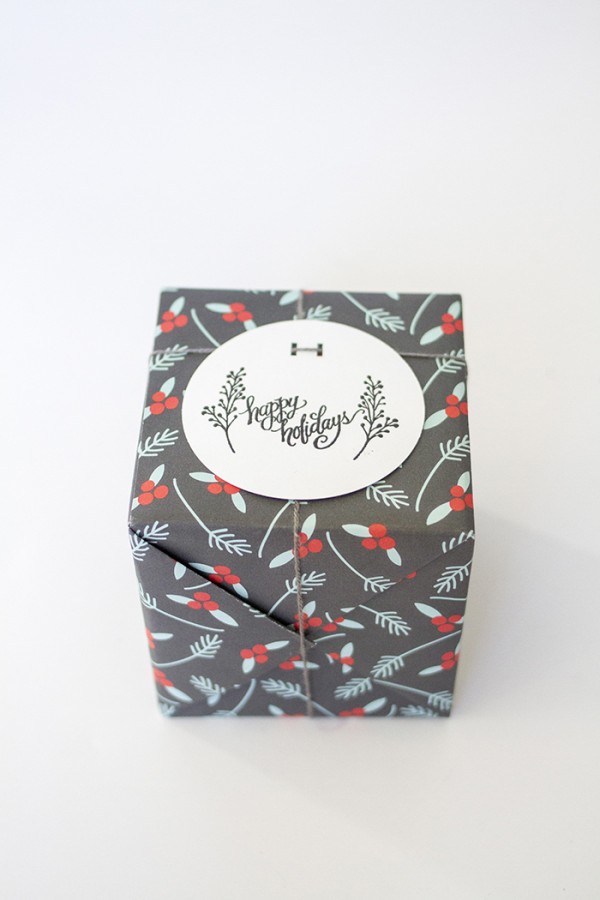
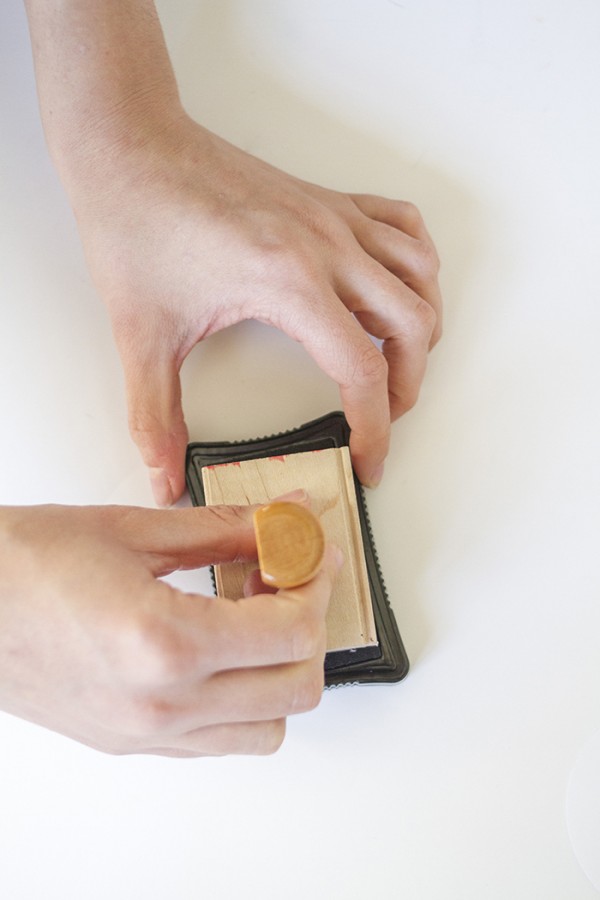
Following that, it’s time to stamp. As I mentioned in the supplies list, my vacation stamp came from Terbear Collectibles with calligraphy by Laura Hooper. I’ve spent a big element of this holiday season finishing all sorts of tags with these fairly stamps (see my custom address stamp here), but for this project I chose my favorite—a berry embellished stamp with a straightforward cursive “happy holidays” sentiment written across the center.
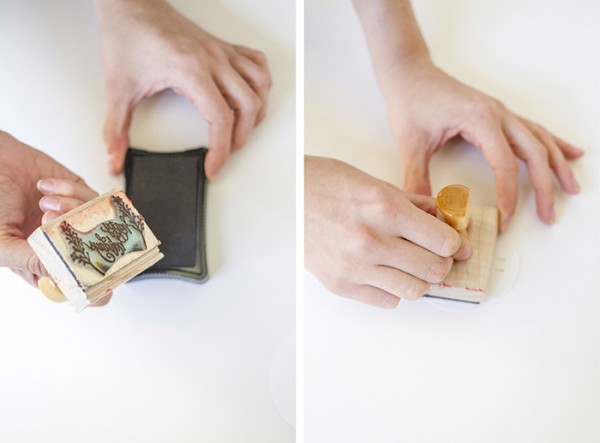
To accomplish your own excellent stamp, open a fresh pad of ink and gently push your stamp into the pigment. You don’t want to push also tough or else you danger getting ink on the sides of your stamp, which could mar your completed tag. Press the stamp onto the ink pad multiple times, shifting the stamp about to get all of the sides inked till you really feel like you have it covered.
Lift the stamp to verify that all of the raised edges are covered with colour, and then gently press it onto your paper tag. If you want to practice beforehand, have a piece of scrap paper handy—I did numerous instances before pressing my stamp onto the real deal.
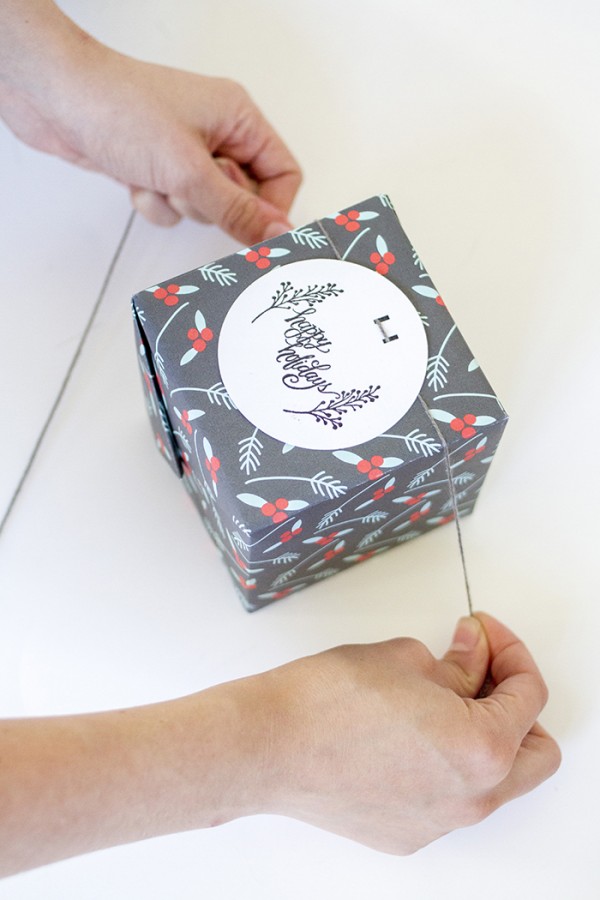
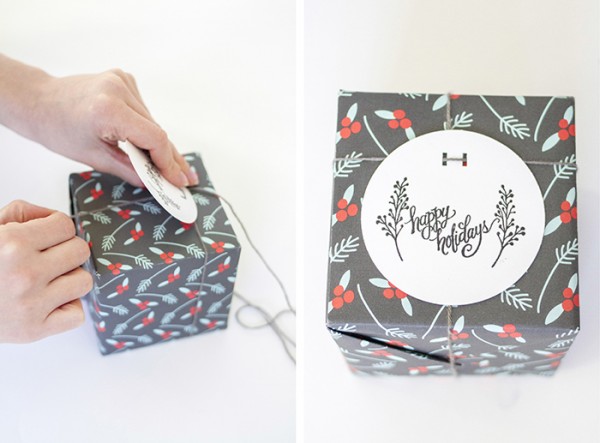
To finish, cut a piece of yarn large enough to encircle your box twice, and then thread it by way of the double holes you made earlier in your paper tag. Bring the yarn and tag more than to your box, set it on top and pull the yarn taut down the sides. Twist the yarn beneath the box and bring it up the opposite two sides. Thread one finish of the yarn beneath your tag and shimmy the ends to the underside of the box to hide your knot.
I’ve been hinting about the pleased news all through the entire week, but I’m pleased to ultimately spill the beans that Terbear Collectibles and Laura Hooper Calligraphy are providing a single DGD reader a custom address stamp of their own to use over and over again in the new year! Just use the Rafflecopter widget beneath to enter. Contest ends next Friday at midnight—good luck!
a Rafflecopter giveaway
P.S. In case you’re too anxious to wait for the giveaway to finish, use code DREAMGREEN at checkout to get 15% off any Terbear Collectibles item!
P.P.S. In case you haven’t entered my 14 Days of Enjoy giveaway, you have significantly less than 24 hours! Don’t miss out on the likelihood to snag \$250 to put towards your subsequent Minted order.
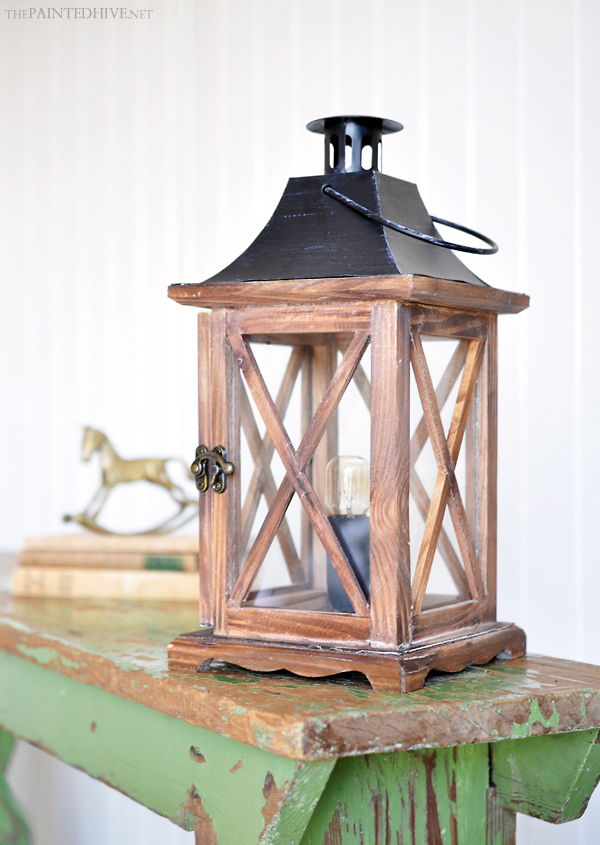
A few months back my mum mentioned she was looking for a new bedside lamp to grace the guest room at her beach house.
Well, actually, that’s not entirely accurate. When I say “looking for” I really mean “dreaming up”, and when I say “new” I really mean “not new at all” because, like me, she has the same weird can’t-leave-well-enough-alone-or-just-buy-stuff-from-a-store-like-most-regular-people disease.
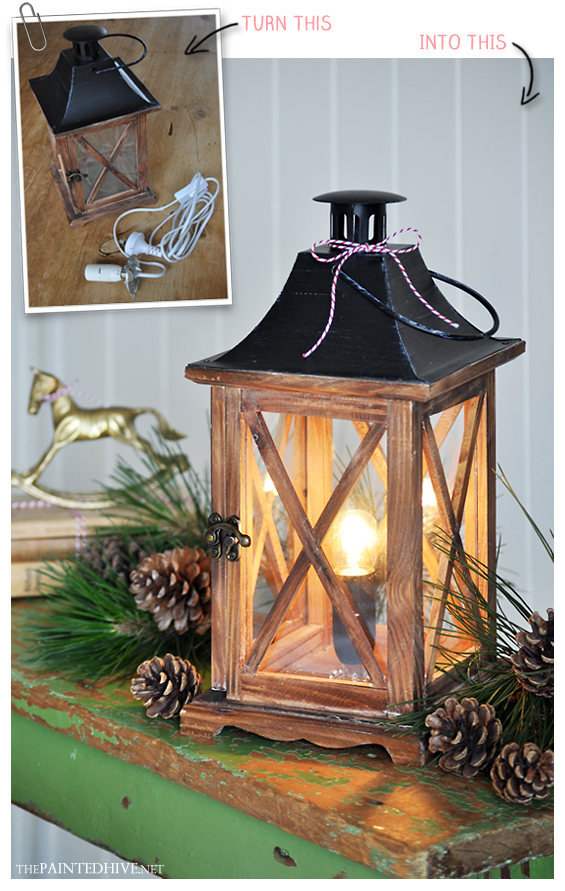
Anyways, her plan was to simply combine two elements she already owned; an inexpensive lantern and a complete lamp cord. Yep, two basic items anyone can get their hands on!
And when I say “simply combine” I really do mean just that! Truly ruly, this is one of the easiest DIY lamps ever. It’s also super affordable, completely one-off and the possibilities are almost endless! Oh, and did I mention the absence of any wiring?
You only need three ingredients…
LANTERN We used a rustic wooden lantern that was found at a discount variety store a few years ago for just \$8. Although we used a lantern you could use almost anything with an appropriate form (as long as it’s safe to use as a lamp – remember, some light bulbs can get pretty hot). I’m liking the idea of a cute wooden birdhouse!
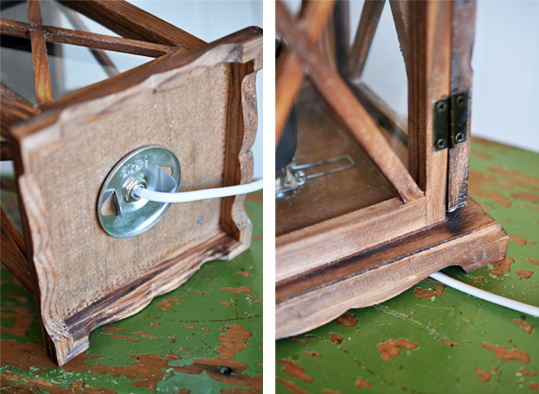
If possible, use something with a raised base to allow space for the socket flange and to provide a feed for the cord (demonstrative photos below). Of course, if you can’t find something raised, you could always add your own little feet/apron or consider the option of hollowing out certain areas (if possible).
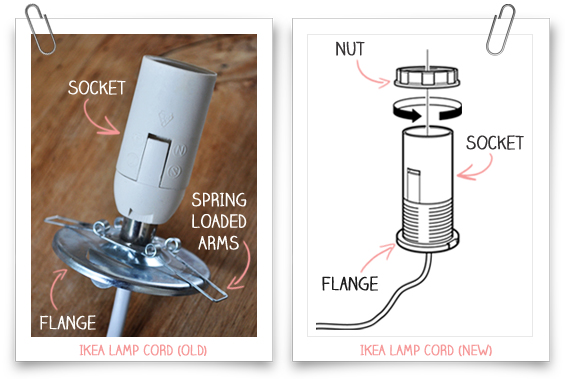
LAMP CORD Did you know you can buy wire-free DIY lamp cords? Whilst we used a cord from an old Ikea MYLONIT lamp (this was a really cheap self-assemble lamp with a complete cord which was entirely independent of the actual lamp form – now discontinued) Ikea still sells super affordable similar lamps with all-in-one cords which would work just as well for a project like this (check out the LATER, KVARNA and KAJUTA).
Note: As an alternative to the Ikea lamp cords, you could try a plug-in pendant cord though they can be pretty pricey (up to \$60) and may not be as well suited for this type of use. I know there are lots of really affordable lamp kits available in the US (and I’ve also just discovered you can actually buy separate cord sets from US Ikea stores) though I think due to legalities they are pretty much non-existent here in Australia. I found using the Ikea lamps to be the best option.
LIGHT BULB We used a little 15 watt pilot bulb (available at supermarkets or hardware stores) which, for whatever reason, I think compliments the subtle nautical style of the lantern. It’s low wattage also emits just the right amount of warm light given it’s shining through clear glass. Of course, you could get fancy with a more decorative filament bulb or use a traditional candle-shaped one.
To convert the lantern into a lamp…
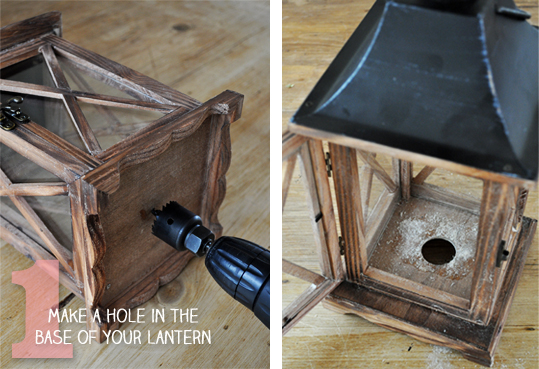
ONE Make a hole in the base of your lantern.
This needs to be large enough to accommodate the socket, though not so large that the flange fits through (refer to diagram below). The flange needs to be ‘caught’ by the underside of the lantern so the socket can be properly secured.
In the case of our old Ikea spring-loaded lamp cord, we had a little room for error in terms of hole size as the circumference of the flange was quite a bit larger than that of the socket. The newer Ikea lamp cords however require a little more precision as the difference in size between the flange and socket isn’t as generous…
That said, for greater ease or to correct any oh-oh-I-made-the-hole-too-big mistakes, you could always use a washer to fake a larger base area.
To create our hole we used a hole saw bit (as can be seen above) though there are lots of ways to go about it. A spade bit (if you have a large enough one) or a multi-tool are just two alternatives.
Note: These methods for creating the hole should work for metal too – as long as the cutting bits are good quality and sharp. Getting through might just take a little longer.
TWO Paint the socket sleeve (thanks for being my hand model mum!).
This just helps disguise the plastic look of it. We went with basic matte black, though you could opt for a trendy colour pop or faux metal finish. You could also choose to conceal the sleeve once in place – I contemplated wrapping it in twine, fine rope or even a sleeve of metallic card, though decided it wasn’t really necessary. I actually quite like the simplicity of it.
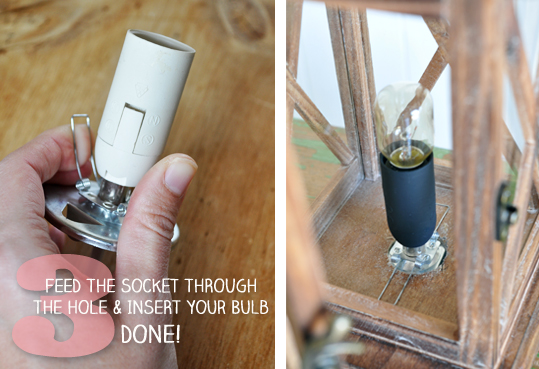
THREE Feed the socket through the hole and insert your bulb – DONE!
Obviously I took the above demonstrative spring arm photo before I painted the socket sleeve!
In our case, this meant squeezing up the spring-loaded arms and inserting the socket from the underside before allowing the arms to snap back, securing the socket in place. If you are using one of the newer Ikea lamp cords, this would simply involve inserting the socket from the underside then screwing down the plastic nut to sandwich the base of the lantern. Essentially, the nut and spring arms serve the same anchoring purpose.
And it really is as simple as that!
Mum now has a totally unique lamp to both compliment and illuminate her beach house guest room – and all for less than \$15 and in under fifteen minutes!
I tested the lamp at night and was immediately smitten with its warm glow and shadow cast. The decorative x’s cut the light quite boldly and produce, what is to me, quite an enchanting ambiance.
Below you can see what I mean about the lantern needing some sort of raised base or hollow. There has to be space to accommodate the socket flange and somewhere for the cord to feed out or the whole thing won’t sit level.
As nice as it is to use lanterns with actual candles, this is just a bit of a quirky take which makes for a unique lamp and provides easy one-click radiance.
I know this isn’t really a Christmas project though given the time of year I thought I’d style it a bit festively.
Since creating this lamp I’ve found my eyes lingering longer over every lantern (slash hollow object) I come across. Do you ever do that too? Get so excited about the possibilities of a project that you just want to make more and more for no good reason? Fortunately stuff like this can make pretty cute one-of-a-kind gifts!
Hope everyone’s Christmas preps are going well 🙂
You’ve just read the post Easy DIY Lantern Lamp from The Painted Hive. Click on over to visit the blog and get engaged in the comments section – I’d love to hear your thoughts! Republishing this article in full or in part is a violation of copyright law.
Have a lovely kitchen at property is one of the greatest stuffs in life. As you know, kitchen generally is the heart of the house. No matter how excellent the residence you have, of course it could be incomplete without having the beautiful kitchen as a portion of it. Nicely, to let people broadly worldwide have their enchanting, beautiful, and even cozy kitchen at home, the styles, types, and even kitchen furniture are available in the broadly enchanting selections nowadays. Nonetheless, apart from concerning about the kitchen style to apply, of course kitchen furnishings also should be concerned as well for getting your fresh and beautiful kitchen appear. So, if you already have the dull kitchen cabinets at property, of course kitchen cabinet refacing is the ideal way to refresh your kitchen look as it when was.
Kitchen cabinet generally is one of the most important kitchen stuffs that always discovered in anyone’s kitchen. Besides has a fantastic function as important kitchen appliance, kitchen cabinet also could be the greatest kitchen decoration to concern for getting chic and cozy even beautiful kitchen at residence. Anyway, most individuals usually straightly replace the old and dull kitchen cabinet with the new 1. If you require such fantastic reference of the smartest saving money reference associated to kitchen cabinet refacing, then re-painting the old and dull kitchen cabinet you have is the most effective way to do.
Just re-paint the old and dull kitchen cabinet that you have at home with any interesting colored paint that you enjoy which also appropriate based on the colour scheme of the kitchen itself. Of course apart from simple to do, re-painting dull and old kitchen cabinet essentially is also fascinating. Just commence the project of kitchen cabinet refacing now by means of re-painting it, then you will see how great it is to bring the new, fresh, and enchanting kitchen cabinet look back like it after was economically!
Gallery of Repainting as the Simplest and Greatest Move of Kitchen Cabinet Refacing
How to Make a Blanket Scarf // Mom Advice : I want to put on this every single day
I’m in adore with this chalkboard star background, you can use the black kraft paper (that we like to use to wrap gifts) draw the stars on a chalkboard that you have or use the table runner from target like Jenny did.
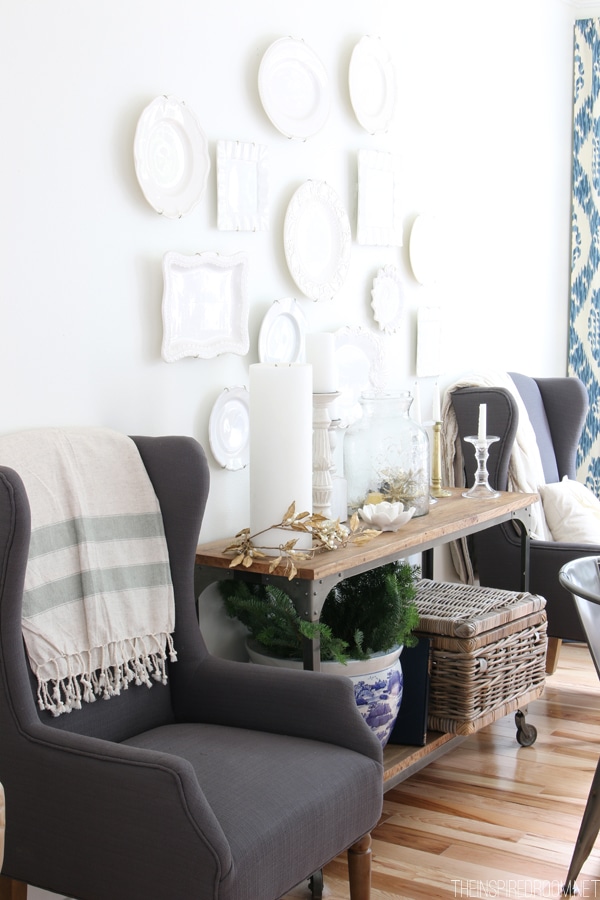
A Gorgeous Christmas Home Tour from Melissa at The Inspired Area
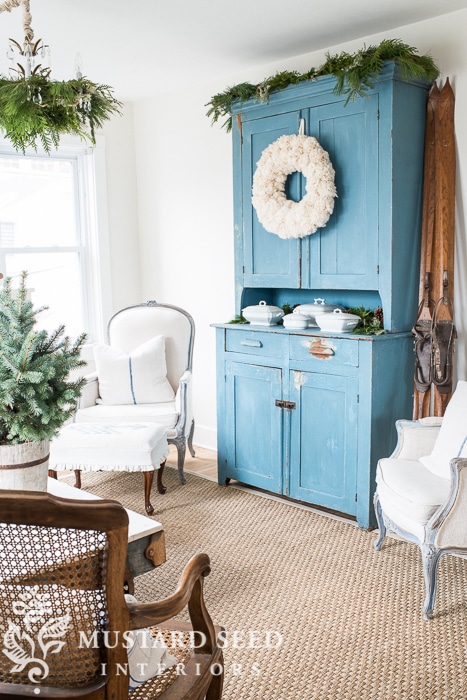
Miss Mustard Seed’s Straightforward and Fresh Living Space all Christmasy
I have a particular web page of Books of 2014. It’s books that I can’t get out of my head, books I study each year, favored books I read this year, books for the inventive. Not books that necessarily came out in 2014 but books that changed me in 2014.
The one’s that changed me in some way, not because they have been released in 2014, but since I study them in 2014. – See a lot more at: http://www.thenester.com/books-of-2014#sthash.2kzAAB7o.dpuf The one’s that changed me in some way, not simply because they had been released in 2014, but due to the fact I study them in 2014. – See much more at: http://www.thenester.com/books-of-2014#sthash.2kzAAB7o.dpuf The one’s that changed me in some way, not since they have been released in 2014, but due to the fact I read them in 2014. – See far more at: http://www.thenester.com/books-of-2014#sthash.2kzAAB7o.dpuf The one’s that changed me in some way, not since they had been released in 2014, but due to the fact I read them in 2014. – See more at: http://www.thenester.com/books-of-2014#sthash.2kzAAB7o.dpuf
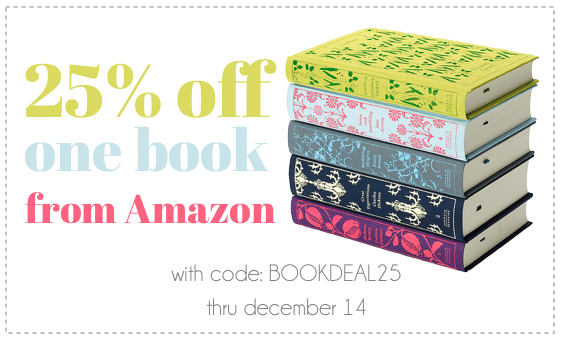
AND by way of Sunday, save 25% off of One particular (true) book (save up to \$10) from Amazon with code BOOKDEAL25 at checkout.


 How to Make a Blanket Scarf // Mom Advice : I want to put on this every single day
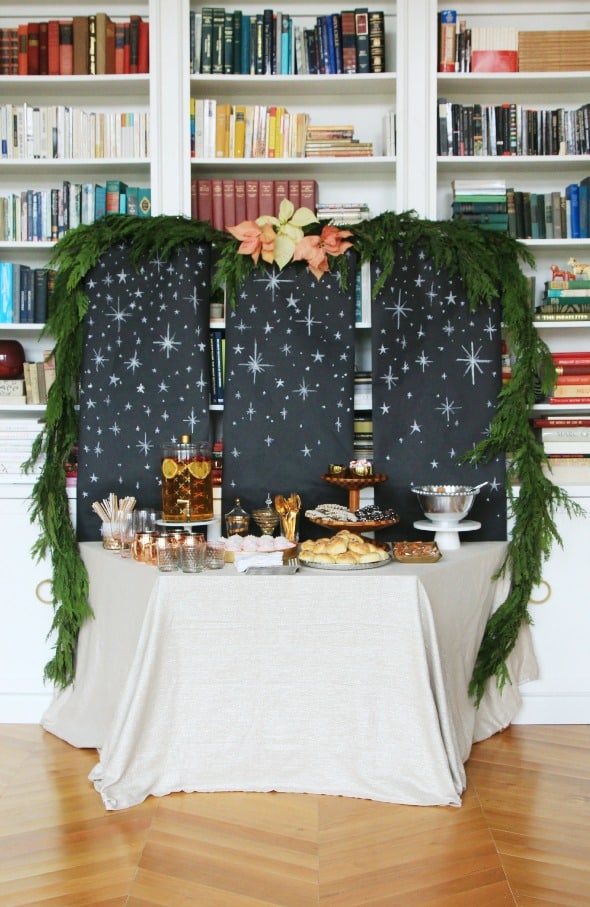
 I have a particular web page of Books of 2014. It’s books that I can’t get out of my head, books I study each year, favored books I read this year, books for the inventive. Not books that necessarily came out in 2014 but books that changed me in 2014.