I’m so thrilled to ultimately share this!
If you’re not new here, you’re probably aware of my involvement in the Re-Really like Project and what it’s all about. For people of you who don’t know, in short it is a Feast Watson campaign in collaboration with Salvos Merchants which sees eight style personalities “re-love” a neglected item of furnishings with the resulting pieces being auctioned for charity. Rather great, huh? You can go through my very first submit about it here and understand far more on the Feast Watson web site here.
It’s such a superb campaign, and is bigger and much better than ever this year, which I’m thrilled to be involved with alongside some quite remarkable peeps!
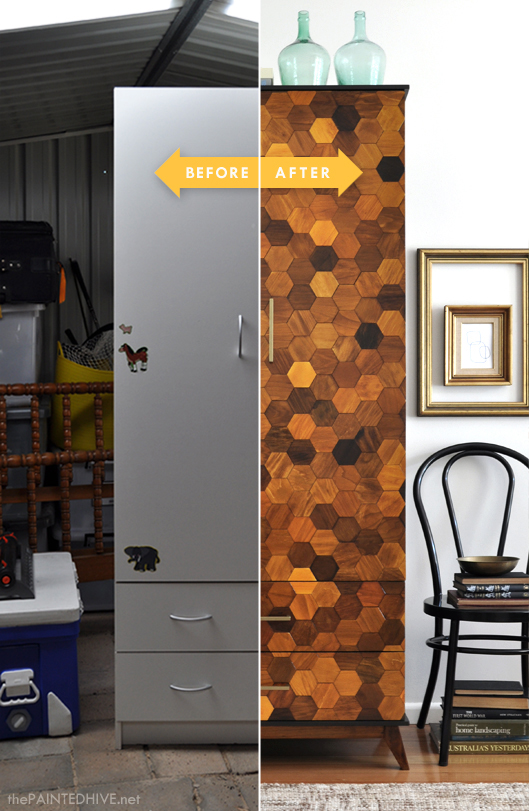
Anyhoo, as uncovered in my prior publish about the undertaking, I commenced with this standard melamine wardrobe which I picked up for \$50…
Rather than consider on a sympathetic restoration, I wanted to challenge myself to fully re-think about some thing very ubiquitous in the hope of inspiring others to think a bit sideways. I’m confident numerous of you guys have an item like this languishing away in a dark corner somewhere. Or perhaps you’ve frequently passed up equivalent pieces in charity merchants or at garage income. They do come across as rather potential-much less.
Effectively, in spite of a couple of hiccups along the way, several vision adaptations and people customary moments of self-doubt (I truly didn’t feel I was going to pull this 1 off!), factors in fact worked out in the finish and I’m stoked with the result! I believe – I’ve been staring at if for as well prolonged now.
The mid-century present day mood of this piece is a departure from my usual farmhouse-y style which made for a slightly ambitious, but fun, creative challenge. I’m underneath no illusion this is a piece for absolutely everyone however am hopeful the fundamental principle of the make-above sparks a handful of ideas. The prospects are nearly limitless!
So, here’s how the whole thing went down…
 

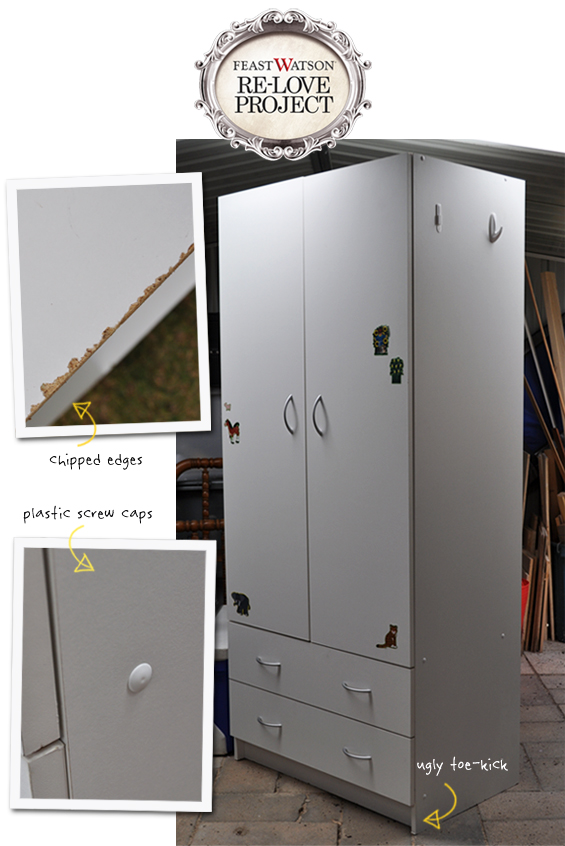
I know this goes with no saying, although to get started with I gave everything a genuinely very good clean, took off the doors, pulled out the drawers and removed all the hardware.
Note: I failed to do this, however before getting rid of the doors it would have been helpful to measure the gap in between them and the gap the place they meet the drawers. This just would have saved me some guesswork while I was attaching the hexagons in terms of allowing for any negative room. Also, it’s a very good concept to mark the doors as left and proper. My doors were identical even though at times they have person quirks and want to be hung a specific way.
 

To give the hexagons a nice frame of kinds I determined to include a new more than-hanging top and base (I was also going to include side cladding although made a decision against it in the finish).
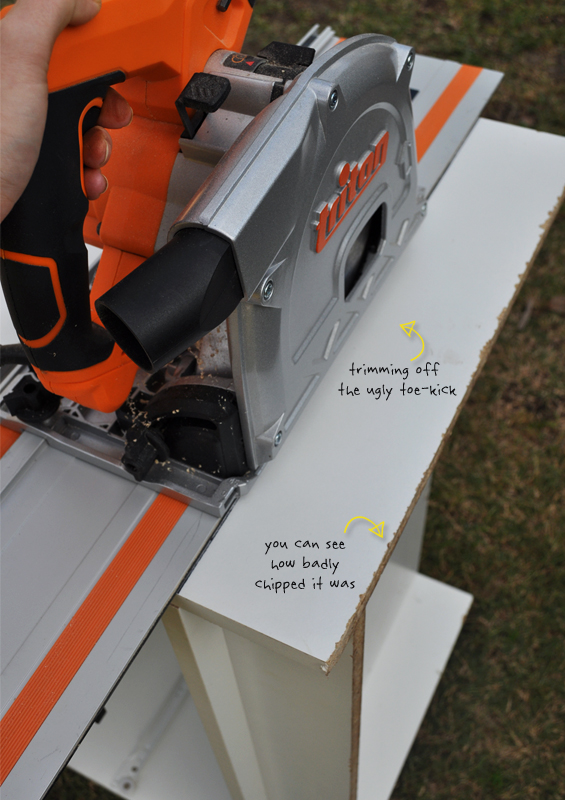
Very first I required to shed the ugly toe-kick. This can either be filled or removed fully. For ease I opted to simply reduce mine off employing our plunge track saw (you could also use a jigsaw or circular noticed).
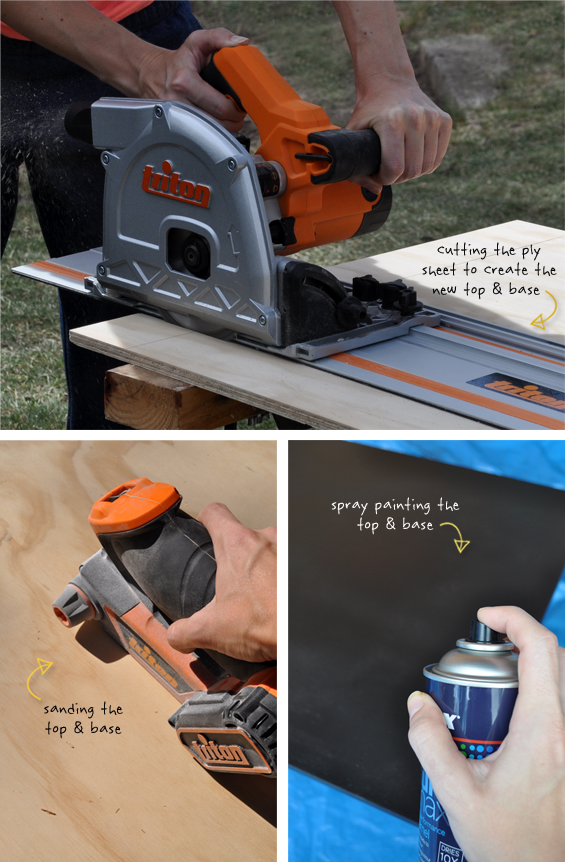
To create the new base and top, I lower two identical panels from simple ply sheet. Next I sanded them totally, finishing with fine grit paper for a nice smooth finish, then sprayed them black (Dulux Duramax in Flat Back).
For the wardrobe sides, I 1st counter-sunk the visible screws and filled the holes.
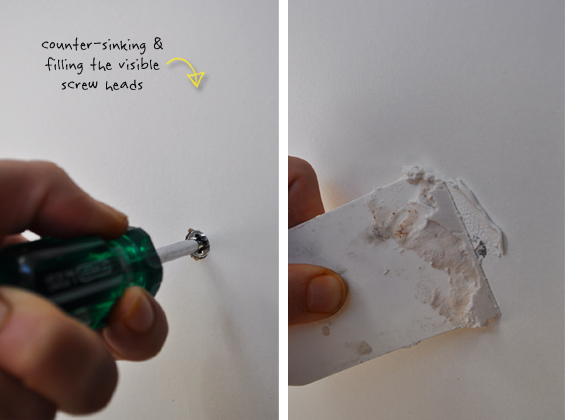
I then sanded down the sides totally using an orbital palm sander and heavy grit paper.

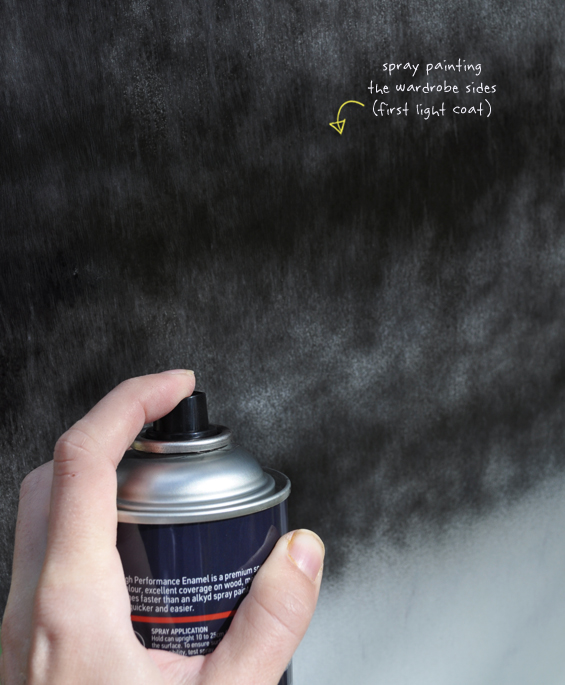
Melamine is slick and shiny so thorough sanding is essential to guarantee any topical application adheres well. I also noticed that using coarse paper produced a subtle texture which, as soon as painted, gave the melamine the appear of timber! I taped off the wardrobe as needed to avoid above-spray then painted the sides black to match the leading and base.
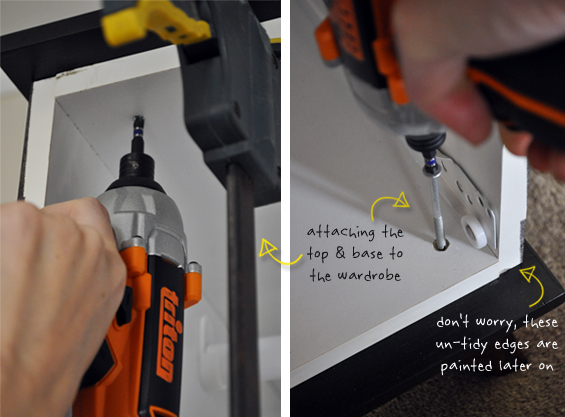
To attach the new best to the wardrobe I 1st smothered the panel with liquid nails, clamped it in area as very best I could, drilled some tiny pilot holes then screwed it down from the within of the wardrobe.
Prior to attaching the base to the wardrobe, the new feet (see below) were connected very first. The wardrobe was then lifted on top and maneuvered into position. As soon as once more I then drilled some pilot holes and screwed the base on from inside the wardrobe. To give the base added power extra long screws have been also drilled through every single foot.
Note: I initially planned to use white paint to develop a modern day Scandi look (which is super common at the minute) though something about it just didn’t gel. Black just worked far better with the wealthy wood tones, tying-in beautifully with the darker hexagons and generating a much more resolved finish. I was also tempted by the concept of navy blue, which I feel could have looked genuinely gorgeous, though for the sake of the charity auction I wished to preserve items neutral to appeal to more buyers.
 

Now, I will admit, we went kinda fancy with our feet. Saying that, it wasn’t hard, it just wasn’t the fastest and easiest option. I know a lot of of you probably don’t want the headache of producing your very own feet (which is understandable – I fought the thought for a handful of weeks!). As an option you can purchase fairly fairly priced prepared to attach ones. If you would like to have a go at creating your personal, like I mentioned, it’s actually not that hard and is super affordable – plus you can create anything fully customized!
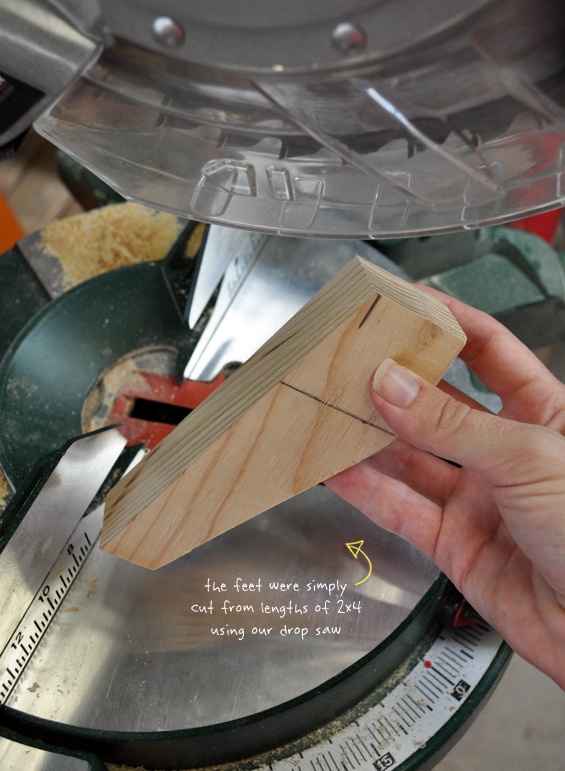
I started out by functioning out the standard form I desired then cutting four identical feet from cheap framing pine (commonly identified as twoࡪ) making use of our drop noticed.
I then cut some lengths of pine to form a connecting frame (two lengthy lengths for the front and rear, and two shorter lengths for the sides). Up coming I biscuit joined (if you don’t have a biscuit joiner you could screw and dowel) the feet to the lengthy lengths of pine (sorry, I didn’t get a pic of this even though you can envision the two longer lengths of pine with feet at both finish – refer to the under pic of the finished frame for a visual) and clamped them in location.
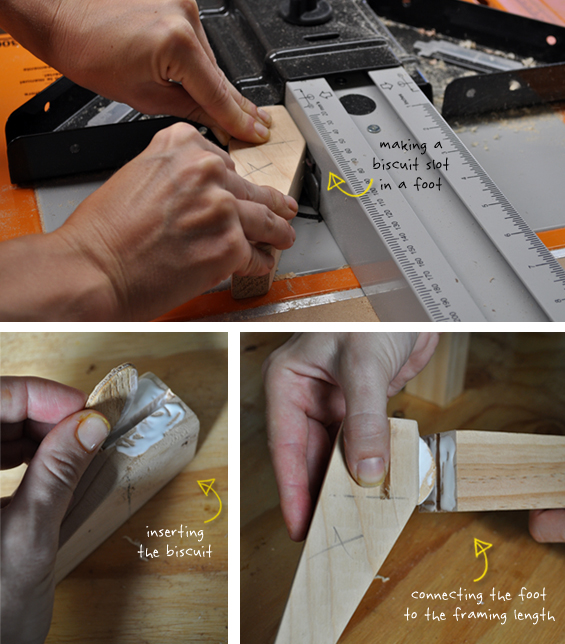
As soon as set, they had been then biscuit joined to the shorter lengths of pine to kind the total frame.
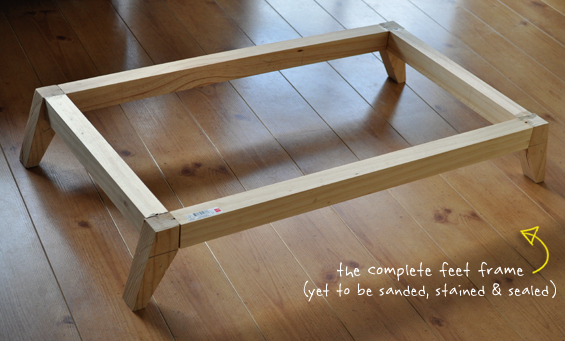
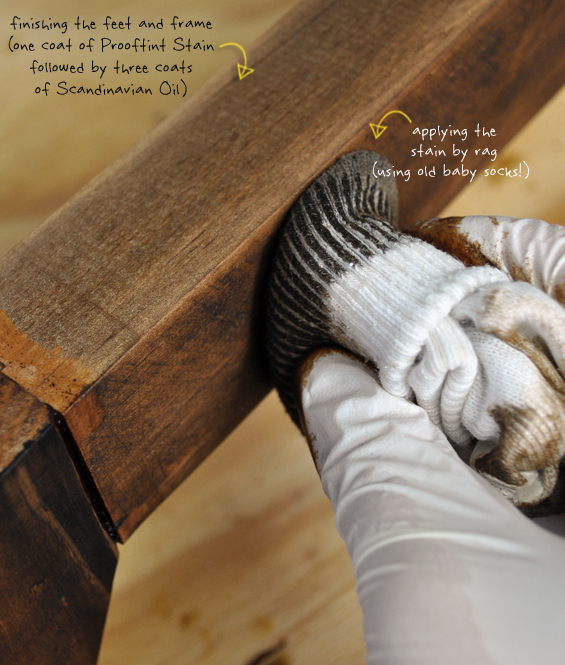
As soon as set, I gave the complete thing a actually very good sand ahead of staining it (Feast Watson Prooftint in Oak) and sealing it (three coats of Feast Watson Scandinavian Oil).
It was then connected to the new base panel with glue and screws prior to currently being connected to the wardrobe (see over).
Note: This wardrobe is Heavy and it was genuinely critical that the new feet have been structurally capable, especially provided they are angled so have outward force. I was tempted to forgo the joinery stage and basically glue and screw every little thing directly to the base even though this wouldn’t have presented the bracing strength essential. For a more lightweight item of furnishings you could get away with it although.
 

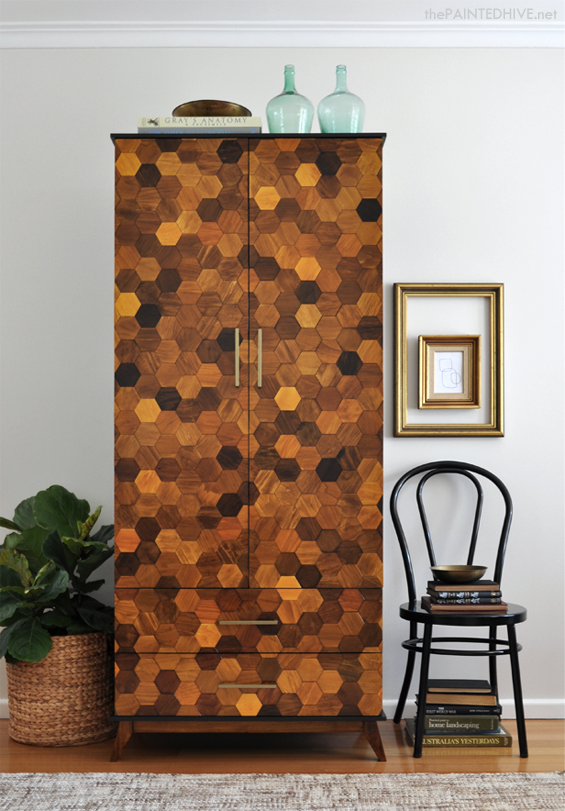
My initial inspiration for this task came from a hexagonal backyard display I noticed in a hardware keep a single day. Don’t ask me how I went from metal fretwork display to timber mosaic wardrobe though it by some means set the wheels in movement.
Of course, this process is primarily parquetry which is a century outdated technique. I like to consider of it much more as wood tiling – at least that’s how it felt – and the layout possibilities are almost countless!
Note: I did perform around with some other shapes and patterns though made a decision to stick with my original hexagonal design simply because based mostly on some analysis I did apparently it’s fairly distinctive (parquetry-sensible) and is also bang on trend at the second. I’d like to experiment with diverse patterns and more rustic tones in the potential.
I wished this to be an interesting DIY. The sort of task that actually inspires other folks to have a go. I figured that hand-cutting a gazillion tiny shapes wasn’t that appealing so I went about sourcing some prepared-manufactured ones (you could fabricate your very own from sheets of ply or veneer – particularly if your design is fairly easy). I assumed that cost-effective wooden shapes would be effortless to locate…ah, not so a lot. These factors are pricey! After loads of study my only option was getting in bulk from China. The good news is, I really necessary a bulk amount. I obtained 2mm thick x 80mm wide raw ply hexagons from this Alibaba vendor at twelve cents a piece – bargain. I ordered 500 and used around 350. I identified this seller genuinely excellent to deal with and they can produce customized shapes at custom sizes. Ah, the possibilities! I presently have one more thought brewing!
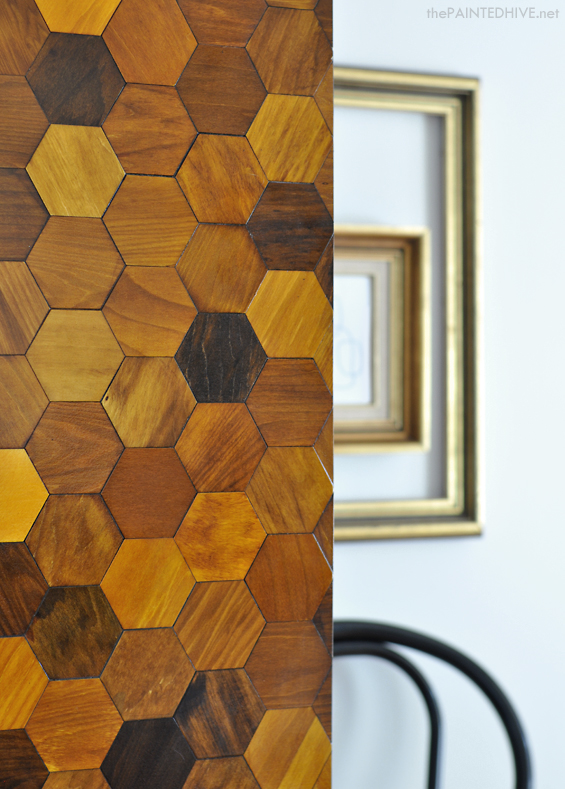
From the beginning my vision for the cladding was a multi-toned mosaic in warm honey tones, reflecting the honeycomb nature of the pattern (by sheer co-incidence it ties in nicely with my website theme also!). I only employed two various stains (Feast Watson Prooftint in Golden Teak and Feast Watson Prooftint in Oak) along with a colour reducer (Feast Watson Prooftint Colour Reducer) however I designed numerous shades by mixing distinct quantities collectively and applying either generously or sparingly. I hand-stained every single hexagon, dipping my brush from colour to colour and coating each form to attain random tones. It sounds extremely tedious even though was remarkably rapid and very therapeutic!

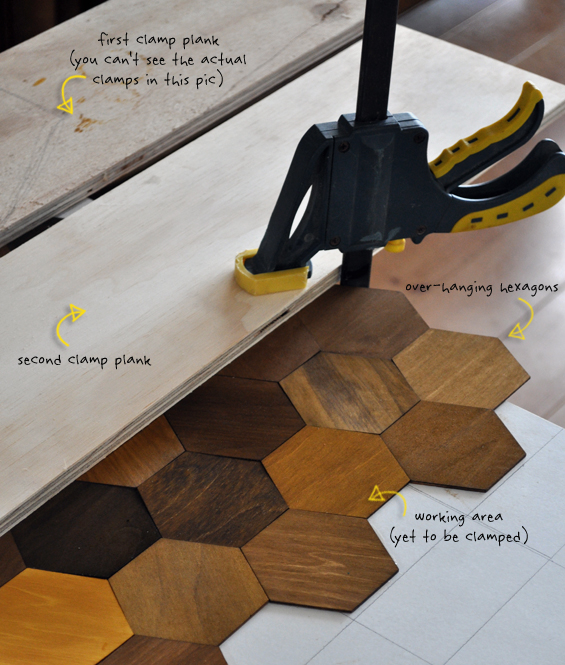
Once all of my hexagons were stained it was time to get “tiling”! I commenced with a wardrobe door. Initial I drew a rough grid on the door (just to provide a basic manual) then right after some mindful contemplation I began gluing the hexagons down. I started center bottom and following some trial and error, worked out the greatest strategy was to brush some glue on the rear of a hexagon, stick it down then move on to the up coming a single. Clamping is essential as the thin ply warps due to the moisture in the glue. My technique was to comprehensive a modest portion, clamp it, perform on the following segment while the glue set (all around twenty minutes) then move the clamp up. For higher efficiency, I clamped two places at a time, employing two narrow planks of wood and four clamps (two clamps per plank). This permitted me to perform continuously till the door was complete!
I then repeated the method with the other door and the drawers.
Note: Prior to attaching any hexagons, it was imperative to very first perform out where they would join in the middle, where they would meet at the base (with the drawers) and what type of more than-hang there would be at the sides and best. This didn’t need to have to be super exact (I sooner or later just had to go for it since my brain starting up hurting and Christmas was coming!) though it was useful to get a great concept of how they would “fit” to stay away from the need for any unsightly slivers or obvious mis-matching.
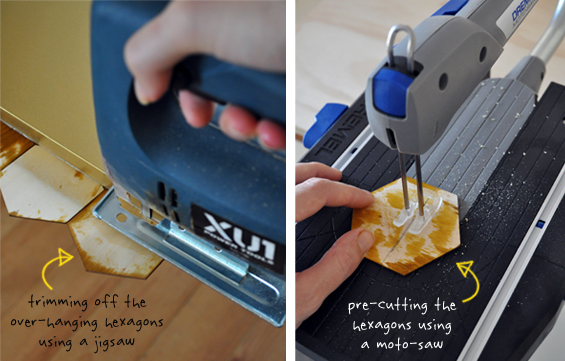
Due to the nature of the hexagonal pattern, there is really a bit of more than-hang. I experimented with two methods of dealing with this 1) gluing complete hexagons on then trimming away any excess with a jigsaw, and 2) pre-cutting the hexagons to match making use of my Moto-Saw. I discovered both approaches to be powerful though they each and every had their pros and cons. Making use of complete hexagons was ideal for locations exactly where only a modest portion required trimming off, even though I did locate that even with careful cutting the jigsaw vibrations triggered some small chipping. Pre-cutting was ideal when only a little portion of the hexagon was needed, however I did require to make sure there was even now a small in excess of-hang which could be sanded flush. If I had to select just one particular method, I would go with pre-cutting. It sounds laborious, even though it wasn’t that undesirable plus I was in a position to use the off-cuts I developed as I worked.
Once the doors and drawers have been completely clad and any over-hang was roughly trimmed, I used a sanding block to sand all of the edges flush (you could use a powered sander).
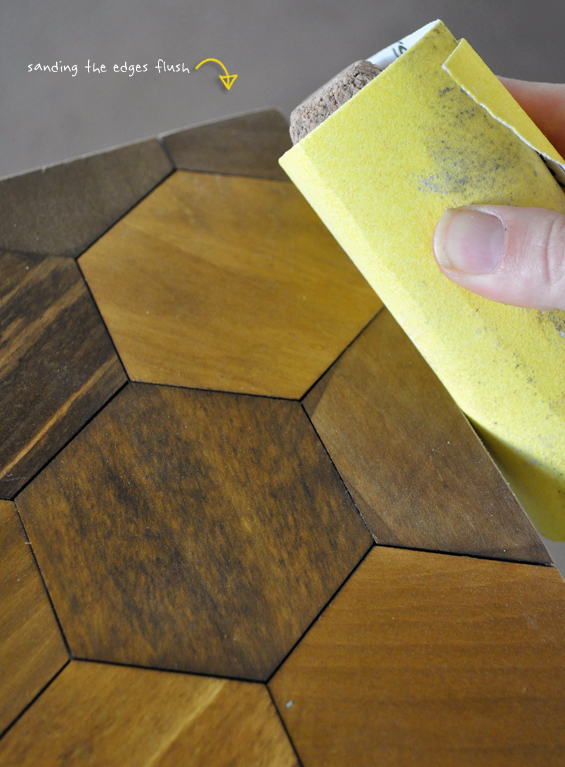
I was concerned this would be hard and that the hexagons wouldn’t appear straight (one of the causes I chose not to do this on a tabletop), though the thin ply is exceptionally soft and effortless to sand so it was truly really basic to achieve excellent lines (tabletop here I come!).
To finish, I sealed the hexagons (about six coats of Feast Watson Scandinavian Oil).

This not only offered a lovely all-natural lustre however also worked to meld the hexagons by filling any small gaps. It’s kinda like the grout of this weird wood tiling globe…kinda.
 

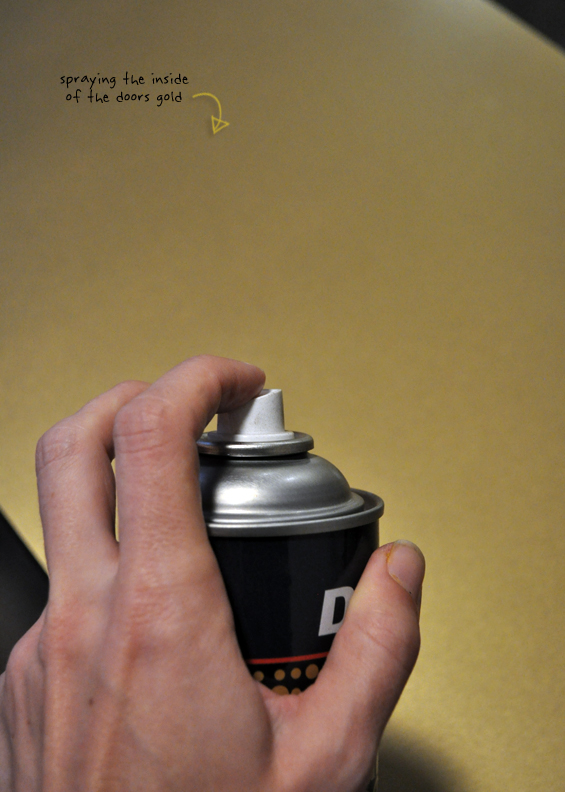
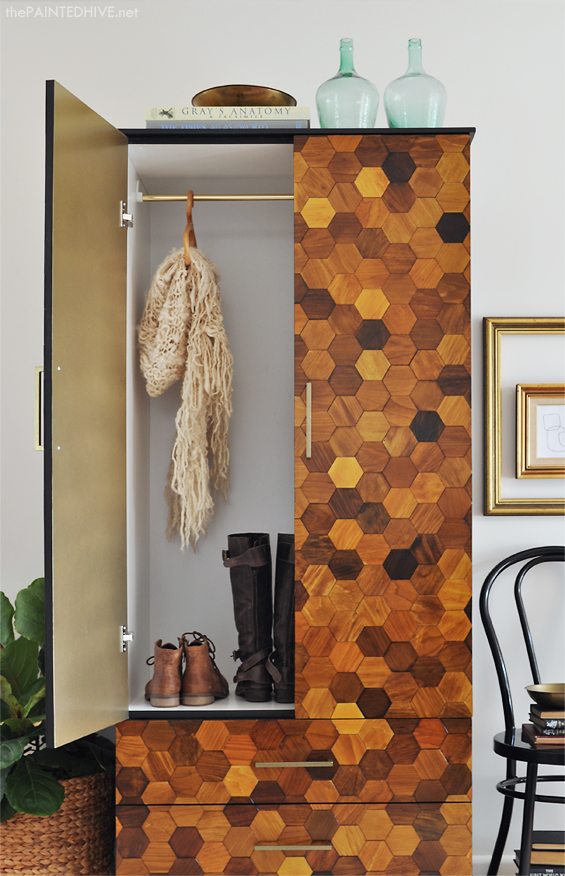
To full the overall seem, I added a glamorous pop of gold to the rear of the doors with some spray paint (Dulux Duramax Brilliant Finish in Gold) and replaced the existing hanging rod with a brass one particular (see pic under) to co-ordinate.
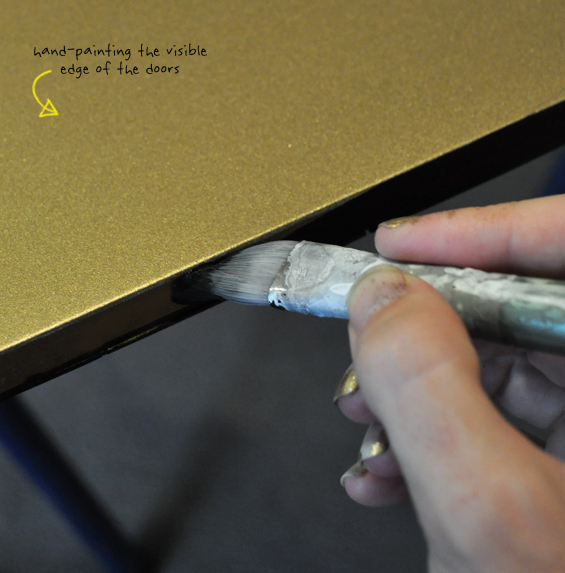
I also utilised some black craft paint to finish the noticeable sides of the doors and drawers along with the front-dealing with edge of the wardrobe frame (to tie-in with the body of the wardrobe).
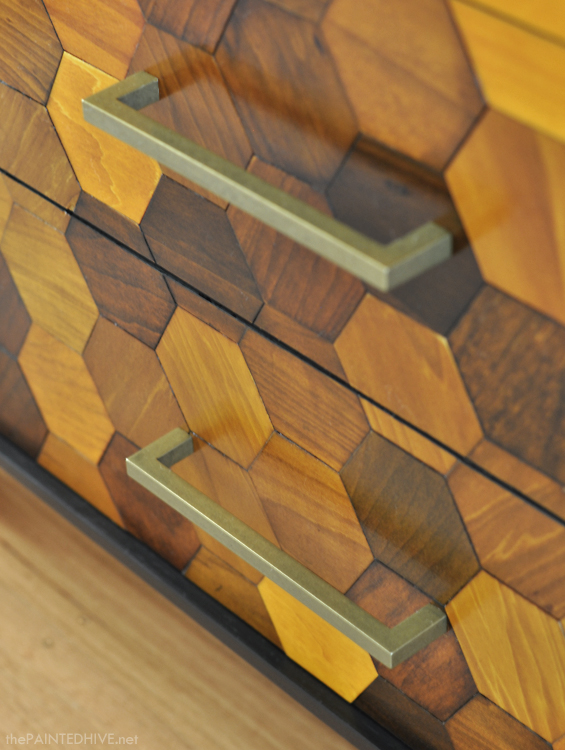
The handles gave me grief! From the starting I envisioned straightforward brass bar pulls although I couldn’t uncover them anyplace in Australia! And I looked All over the place! I couldn’t even find what I wished within my budget on eBay, Alibaba, AliExpress, IndiaMart, Etsy and numerous other international websites. Getting handles dipped was going to be way too expensive so I virtually resigned myself to purchasing some chrome ones and spray painting them (a resolution I wasn’t thrilled with given this item would be on-sold and the possibility of the paint chipping was large). As a final resort I decided to turn to the US. I knew they would have the handles I was right after (you guys have every thing 🙂 however from past encounter I wasn’t assured about the affordability of shipping. Thankfully, I happened to come across an on-line retailer which was not only inclined to ship cheaply by means of USPS even though also had the handles on sale – yay! If you’re interested I identified them here (\$eight each on sale). I at first needed longer ones in blingy polished brass however am truly happy with the look of these.
Initially, the doors had been out of alignment. I was a bit concerned that when I re-hung them I wouldn’t be ready to get them degree. Thankfully, the recessed hinges are adjustable so I could square them up properly. This is one thing to keep in thoughts when searching at second-hand furnishings. Mis-aligned doors can be off-putting although if the hinges are adjustable they possibly just need a bit of tweaking.
Aaaaaaand, that’s how you flip a melamine piece of furniture on its head!
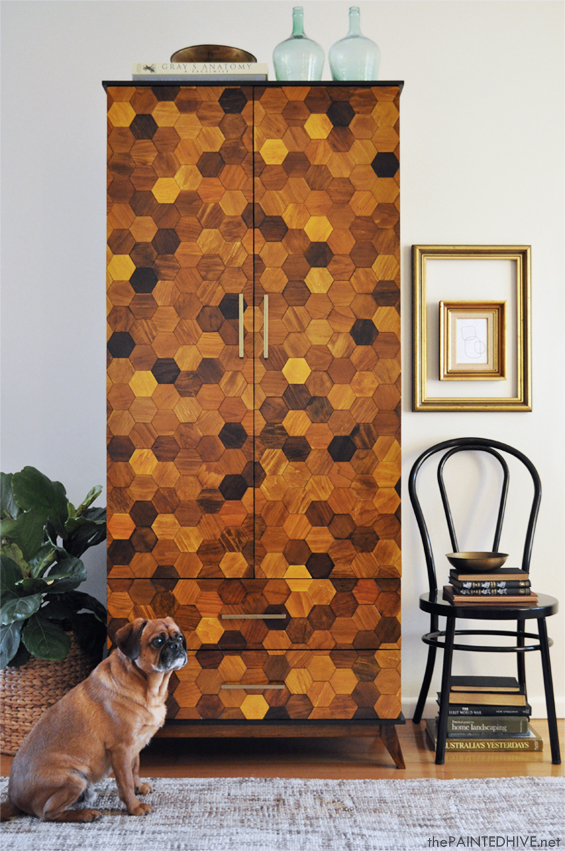
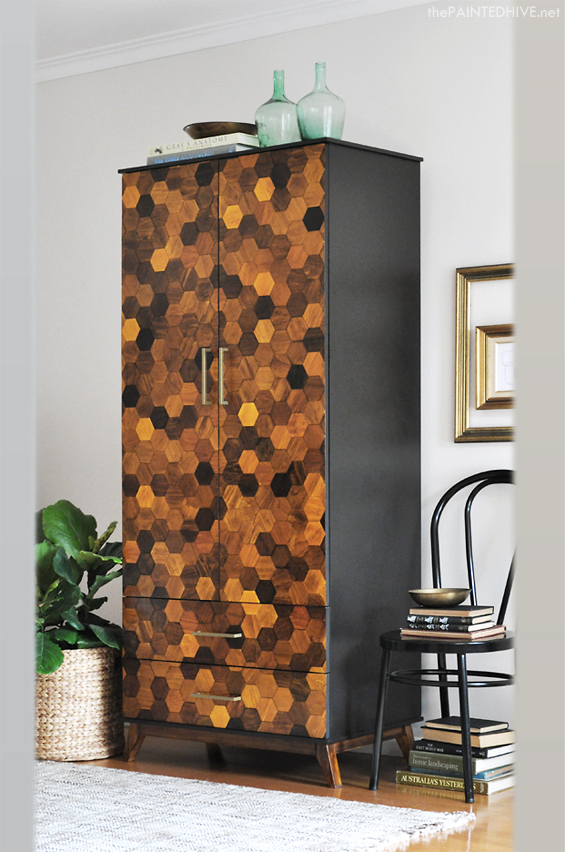
I love all the random grain instructions. I’m also genuinely satisfied with the way the sprinkle of both added light and dark hexagons gives the pattern extra definition. That was my prepare however I had no idea it was actually going to perform!

All up this task expense me around \$200. I know that’s not super inexpensive though I also happen to know that this exact wardrobe, in its prior to state, retails for \$300 new! So, for \$300 you can have a generic wardrobe from the furnishings keep OR for \$200 you can choose up a 2nd-hand one particular and – with some elbow grease and imagination – have some thing entirely distinctive.
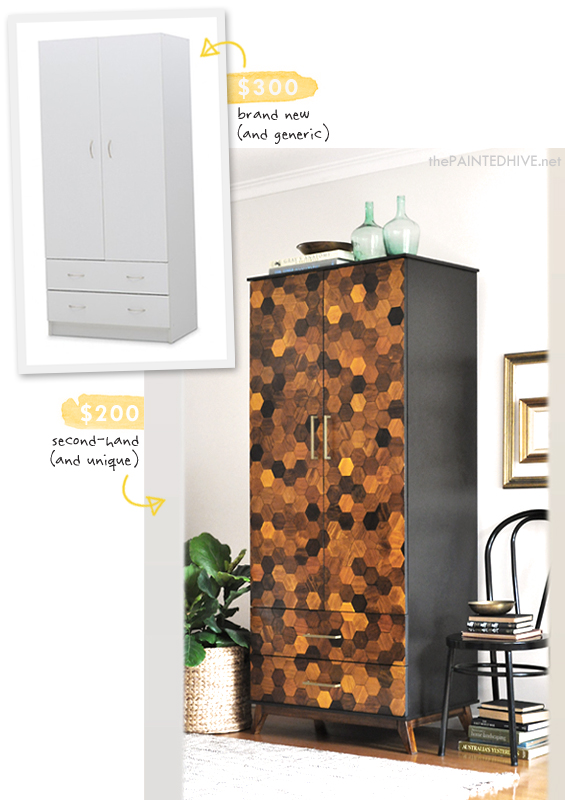
I believe I know which 1 I choose.
The photographs truly don’t do this baby justice. On the day I did the shoot it was genuinely dark and gloomy so acquiring a good vibrant shot was tough.
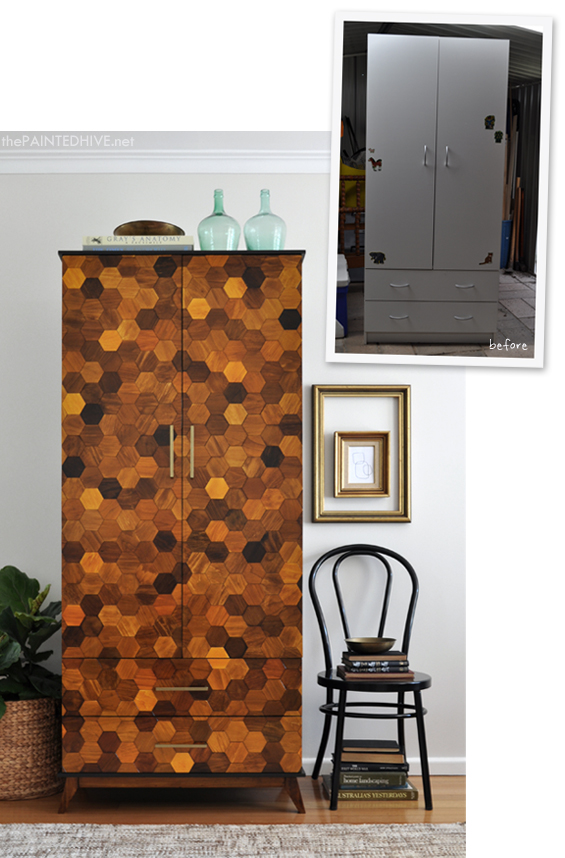
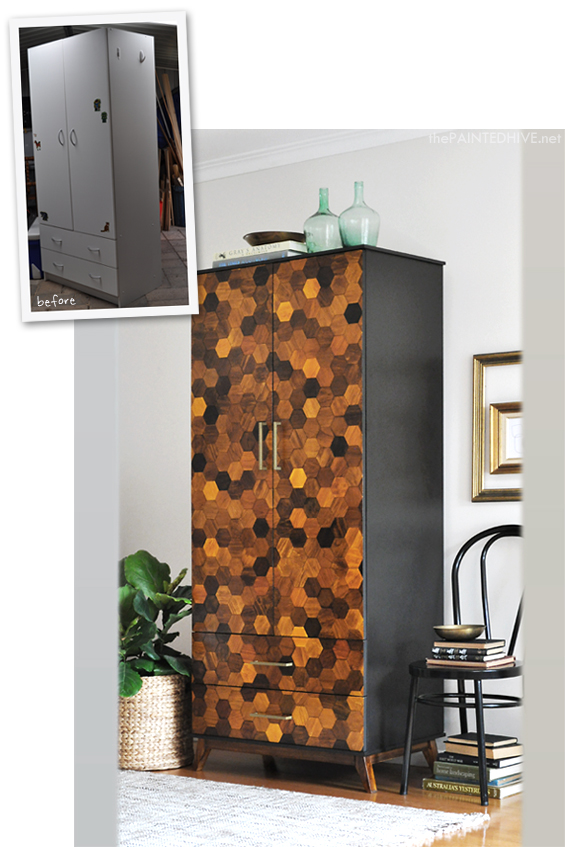
Here are the prior to and afters…
![]()
I hope you guys like it! That said, I do know what some of you are probably pondering “Why bother performing all that with a low cost unsightly flat pack?”. Permit me to make clear…
I needed this to be a Massive transformation. Positive, I could have started with a good timber piece, however my contemplating was, why entirely transform anything that’s previously wonderful? Wonderful issues don’t require full overhauls, they just require a tiny adore. Also, great timber pieces aren’t that plentiful or reasonably priced. Confident, you may possibly get lucky though I know for a fact that inexpensive ugly flat packs are Everywhere and I was on a tight price range and dead-line for this undertaking. I believe making use of one thing ubiquitous can make this project significantly far more “real” and replicable. The wardobe is robust and sturdy and isn’t about to fall apart.
I also know that some of you are probably contemplating “For that volume of perform why not just create the wardrobe from scratch?”. Again, enable me to describe…
Primarily, this was a glue and screw project. I’m great at these. It’s also the sort of cosmetic DIY which I feel most inspires my readers. If I developed the wardrobe from scratch, I nonetheless would have had to “tile” it. Constructing it just would have cost a whole lot a lot more funds and taken a good deal much more time, not to mention anxiety (joinery isn’t my robust suit). On best of that, of course the total notion behind this campaign is to show how old furniture can be re-loved. As a enormous bonus I also got to conserve it from land-fill – yay!
I’m satisfied to admit I did go to extra lengths to generate anything particular right here as this piece will be auctioned off for charity. Not only did it have to search proper, it really had to be appropriate (I don’t want the legs breaking off in two months time!). As far as furniture make-overs go, this was a somewhat involved 1, though nothing at all about it was hard. The hardest element was truly all the figuring out, sourcing and troubleshooting due to the reality I was entirely creating issues up as I went along! Hopefully my tutorial can conserve you some of the ‘figuring out’ although if identified some of my processes a bit total-on, come to feel free to compromise away. I have pointed out simpler options where achievable. You don’t want to go to the very same extreme to produce an amazing parquet piece that you can really feel proud of.
If something, by way of this task I basically hope to motivate others to cock their head additional, skew their lip harder and seem that minor bit longer at that seemingly “beyond aid” piece of furnishings. With a small ingenuity and some elbow grease you can affordably transform practically anything at all into something actually amazing!
![]()
Keep in mind, along with the pieces of the other great designers concerned with this campaign (be sure to check out out their incredible prior to and afters right here), this distinctive wardrobe is getting sold for charity, so if you enjoy it (or know an individual else who would) be certain to keep tuned! The eBay auctions kick-off on July eight and Ill be certain to post once more once they go live. In addition, I’m enthusiastic to allow you know that Feast Watson will be covering shipping charges Australia broad! How amazing is that? Of program, if you’re positioned outdoors Australia you are far more than welcome to organize your personal freight.
C’mon guys, allow’s share this about socially and work up some hype for the Salvos!
 
![]()
STYLING PROPS
Metal Bentwood Chair Early Settler
Seaglass Demijohns Target
Fiddle Leaf Fig Basket Spotlight
You have just go through the submit Re-Love Project…before and following from The Painted Hive. Click on more than to pay a visit to the site and get engaged in the comments area – I would enjoy to hear your thoughts! Republishing this report in complete or in part is a violation of copyright law.
")


")


