
Hello there my friends! I hope your holiday was wonderful!! Ours was fantastic and we’re totally enjoying the entire break so far. I read one book cover to cover in one day, we’ve seen Night at the Museum 3 (loved it) and hope to see Into the Woods tonight. I’ve done equal parts sitting on my butt and cleaning/decrapifying/organizing as well. 🙂
Since we are nearly the end of 2014 I like to look back at the biggest projects I completed throughout the year. If you haven’t noticed before and after pictures are pretty much my favorite thing ever, so I’m including pics of how they looked at the start of the year as well as the final result (which is often not the end result cause everything takes me forever).
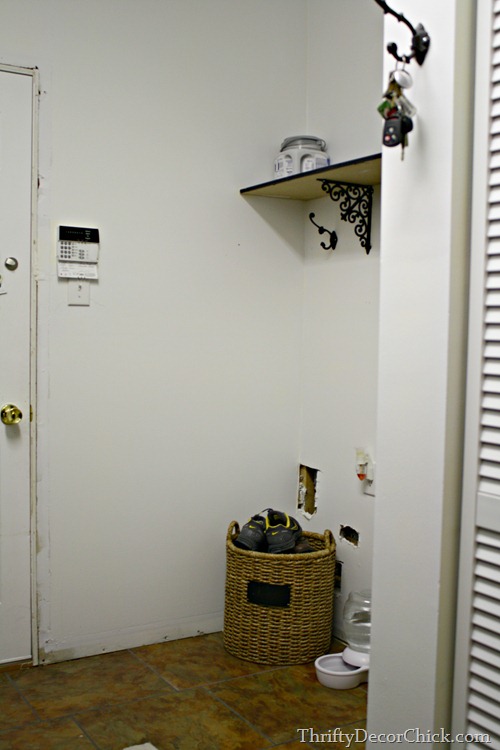
First up, the mud room. Ohhhh yes. The mud room! When we had the basement finished a few years ago we moved our laundry down there and it’s seriously one of the best things we’ve ever done. We lived with it as it was for quite a while and then at the beginning of this year I got started. This is how it looked to start:
What’s funny is I was so tired of the bright yellow I had in there for years I felt like the blank white looked a ton better:

I love that you can see where I painted around the washer and dryer way back when. At least I used tape to get a straight line!
So anyway, I got busy installing the rest of the beadboard and painting it, building a bench (out of kitchen cabinets), DIYing a cushion out of a rug and then adding the sconces:

Um…we LOVE it. Love love love. Seriously, I’m so happy to have an actual landing zone when we walk in now.
I still have a lot I want to do in here – I’ve been wanting to build the upper storage for a year now and just haven’t gotten to it. The ceiling needs to be patched and painted (due to some water issues) and I will add crown molding too:

I changed out the overhead light in the space recently and still need to show you that too (it created some new holes in the ceiling as well).
Funny thing, seeing our big cat in these photos – this bench is his absolute favorite spot in the house. The furnace is in here so I think it’s probably the toastiest room:

On a side note – if you’ve ever wanted to spray paint your door knobs be sure to check out my experience with it in this room here.
We didn’t do much in the basement this year (although I still have some fun plans in mind) but I did make some progress on the little kitchenette down there. This is how we started at the beginning of the year:

I installed the (super cheap!) countertops and painted the cabinets. Then I added a little bling to that wall with a stencil I found at Hobby Lobby:

We’ve since installed the sink down there and I’ve had the shelves to hang for probably six months. Hoping to get those up over break.
I also shared the details of how we had our basement finished for (what I think) a great price:

Basically we used small business contractors, spread it out over time and I did the finish work myself. But I share all of the costs and break down in that post.
Our master bedroom got some updates as well. I’ve been working on this room for over a year now and may finish it next year…we’ll see. 😉
I couldn’t decide if I wanted our room to be bright and light or dark and comfy…so I went halfway. I started painting the room the lighter color I picked out:

And then decided I was craving some drama. So I added it in the form of some trim and a dark gray color called Peppercorn:
 I also beefed up the baseboards (without taking off the old ones!), added craftsman trim around the doors, and changed out the light (from the old dining room). It is becoming a truly beautiful space and we love it!!
(To see how I made the tufted headboard for less than \$100, go here.)
I worked my tail off on one of the biggest transformations in our house this year that no one sees but us – our master closet. It’s b
ig and we weren’t using it well. This before photo was the closet on a really, really good day:

I mean…really. This was nothing compared to the usual mess.
I purged big time, installed more kitchen cabinets (yes, I have a problem. Yes, they work and they are cheap!) and then painted everything in purple tones – my one girly room the house! 🙂
It kind of changed our lives:

You can see more of the final reveal here. A functional, clean closet it highly underrated. I still have more plans for the space but so far it’s working SO MUCH better than what we had before.
And finally, the spaces I got some help on. We had dreamed and planned to potentially add on to the back of our home – our family room and kitchen were open to each other but very tight and awkward due to the layout of the fireplace and windows.
We had saved up a chunk of change do a renovation but we realized pretty quickly it wasn’t going to happen. Getting contractors to respond was impossibly hard (only a few even responded) and the costs we were getting from those who did respond were astronomical.
Along the way a reader put an idea in my head and we went with it. Here’s an old photo of the wall that we took down:

We knocked down the wall between my office and the family room and reconfigured the fireplace. We gained 100 square feet in doing so:

The biggest part of the room is the new fireplace placement and built ins. They looked like this to start:

That white chunk of wall is where the old corner fireplace was. So happy that is gone!!
After I trimmed it out and painted, added some new doors to the cabinets (so we could hide the electronics in there), tiled the surround and then planked the wall above, it turned out like this: 
That’s the Christmas version. 😉
Here’s another view of the room before (a more recent one):

And now from the same general area:  The changes made a bigger impact to the kitchen than we anticipated too, so we went ahead with our second phase sooner than planned. Here’s the view into the family room before:

And here it is now (as a kitchen!) with the new doors:

Those doors? Easily top five best things we’ve done in the almost 11 years here. They are amazing and completely changed how we function in these rooms. Absolutely love:

You can see the entire renovation process (over five months) here.
It’s been a GREAT year! I am so happy with the changes we’ve made and so thankful we were able to make them!
Onto 2015…I’ll share my plans for that next! Did you do anything fun to your house this year? We did a lot but it’s kind of my job. 😉 And it’s my passion – I love it!!


