So you could have read that title and came here to read considering this post was something Large. Like dreams typical folks have…a trip overseas. Or a new auto. World peace. (Um, me too.) My dream? It is usually been a window seat. Each and every given that I was a wee one at 20 years of age – I’ve looked at them in magazines and on Television and I. loved. them.
I have a couple spots in our house where we could potentially build a seat a single day, but when we changed items about during our household room reno last year I discovered a spot that would function even much better. I knew it would be best and would be additional seating and would look like it was always meant to be there.
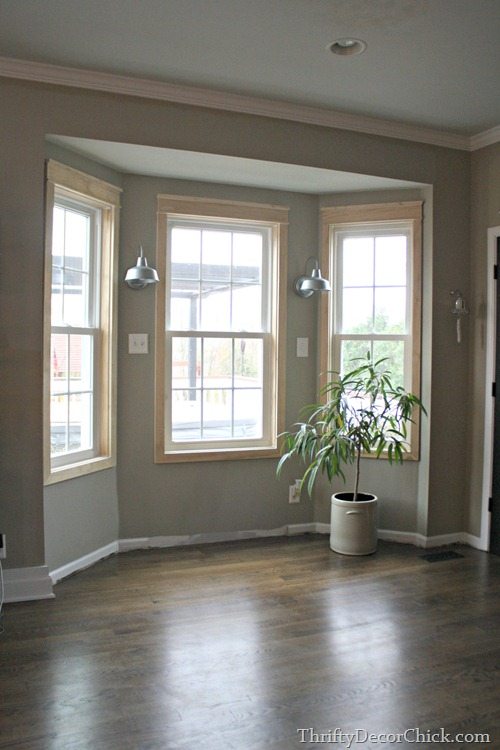
Our bay window in the kitchen was that ideal spot. The very first phase was to take away the old back door that utilized to be in among the windows. Whilst they had been at it I had some lights added considering that that area can get genuinely dark:

It sat like that for the previous 3 months. I didn’t even paint the trim simply because I was so busy. I lie…I knew it was going to take forever so I ignored it. 🙂
But final week I finally began the painting and then at the end of the week this started as properly:

If you don’t forget I pointed out final week that our plans for the kitchen island changed a bit. Those adjustments resulted in a Large savings – the spending budget for the island was reduce in about a third.
So when the handymen stated they would build the seat for \$300, I mentioned DO IT:

And yes, I paid them on the last day of the no invest month. 🙂
I planned to do this myself but I am hosting a shower this weekend (the additional seating will be wonderful!!), I do not have a table saw and it would take me about a month to do this on my own. And goodness…sometimes it’s nice to have aid. So I hired this element out. They framed it and place the face on – and have been done in significantly less than a day.
We utilized scrap two by fours that I had for the frame and some other scrap wood I had for the inside of the seat. I also had them extend the outlet so we could still use it.
Most of it wasn’t as well complex – but the leading piece did take some precise cutting. I was impressed that they got the front perfectly flush with the wall so the baseboard flows seamlessly. And they had to construct up the inside of the bench so the lid would support a handful of human beings. 🙂
When they left my work began. Here’s how it looked (I had currently started all the trim and painting on the walls last week:

I added the beefed up baseboard 1st – I do it this way so the vertical boards (the board and batten about the area) have some thing flush to sit on. I also added a board across the top on the front of the bench:
Next up came quarter round and primer:

It was starting to come together!
I finished up the NINE coats of paint on the windows (three per window – I in fact want to do one much more quick coat on the fronts of the trim):

Subsequent I sanded and caulked everything and did a coat of semi gloss white all over the seat. The last step was to add the rest of the trim to the front and along the leading of the white on the walls:

I really have one a lot more coat to do on every little thing and a small far more caulking but I was pooped at midnight final evening and had to quit. I threw some pillows on right here just to show how Wonderful that white will look with some color!:

Oh, and I still need to place some trim around the edges on prime to hide the modest gap along the walls. I am making myself finish all these information before I can start on the island. 🙂
And of course ultimately there will be a large cushion on right here as effectively! It will take me some time to figure out what fabric and colors I want to go with right here so that will not happen for a bit:

It will absolutely incorporate some colour though! Due to the fact this location gets so significantly sun I’m thinking I’ll have to go with an outside fabric.
But for now…isn’t it beautiful?? Sing it to your self:

Every night this previous weekend I would stand right here before going to bed and just stare at it. I’m not gonna lie, I got a small teary at one point. Goofy I know, but sometimes it hits me difficult that I get to do this stuff in our house. Far better than I deserve.
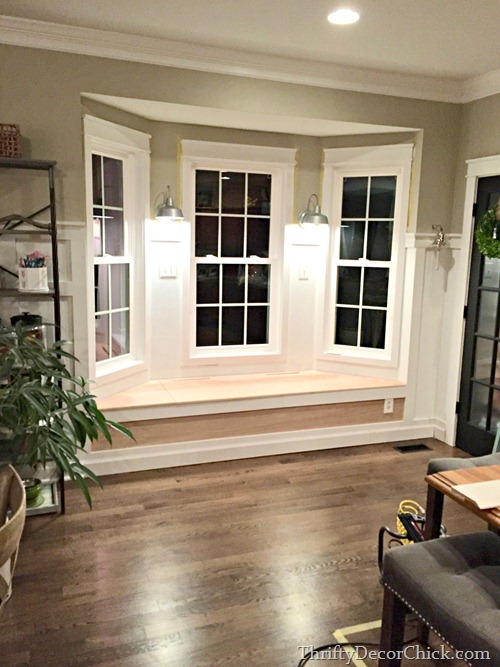
Here is it is at evening with the lights on:

1 much more point to add to my list – a dimmer. Oh yes.
Of course in this house I need to have factors to be functional as well as pretty, so the very best element is hiding under that prime:

BOOM. (Fist pump and explode):

I’ve had my supplies in right here for now but ultimately a spot for all of the basketballs!! Is this heaven?? 
Actually I do not know what we’ll keep in here. It may possibly really well be the basketballs. I can also see maintaining the big kitchen stuff like the crock pot and drink dispensers in right here. Oh my goodness…the possibilities. I do require to add some hinges that will hold up the heavy door though – I think I may have to get something online because nothing at all I’ve identified at the retailer is powerful adequate.
There you go…a dream realized. It does not take significantly for me people. 🙂 As I pointed out, I hope to get all the little stuff carried out on the seat this week and then I will commence on the island. I will be creating the extension for that myself and I’m so excited about my final minute addition! Crossing my fingers it all performs out.
After the island is done I’ll be taking a break from the kitchen to save up for the subsequent phase, building an enclosure for the fridge. Thanks again for coming along for my house projects! It’s fun to share this with you all. 🙂


")


